
User's Manual


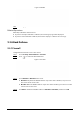


Table Of Contents
- Foreword
- Important Safeguards and Warnings
- 1 Overview
- 2 Configuration Flow
- 3 Device Initialization
- 4 Setting
- 4.1 Device Login
- 4.2 Local
- 4.3 Camera
- 4.4 Network
- 4.5 PTZ
- 4.5.1 Configuring Presets
- 4.5.2 Configuring Tour
- 4.5.3 Configuring Scan
- 4.5.4 Configuring Pattern
- 4.5.5 Configuring Pan
- 4.5.6 Configuring PTZ Speed
- 4.5.7 Configuring Idle Motion
- 4.5.8 Configuring Power Up
- 4.5.9 Configuring PTZ Rotation Limit
- 4.5.10 Configuring Scheduled Task
- 4.5.11 Configuring PTZ Maintenance
- 4.5.12 Configuring Protocol
- 4.6 Event
- 4.7 Storage
- 4.8 System
- 4.9 System Information
- 4.10 Setting Log
- 5 Live
- 6 Record
- 7 Picture
- 8 AI
- 9 Security
- 10 Report
- Appendix 1 Cybersecurity Recommendations

157
Figure 9-10 Certificate information (1)
Step 5 Click
Create and install certificate
.
After the certificate is created successfully, you can view the created certificate on the
Device Certificate
page.
Related Operations
●
Click
Enter Edit Mode
, you can edit the custom name of the certificate.
●
Click to download the certificate.
●
Click to delete the certificate.
9.4.1.2 Applying for and Importing CA Certificate
Import the third-party CA certificate to the camera.
Procedure
Step 1 Select
Security
>
CA Certificate
>
Device Certificate
.
Step 2 Select
Installing Device Certificate
.
Step 3 Click
Apply for CA Certificate and Import (Recommended)
, and then click
Next
.
Step 4 Enter the certificate information.
IP or domain name of the device is automatically entered in
IP/Domain Name
.