
User's Manual


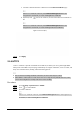
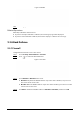


Table Of Contents
- Foreword
- Important Safeguards and Warnings
- 1 Overview
- 2 Configuration Flow
- 3 Device Initialization
- 4 Setting
- 4.1 Device Login
- 4.2 Local
- 4.3 Camera
- 4.4 Network
- 4.5 PTZ
- 4.5.1 Configuring Presets
- 4.5.2 Configuring Tour
- 4.5.3 Configuring Scan
- 4.5.4 Configuring Pattern
- 4.5.5 Configuring Pan
- 4.5.6 Configuring PTZ Speed
- 4.5.7 Configuring Idle Motion
- 4.5.8 Configuring Power Up
- 4.5.9 Configuring PTZ Rotation Limit
- 4.5.10 Configuring Scheduled Task
- 4.5.11 Configuring PTZ Maintenance
- 4.5.12 Configuring Protocol
- 4.6 Event
- 4.7 Storage
- 4.8 System
- 4.9 System Information
- 4.10 Setting Log
- 5 Live
- 6 Record
- 7 Picture
- 8 AI
- 9 Security
- 10 Report
- Appendix 1 Cybersecurity Recommendations

152
Figure 9-2 Security status
9.2 System Service
Service functions can be used only after system services are enabled.
9.2.1 802.1x
Cameras can connect to LAN after passing 802.1x authentication.
Step 1 Select
Security
>
System Service
>
802.1x
.
Step 2 Select the NIC name as needed, and click to enable it.
Step 3 Select the authentication mode, and then configure parameters.
●
PEAP (Protected EAP protocol).
1. Select PEAP as the authentication mode.
2. Enter the username and password that has been authenticated on the server.
3. (Optional) Click next to CA certificate, and select the trusted CA certificate in
list.
If there is no certificate in the list, click
Certificate Management
at the left
navigation bar. For details, see "9.4.2 Installing Trusted CA Certificate".
Figure 9-3 802.1x (PEAP)
●
TLS (Transport Layer Security). It is applied in two communication application programs
to guarantee the security and integrity of the data.
1. Select TLS as the authentication mode.
2. Enter the username.