
User's Manual
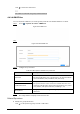


Table Of Contents
- Foreword
- Important Safeguards and Warnings
- 1 Overview
- 2 Configuration Flow
- 3 Device Initialization
- 4 Setting
- 4.1 Device Login
- 4.2 Local
- 4.3 Camera
- 4.4 Network
- 4.5 PTZ
- 4.5.1 Configuring Presets
- 4.5.2 Configuring Tour
- 4.5.3 Configuring Scan
- 4.5.4 Configuring Pattern
- 4.5.5 Configuring Pan
- 4.5.6 Configuring PTZ Speed
- 4.5.7 Configuring Idle Motion
- 4.5.8 Configuring Power Up
- 4.5.9 Configuring PTZ Rotation Limit
- 4.5.10 Configuring Scheduled Task
- 4.5.11 Configuring PTZ Maintenance
- 4.5.12 Configuring Protocol
- 4.6 Event
- 4.7 Storage
- 4.8 System
- 4.9 System Information
- 4.10 Setting Log
- 5 Live
- 6 Record
- 7 Picture
- 8 AI
- 9 Security
- 10 Report
- Appendix 1 Cybersecurity Recommendations

95
Figure 4-94 Upgrade
Step 2 Click
Browse
, and then upload upgrade file.
The upgrade file should be a .bin file.
Step 3 Click
Upgrade
.
The upgrade starts.
4.9 System Information
You can view the information, including version, log and online user, and back up or clear log.
4.9.1 Version
View the
ONVIF Version
,
System Version
,
Web Version
and other information of the camera.
Select >
System Info
>
Version
to view the version information of the camera.
4.9.2 Online User
View all the current users logging into the web.
Select >
System Info
>
Online User
to view all the current users logging into the device.
4.9.3 Durability Statistics
View the
Total Working Time
,
Update Times
,
Last Upgrade Date
of the camera.
Select >
System Info
>
Durability Statistics
to view the durability statistics of the camera.
4.9.4 Legal Info
View the
Software License Agreement
,
Privacy Policy
,
Open Source Software Notice
of the
camera.
Select >
System Info
>
Legal Info
to view the legal information of the camera.
4.10 Setting Log
4.10.1 Log
You can view and back up logs.
Step 1 Select >
Log
>
Log
.
Step 2 Configure
Start Time
and
End Time
, and then select the log type.