Floodlight Network Camera Quick Start Guide V1.0.
Foreword General This manual introduces the installation and operations of network camera. Read carefully before using the device, and keep the manual safe for future reference. Safety Instructions The following signal words might appear in the manual. Signal Words Meaning Indicates a medium or low potential hazard which, if not avoided, could result in slight or moderate injury.
might result in some differences appearing between the actual product and the manual. Please contact customer service for the latest program and supplementary documentation. ● There might be deviations in the description of the technical data, functions and operations, or ● ● ● ● errors in the print. If there is any doubt or dispute, we reserve the right of final explanation. Upgrade the reader software or try other mainstream reader software if the manual (in PDF format) cannot be opened.
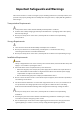
Important Safeguards and Warnings This section introduces content covering the proper handling of the device, hazard prevention, and prevention of property damage. Read carefully before using the device, comply with the guidelines when using it. Transportation Requirements ● Transport the device under allowed humidity and temperature conditions. ● Pack the device with packaging provided by its manufacturer or packaging of the same quality before transporting it.
regulations. ● Ground the function earthing portion of the device to improve its reliability (certain models are not equipped with earthing holes). The device is a class I electrical appliance. Make sure that the power supply of the device is connected to a power socket with protective earthing. ● The dome cover is an optical component. Do not directly touch or wipe the surface of the cover during installation. Operation Requirements ● The cover must not be opened while the device is powered on.
● Do not directly touch the photosensitive CMOS. Use an air blower to clean the dust or dirt on the lens. When it is necessary to clean the device, slightly wet a soft cloth with alcohol, and gently wipe away the dirt. ● Clean the device body with a soft dry cloth. If there are any stubborn stains, clean them away with a soft cloth dipped in a neutral detergent, and then wipe the surface dry.
Table of Contents Foreword ........................................................................................................................................................................................................I Important Safeguards and Warnings............................................................................................................................................ III 1 Package List...........................................................................................
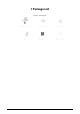
1 Package List Figure 1-1 Packing list 1
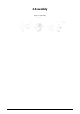
2 Assembly Figure 2-1 Assembly 2
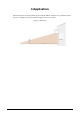
3 Application When mounted at 3 m (10 feet) off the ground, with the PIR lens parallel to the ground, the motion detector is optimized to detect human-sized objects up to 10 m (33 feet).
4 Overview Figure 4-1 Overview Press and hold the reset button for 10 s to reset the camera.
5 Operating with DMSS APP To ensure the best possible wireless performance, make sure that there are no obstacles and electromagnetic interference between the device and the router. Step 1 Add the device. 1) Tap + button on the upper-right corner of the DMSS home page to scan the QR code on the camera. If your DMSS fails to scan the QR code, tap Manually enter SN. 2) Make sure the indicator light on the device flashes green, and then tap Next. Figure 5-1 Add the device Step 2 Configure the device hotspot.
Select your Wi-Fi network from SSID list and then enter the password. Step 4 Configure the device information. 1) Create the device name, and then tap Save. 2) Set the time zone, and then tap Done.
6 Installation ● Risk of electrical shock. ◇ Be sure to disconnect the power at the fuse or circuit breaker before installation. ◇ Verify that the supply voltage is correct. Connect the fixture to a 100-240 VAC 50/60 Hz power source. ◇ Properly ground fixture. Always follow code standards when installing wired connection. We strongly suggest that you hire a licensed electrician to install the camera. ● Risk of fire. Do not install the camera near combustible or flammable surfaces.
6.2 Attaching the Camera Figure 6-2 Attaching the camera 6.3 Adjusting the Lens Angle ● Adjust the lens angle by loosening the screws and rotating the universal joint.
Figure 6-3 Adjust the lens angle (1) ● Adjust the lens angle by rotating the universal joint only.
Legal and Regulatory Information Legal Considerations This product can be regulated by laws that vary from country to country. Check the laws in your local region before using it. Disclaimer Every care has been taken in the preparation of this document. Please contact us through the following contact information of any inaccuracies or omissions.