IPC-C22E-S2 Network Camera Quick Start Guide V1.0.
Foreword General This manual introduces the functions, and installation of the camera. Safety Instructions The following categorized signal words with defined meaning might appear in the manual. Signal Words Meaning WARNING Indicates a medium or low potential hazard which, if not avoided, could result in slight or moderate injury. Indicates a potential risk which, if not avoided, could result in property damage, data loss, lower performance, or unpredictable result.
⚫ occurred when using the device. If there is any uncertainty or controversy, please refer to our final explanation.
Table of Contents Foreword ..................................................................................................................................................I 1 Packing List .........................................................................................................................................1 2 Product Introduction ...........................................................................................................................2 3 Imou App Operation ..............
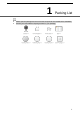
1 ⚫ ⚫ Packing List Please open the package and check if all the components are included before installation. Contact your local retailer if anything is broken in your package.
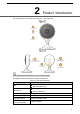
2 Product Introduction For the introduction of the device, see Figure 2-1 and Figure 2-2. Press and hold the reset button for 10 s to reset the device. The pattern of the LED indicator is included in Table 2-1.
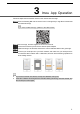
3 Imou App Operation Follow the steps below to add the camera in the network with Imou App. Scan the following QR code or search "Imou" in Google Play or App Store to download and install Imou App. If you have installed the App, update it to the latest version. Run Imou App, and then register an account for first use. Connect the camera to power source with the power adapter. Wait for booting to be finished, and then the camera indicator flashes with green light.
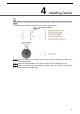
4 Installing Device Make sure the mounting surface is strong enough to hold at least three times of the camera weight. For the installation diagram and item list of the camera, see Figure 4-1. Installation diagram Drill screw holes on the mounting surface as the mounting map shows, and then put in the expansion bolts. Attach the mounting plate to the mounting surface with the self-tapping screws.