
User's Manual
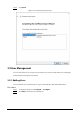


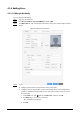
Table Of Contents
- Foreword
- Important Safeguards and Warnings
- 1 Overview
- 2 Local Operations
- 3 Web Operations
- 3.1 Initialization
- 3.2 Logging In
- 3.3 Resetting the Password
- 3.4 Data Capacity
- 3.5 Configuring Video and Image
- 3.6 Configuring Face Detection
- 3.7 Configuring Network
- 3.8 Safety Management
- 3.9 User Management
- 3.10 Maintenance
- 3.11 Configuration Management
- 3.12 Upgrading System
- 3.13 Viewing Version Information
- 3.14 Viewing Logs
- 4 Smart PSS Lite Configuration
- Appendix 1 Important Points of Face Registration
- Appendix 2 Cybersecurity Recommendations

51
Figure 4-2 Auto search
A device list will be displayed.
Select a device, and then click
Modify IP
to modify its IP address.
Step 3 Select the Time & Attendance that you want to add to Smart PSS Lite, and then click
Add
.
Step 4 Enter the username and the password of the Time & Attendance.
You can view the added Time & Attendance on the
Devices
page.
The Time & Attendance automatically logs in to Smart PSS Lite after being added.
Online
is
displayed after successful login.
4.3 User Management
Add users, assign cards to them, and configure their access permissions.
4.3.1 Configuring Card Type
Set the card type before you assign cards to users. For example, if the assigned card is an ID card, set
card type to ID card.
Step 1 Log in to Smart PSS Lite.
Step 2 Click
Access Solution
>
Personnel Manager
>
User
.
Step 3 On the
Card Issuing Type
and then select a card type.
Make sure that the card type is same to the actually assigned card; otherwise, the card
number cannot be read.
Step 4 Click
OK
.