
User's Manual
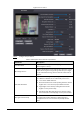
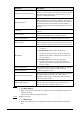
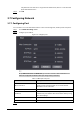

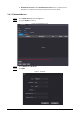
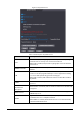
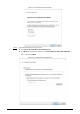
Table Of Contents
- Foreword
- Important Safeguards and Warnings
- 1 Overview
- 2 Local Operations
- 3 Web Operations
- 3.1 Initialization
- 3.2 Logging In
- 3.3 Resetting the Password
- 3.4 Data Capacity
- 3.5 Configuring Video and Image
- 3.6 Configuring Face Detection
- 3.7 Configuring Network
- 3.8 Safety Management
- 3.9 User Management
- 3.10 Maintenance
- 3.11 Configuration Management
- 3.12 Upgrading System
- 3.13 Viewing Version Information
- 3.14 Viewing Logs
- 4 Smart PSS Lite Configuration
- Appendix 1 Important Points of Face Registration
- Appendix 2 Cybersecurity Recommendations

35
Only when the size of the face is larger than the defined size, the face can be detected
by the Time & Attendance.
Step 6 Click
OK
.
3.7 Configuring Network
3.7.1 Configuring Port
You can limit access to the Time & Attendance at the same through web, desktop client and phone.
Step 1 Select
Network Setting
>
Port
.
Step 2 Configure port numbers.
Figure 3-9 Configure ports
Except
Max Connection
and
RTSP Port
, you need to restart the Time & Attendance to
make the configurations effective after you change other parameters.
Table 3-7 Description of ports
Parameter Description
Max Connection
You can set the maximum number of clients (such as web,
desktop client and phone) that can access the Time &
Attendance at the same time.
TCP Port Default value is 37777.
HTTP Port
Default value is 80. If you want to change the port number,
add the new port number after the IP address when you log
in to the webpage.
HTTPS Port Default value is 443.
RTSP Port Default value is 554.
Step 3 Click
OK
.