
User's Manual

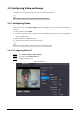


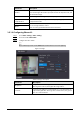
Table Of Contents
- Foreword
- Important Safeguards and Warnings
- 1 Overview
- 2 Local Operations
- 3 Web Operations
- 3.1 Initialization
- 3.2 Logging In
- 3.3 Resetting the Password
- 3.4 Data Capacity
- 3.5 Configuring Video and Image
- 3.6 Configuring Face Detection
- 3.7 Configuring Network
- 3.8 Safety Management
- 3.9 User Management
- 3.10 Maintenance
- 3.11 Configuration Management
- 3.12 Upgrading System
- 3.13 Viewing Version Information
- 3.14 Viewing Logs
- 4 Smart PSS Lite Configuration
- Appendix 1 Important Points of Face Registration
- Appendix 2 Cybersecurity Recommendations

29
Figure 3-5 Exposure
Table 3-3 Exposure parameter description
Parameter Description
Anti-flicker
Set anti-flicker to reduce flicker and decrease or reduce uneven colors or
exposure.
●
50Hz
: When the mains power supply is 50 Hz, the exposure is
automatically adjusted to prevent the appearance of horizontal
lines.
●
60Hz
: When the mains power supply is 60 Hz, the exposure is
automatically adjusted to reduce the appearance of horizontal lines.
●
Outdoor
: When
Outdoor
is selected, the exposure mode can be
switched.
Exposure Mode
You can set the exposure to adjust image brightness.
●
Auto
: The Time & Attendance automatically adjusts the brightness
of images.
●
Shutter Priority
: The Access Terminal will adjust image brightness
according to shutter exposure range. If the image brightness is not
enough and the shutter value has reached its upper or lower limit,
the Time & Attendance will adjust the gain value automatically for
ideal brightness level.
●
Manual
: You can configure gain and shutter value manually to
adjust image brightness.
◇
When you select
Outdoor
from the
Anti-flicker
list, you can
select
Shutter Priority
as the exposure mode.
◇
Exposure mode might differ depending on different models of
Time & Attendance.