
User's Manual
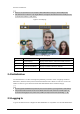
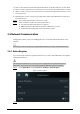
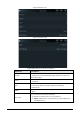

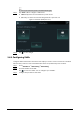
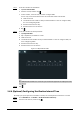
Table Of Contents
- Foreword
- Important Safeguards and Warnings
- 1 Overview
- 2 Local Operations
- 3 Web Operations
- 3.1 Initialization
- 3.2 Logging In
- 3.3 Resetting the Password
- 3.4 Data Capacity
- 3.5 Configuring Video and Image
- 3.6 Configuring Face Detection
- 3.7 Configuring Network
- 3.8 Safety Management
- 3.9 User Management
- 3.10 Maintenance
- 3.11 Configuration Management
- 3.12 Upgrading System
- 3.13 Viewing Version Information
- 3.14 Viewing Logs
- 4 Smart PSS Lite Configuration
- Appendix 1 Important Points of Face Registration
- Appendix 2 Cybersecurity Recommendations

5
account can enter the main menu of the Time & Attendance. For the first-time use, use the admin
account to enter the main menu screen and then you can create the other administrator accounts.
●
admin account: Can log in to the main menu screen of the Time & Attendance, but has no door
access permission.
●
Administration account: Can log in to the main menu of the Time & Attendance and has door
access permissions.
Step 1 Press and hold the standby screen for 3 seconds.
Step 2 select a verification method to enter the main menu.
●
Face: Enter the main menu by face recognition.
●
PWD: Enter the user ID and password of the administrator account.
●
admin: Enter the admin password to enter the main menu.
2.6 Network Communication
Configure the network, serial port and Wiegand port to connect the Time & Attendance to the
network.
The serial port and the wiegand port might differ depending on models of Time & Attendance.
2.6.1 Active Register
You can turn on the automatic registration function to access the Time & Attendance through the
management platform.
The management platform can clear all personnel configurations and initialize the Time &
Attendance. To avoid data loss, keep the management platform permissions properly.
Step 1 On the
Main Menu
, select
Connection
>
Network
>
Active Register
.
Figure 2-3 Auto register
Step 2 Turn on the automatic registration function and set the parameters.