
User's Manual


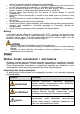
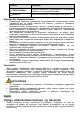
Table Of Contents

Table 5-1 Installation items
No. Item name No. Item name
1 Door 1 4 Expansion bolt
2 Door 2 5 Attachment panel
3 ST3 × 18 mm self-tapping screw 6 Magnet
Step 1 Drill 4 holes in door 1 and door 2 according to the hole
positions of the attachment panels.
Step 2 Put the expansion bolts into the holes.
Step 3 Align the screw holes on the plate with the expansion bolts.
Step 4 Fix the attachment panels with ST3 × 18 mm self-tapping
screws.
Step 5 Put the door detector into the attachment panel from top to
bottom.
6
Door Detector Configuration
6.1 Configuring the Door Detector
On the Hub interface, select the door detector as needed from the
accessory list, and then you can configure the parameters of the door
detector.
Table 6-1 Door detector parameter description
Parameter Description
Device Configuration
●
View device name, type, SN and device
model.
●
Edit device name, and then tap Save to
save configuration.
Area
Select the area to which the door detector is
assigned.
24 H Protection Zone
The accessory located in the 24 h protection
zone is always active whether the security
system is configured in the armed mode or
not.
Home Mode
Enable the home mode, and then the
selected accessories under the hub will be
armed.
Delay Mode under Home Mode
Enable the Delay Mode under Home Mode,
the selected accessory under the hub will be
armed and the alarm will not be triggered until
the end of customized delay time.
Only enable Home Mode first can Delay
Mode under Home Mode take effect.
Delay Time
●
The system provides you with time to
leave or enter the armed zone without
alarm.
●
Select from 0 s to 120 s.
The arming mode will be effective after the
delay time.
External Detector Access Connect the wired peripheral with the cable.
Alarm-speaker Linkage
When an alarm is triggered, the accessories
will report the alarm events to the hub and
alert with siren.
Alarm-video Linkage
When an alarm is triggered, the accessories
will report the alarm events to the hub and
then will be linked with videos.
Parameter Description
Video Channel Select the video channel as needed.
Signal Strength Detection Test the current signal strength.
Detector Test Detect whether the accessory works.
Transmit Power
●
Select from high, low, and automatic.
●
The higher the transmission power, the
farther the transmission and the higher
power consumption.
Cloud Update Update online.
Delete
Delete the online accessory.
Go to the Hub interface, select the
accessory from the list, and then swipe left
to delete it.
6.2 Viewing Status of the Door Detector
On the Hub interface, select the door detector as needed from the
accessory list, and then tab
to view the status of the door detector.
Table 6-2 Status
Parameter Value
Temperature The temperature of the environment.
Signal Strength
The signal strength between the hub and the door
detector.
●
: Ultra low.
●
: Low.
●
: Moderate.
●
: High.
●
: No.
Battery Level
The battery level of the detector.
●
: Fully charged.
●
: Sufficient.
●
: Moderate.
●
: Insufficient.
Anti-tampering Status Anti-tampering status of the door detector.
Online Status
Online and offline status of the door detector.
●
: Online.
●
: Offline.
Entrance Delay Time
Exit Delay Time
Entrance and exit delay time.
Door Status
Open or close status of the door.
●
: Open.
●
: Close.
24 H Protection Zone
Status
Active status of the 24 h protection zone.
●
: Enable.
●
: Disable.
Program Version The program version of the door detector.