
User's Manual


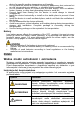
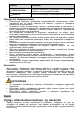
Table Of Contents

Step 4 Initialize the hub and add it to the app. Go through step 5 and step 7
in “Adding Alarm Hub through Wi-Fi”.
6
Pairing with Accessories
You can add multiple accessories, including wireless keyfob, siren, door
detector and PIR detector, into the hub. The section takes door detector as
an example.
Up to 6 sirens and 64 keyfobs can be added to a hub.
Step 1 On the Home interface, tap at the upper-right corner, and then
scan QR code at the bottom of door detector.
Step 2 Tap Next.
Step 3 Follow on-screen instructions and switch the door detector to on,
and then tap Next to add it to the hub.
Step 4 Wait for the pairing.
Step 5 Customize the name of the door detector and select the area, and
then tap Completed.
●
Delete the accessory: Go to the Hub interface, select the
accessory from the list, and then swipe left to delete it.
●
Up to 32 areas can be created in a hub.
7
Installation
Prior to installation, insert the SIM card or the network cable, connect to
the power supply and turn on the hub switch, and make sure that you have
completed network configuration.
We recommend installing the hub with expansion screws. Do not place the
hub in the following areas:
●
Outdoors.
●
Places close to metal objects that cause attenuation and shielding of the
radio signal.
●
Places with a weak GSM signal.
●
Places close to radio interference sources which are less than 1 meter
from the
●
Places where the temperature and humidity exceed allowed limits.
Figure 7-1 Installation
1
2
3
4
5
6
Table 7-1 Installation items
No. Item Name No. Item Name
1 Hub 4 Mounting plate
2
M3 × 8 mm countersunk head
screw
5 Expansion bolt
3 ST4 × 25 mm self-tapping screw 6 Wall
Step 1 Confirm the position of screw holes, and then drill them on the
mounting plate.
Step 2 Put the expansion bolts into the holes.
Step 3 Put the mounting plate into the wall, and then align the screw holes
on the plate with the expansion bolts.
Step 4 Fix the mounting plate with ST4 × 25 mm self-tapping screws.
Step 5 Put the alarm hub into the mounting plate from top to bottom.
Step 6 Fix the alarm hub and mounting plate with M3 × 8 mm countersunk
head screws.
8
Hub General Settings
On the Hub interface, tap , and then you can view and edit general
information of the hub.
Table 8-1 Parameter description
Parameter Description
Device
Configuration
●
View device name, type, and SN.
●
Edit device name, and then tap Save to save
configuration.
Notifications Tap to enable alarm notification.
Hub Status For details, see “Viewing Hub Status”.
Hub Setting For details, see “Configuring the Hub”.
Time Zone
Tap to select your time zone, and enable DST
(daylight saving time) if necessary.
●
Time zone: Select the time zone in which the hub
operates.
●
DST: Select date or week, and then select start
time and end time.
Network
Configuration
Show your present network information.
Device Sharing
●
Tap Share to User to share the status of the hub
with the other users.
●
Tap Entrust to Company to share the status of
the hub with the company.
Cloud Update
Update online.
Update is not allowed when the hub is in armed
status or the battery level is low.
8.1 Configuring the Hub
On the Hub interface, select > Hub Setting to configure the hub
parameters.
Table 8-2 Hub parameter description
Parameter Description
Global Arming/Disarming
Arm or disarm all the detectors in all the areas
with one tap.
Schedule Arming/
Disarming
Arm or disarm the areas by schedule.
●
Area: Select the area in which the hub
operates.
●
Command setting: Select an arming mode
as needed by tapping Home, Away, or
Disarm.
●
Time: Select the time period in which the
hub operates.
●
Repeat: Copy the arming or disarming
schedule.
Ringtone Setting
The ringtone when entering or exiting the
arming mode.
Phone Number
Management
●
Add and manage the phone number.
●
You can be notified of all events (alarm,
fault, operation) through push notifications,
SMS messages and calls (if activated).
Test Mode
Tap Start to test the status of the accessories
connecting to the hub in different areas, and
then tap Stop to complete detection.
Heartbeat
Configure the hub-detector ping interval. The
settings determine how frequently the hub
communicates with the accessories and how
quickly the loss of connection is detected.
●
Detector Ping Interval: The frequency of
connected accessories operated by the hub
is configured in the range of 12 s to 300 s
(60 s by default).
The shorter the detector ping interval, the
shorter the life span of the battery.
●
Number of undelivered packets to
determine connection failure: A counter
of undelivered packets is configured in the
range of 3 to 60 (15 packets by default).
The smaller the number, the more
frequently the offline status of accessories
is detected and reported.
Parameter Description
Anti-tampering Speaker
Alert with a siren if the lid of accessories and
hub is open.
System Integrity Check
If enabled, the hub checks the status of all
detectors before arming, such as battery
charge, tampers, and connection. If problems
are detected, warnings will be displayed.
●
For keyfob, flashes green first, and then
turns to red.
●
For app, an alarm message will pop up.
8.2 Viewing Hub Status
On the Hub interface, select > Hub Status to view the hub status.
Table 8-3 Hub parameter description
Parameter Description
GSM Signal Strength
The signal strength of the mobile network for the
active SIM card.
●
: Ultra low.
●
: Low.
●
: Moderate.
●
: High.
●
: No.
Wi-Fi Signal Strength
Internet connection status of the hub via Wi-Fi.
For greater reliability, we recommend installing
the hub in places with the signal strength of at
least 2 bars.
●
: Ultra low.
●
: Low.
●
: Moderate.
●
: High.
●
: No.
Storage Battery
Show remaining electricity of the battery.
●
: Fully charged.
●
: Sufficient.
●
: Moderate.
●
: Insufficient.
Anti-tampering
The tamper mode of the accessory, which reacts
to the detachment of the body.
Main Power Status Show main power status.
GSM Connection Status
Wi-Fi Connection Status
Network Cable
Connection Status
Internet connection status of the hub via SIM
card, Wi-Fi, and Ethernet.
●
: Connected.
●
: Disconnected.
SIM Card Status
Connection status of the SIM card.
●
: SIM card 1 is active.
●
: SIM card 2 is active.
●
: No SIM card.
Program Version The program version of the hub.
9
Arming the Accessory
After the accessories have been added to the hub, you can arm and disarm
them. Only wireless door detector and PIR detector can be armed.
9.1 Types of Arming Modes
There are three types of arming modes.
●
Home: Enable the home mode, and then the selected accessories under
the hub will be armed.
Make sure that home mode has been activated for the selected
detectors. For details, see Wireless PIR Detector_User's Manual and
Wireless Door Detector_User's Manual.
●
Away: Enable the away mode, and then all the accessories under the hub
will be armed.
●
Disarm: Enable the disarm mode, and then all the accessories under the
hub will be disarmed.
9.2 Operations
You can arm and disarm the detectors in a single area or all the areas
through manual or scheduled operations.
●
Single Arming and Disarming: Arm and disarm the detectors in a single
area.
●
Global Arming and Disarming: Arm and disarm the detectors in all the
areas .
●
Manual Arming and Disarming: Arm the security system through DMSS
App or keyfob.
●
Schedule Arming and Disarming: Arm and disarm the detectors by
schedule .
9.2.1 Single Arming and Disarming
Step 1 Go to Hub interface.
Step 2 Tap , and then select from Home, Away, Disarm, and Disable
in the white box to switch arming modes. For details, see “Types of
Arming Modes”.
Figure 9-1 Switch arming mode
Disable: Close the current interface.
9.2.2 Global Arming and Disarming
Step 1 On the Hub interface, tap , and then tap Hub Setting.
Step 2 Enable Global Arming and Disarming. For details, see
“Configuring the Hub”.
Step 3 Go back to the Hub interface.
Step 4 Select from Home, Away, and Disarm at upper of the box.
Figure 9-2 Select mode
9.2.3 Manual Arming and Disarming
You can arm the security system through DMSS App or keyfob.
●
To arm and disarm the detectors in a single area or all the areas, see
“Single Arming and Disarming” and “Global Arming and Disarming”.
●
To operate on the keyfob, you need to assign the control permissions over
the areas to the keyfob first.
9.2.4 Scheduled Arming and Disarming
You can arm and disarm the accessories in the selected areas by schedule.
Step 1 On the Hub interface, tap , and then tap Hub Setting.
Step 2 Tap Scheduled Arming and Disarming, and then configure
scheduled arming and disarming. For details, see “Configuring the
Hub”.