
Specifications


83
FSA Server Initial Configuration
FSA Server Initial Configuration
The basic settings for the FSA Server must be entered the first time that the FSA
Maintenance Utility is run. After that, the utility will retain the settings.
For the purposes of the procedure given here, it is assumed that the FSA Maintenance
Utility is being run on the same PC that is host to the FSA Server and the VoIP Gateway
Server.
♦ Making Initial Settings for the FSA Server
1. Start the FSA Maintenance Utility program.
2. In the menu on the left of the utility window, click Server Settings.
3. (The utility will default to a setting of “localhost”, and if the utility is running on
the same computer as the server, you may leave the parameter set that way.) In the
FSA Server Settings window, in the FSA Server Connection box, click in the Host
parameter field and fill in the URL of the computer running the FSA Server.
4. Unless instructed to do otherwise by Zetron, leave the Port parameter set to the
factory default of 43001.
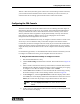
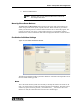
5. Click Connect. If the address and port settings are correct, the utility connects to
the server and the host and port settings for the server become unavailable. See
Figure 28.
6. If the VoIP Gateway Server has not been entered previously, click Add or Edit (as
appropriate) and enter the URL of the computer running the VoIP Gateway Server
under the VoIP Gateway Server parameter. (The VoIP Gateway Server defaults
to “localhost” and the Port to 43002. In most systems, you should be able to
simply leave these parameters at their default settings.)
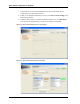
7. In the menu on the left of the window, click Global Server Settings. The window
shown in Figure 29 opens.
8. Fill in the parameters in the Zetron Customer box. These parameters do no affect
the operation of the system, but can be useful when calling Zetron for technical
support. It might be helpful to include the System ID number and your Zetron
Customer ID number in this field.
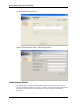
9. Review the parameters under Settings and change them if necessary. For details
about the parameters in this box, see Global Settings Window on page 84.
10. In the menu on the left of the utility window, click Server Settings. Click Save to
Server before leaving this window to save the changes made.
11. Restart the FSA Server for the changes you made to take effect.
Note If Gateway is selected for the VoIP Connection in the Fire-Station
Definitions window, the Add, Edit, and Remove buttons will be
grayed out and will not function.