
Installation guide


Installation – Mounting the Range Hood
13
6HOHFWSUHIHUUHGGXFWORFDWLRQYHUWLFDORU
KRUL]RQWDOLIGXFWLQJRXWRINLWFKHQ5HIHUWR
page 10 for details.
2. Install utensil bar to hood. Refer to page 12 for
details.
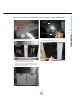
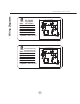
%HJLQLQVWDOODWLRQE\UHPRYLQJWKHPHVK¿OWHUV
DQGOLJKWSDQHOV)LJ
4. Reinforce cabinet with 1”x2” wood strips
if additional strengthening is required or if
cabinets are framed.
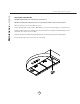
5. Temporarily position the range hood in the
desired mounting location. Measure and
mark the mounting holes, duct and electrical
locations with a pencil.
6. Drill/cut out the required openings for duct and
electrical access; make sure the duct opening
is large enough to apply duct tape.
)DVWHQKRRGRQWRFDELQHWZLWK0ZRRG
screws provided.
8. Install electrical.
9. Install duct work and seal with duct tape.
5HLQVWDOOPHVK¿OWHUVDQGOLJKWSDQHOV
11. Power up hood and check for leaks around
duct tape.
12. If recirculating the hood refer to page 11 for
more details.
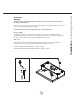
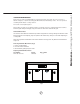
Hood is designed for installation under a
kitchen cabinet
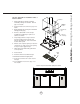
9. Aluminum du
c
tape
6. Duct
opening/
cutout
4. Add 1”x2”
wood
strips
2. Mesh
filters
8. Electrical
Fig 3
Push in on panel latch then pull panel down
Fig 4