
Tilt Range Hood Installation Guide
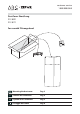


Installation - Mounting the Duct Cover
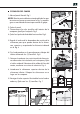
MOUNTING THE DUCT COVER
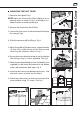
1. Open the front panel. Fig.1
NOTE! Open the front panel while holding it by its
external sides, as shown in Fig.1, and keep at a su-
itable distance to avoid impacting it.
2. Remove the Decorative Mesh Filters.
3. Loosen the two screws inside the hood that fasten
the canopy. Fig.2
4. Slide the top cover o by lifting it. Fig.3
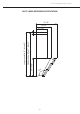
5. Adjust the width of the duct cover support bracket
so that it ts inside the top of the chimney and
observing the distance shown in Fig. 4
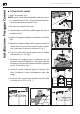
6.
Secure duct cover bracket to top of wall just below
the ceiling using (2) screws provided. See Fig.5
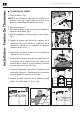
7. Place correct size ducting for your installation (not
supplied) to the hood and secure to the blower
collar with aluminum duct tape. Fig. 6
8.
Insert top duct cover into bottom duct cover. Seat
the duct covers correctly on the hood.
9. Extend top duct cover up and secure to the duct
cover bracket using (2) screws. See Fig. 7
- 3 -