
Corporation Range Hood Use, Care, and Installation Guide

13
Installation - Mounting Hood
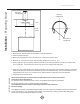
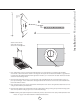
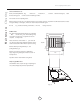
gap between
bracket and
wall
Top
Bottom
1. Place wall brac
ket on line C. Position top of wall bracket so it is even with the 21” mounting spread. Make
sure bracket is attached to wall as shown in the diagram. The top of the wall bracket should have a gap between
it and the wall. The bottomshould be ush against the wall. Use (3) 2” wood screws to attach bracket to wall. Use
anchors if not mountingto studs.
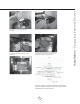
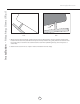
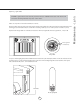
2. Lift hood onto wall bracket, there is a lip on the back of the hood which will rest on the wall bracket. Secure in
place by *screwing (2) screws with washers throughhood into the wall. There are two holes at the bottominside
the hood in which to do this.
3. Place telescopic duct covers on top of hood and extend top duct cover to the ceiling bracket. Attach duct cover to
ceiling bracket with the providedscrews.
4. Run duct work down to top of motor. Attach electrical wiring from ceiling to wiring on top of motor housing. (slide
duct cover up towards ceiling to gain access to the motor housing)
* Note: If installing onto drywall only with no wall studs present, attach E Z anchors (not provided) into the wall.
Please see page 15 for external blower installation instructions.
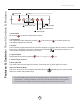
B
A
C
Attach screws to both
sides of the duct covers
and secure to ceiling bracket.
Electrical
10”