
Range Hood Installation Instructions


Installation - Internal Blower
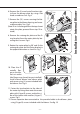
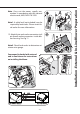
6. Remove the 6” round metal knockout pla-
te from the blower plate by using a at
head screwdriver. See. Fig.4
7. Remove the (10 ) screws securing the blo-
wer plate to the blower housing and remo-
ve blower plate. See. Fig.5
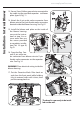
(Note! If air is discharged from the top, do not
rotate the plate; proceed from step 10 in-
stead).
8. Remove the rectangular plate and the -
xing bracket from the motor plate by loo-
sening the 6 screws. Fig.6
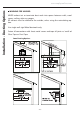
9. Rotate the motor plate by 90° and x the
rectangular plate and the xing bracket in
the opposite direction as shown in Fig.7
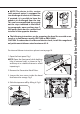
10. Place the 6"
metallic an-
ge on the blo-
wer's air outlet
(the ange may already be pre-installed).
Install internal blower into blower plate
and secure using (4 ) screws included with
the blower. See Fig. 8
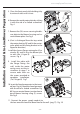
11. Fasten the two brackets to the sides of
the motor by xing them onto the motor
plate with (4 type B) screws, and to the si-
des of the motor with another (4 type C)
screws. Fig 9
12. Secure capacitor box connected to the provided cable to the blower plate
using (2 type B) screws included with the blower. See g. 10
- 11 -