
User Manual


11
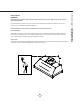
1.5HPRYHEDIÀH¿OWHUVE\1)3XOOLQJ¿OWHUWRZDUG
front of insert. 2)3LYRWLQJUHDURI¿OWHUGRZQ
2. Remove grease tray by: 1) Pulling up on tray to
release from bottom panel. 2) Lifting tray out of
insert body.
3. Remove left and right side spacer panels by
UHPRYLQJVFUHZVIURPEHKLQGHDFKSDQHO
Installation – Insert Preparation
1
2
11
2
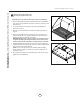
Locking Tabs
Bottom Panel Screws
22
1
4. Remove bottom panel by: 1)5HPRYLQJ
screws from left and right sides of bottom panel.
2) Pulling bottom panel toward front of insert to
release from locking tabs.
6. Hood preperation is complete. Refer to page 10,
step 4 to complete installation.
5. Secure 10” round ducting collar to top of insert by
0[PPVFUHZV