
Installation Guide


10
www.zephyronline.com
C/L
C/L
A
B
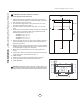
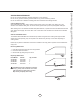
16 7/8”
min
30”
4”
wood board
FIG. 1
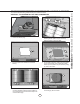
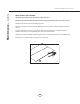
16 7/8”
16 1/8”
13 5/8”
1 11/16”
3 5/16”
21 1/4”
35 1/4” (42”, 48”, 54”)
5 5/16”
FIG. 2
Installation – Mounting the Range Hood
1.Selectpreferredductingapplication(verticalorhorizontal)and
prepare hood. Refer to page 11 for horizontal ducting conversion.
2. Plumandmarkcenterlineonwall.
3. Choosedesiredheightabovecookingsurface(30”min).Level
andmarkhoodbottom,lineA(FIG.1)
4. Levelandmarktopofwoodboard,lineB(FIG.1)167/8”from
line A.
5. Markcenterlineofwoodboard.Centerandaligntopofboardwith
lineB.Securewoodboardtostudsusing(4)M6woodscrews.
Wood Board Dimensions:(WxDxH)
AK7836BS - 33” x 1/2” x 4”
AK7842BS - 39” x 1/2” x 4”
AK7848BS - 45” x 1/2” x 4”
AK7854BS - 51” x 1/2” x 4”
6. Prepare duct pipe and duct cut outs in upper cabinet if needed or
wallIfhorizontallyductinghood.Refertohoodspecicationson
page 8 for dimensions.
7. Prepare electrical wiring and electrical cut outs in upper cabinet if
neededorwallifhorizontalelectricalhookupisrequired.Referto
hoodspecicationsonpage8fordimensions.
8. Mounthoodontowoodboardandsecureusing(4)M6wood
screws.
9. Further secure hood onto wall through lower body screw holes by
(2)M6woodscrews.SeedimensionsinFIG.2.
10. Install electrical.
11.Installductworkandsealwithcertiedaluminumducttape.
12.Poweruphoodandcheckforleaksaroundducttape.
13.Installbaelters.
CAUTION: At least two installers are required
due to the weight and size of the hood.
!
WARNING: Electrical wiring must be done by a qualified person(s) in
accordance with all applicable codes and standards. This range hood must be
properly grounded. Turn off electrical power at service entrance before wiring.
!