
Operation Manual


Z41 Pro
http://www.zennio.com Tecnical Support: http://support.zennio.com
7
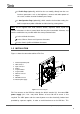
external power must be supplied to the device through the corresponding terminal (10)
provided within the original packaging, ensuring that each cable is properly connected
and respecting the electrical polarities –positive and negative– from the supply to the
device.
In addition to the external supply, Z41 Pro makes use of a button battery (LR44),
located at the corresponding slot (4), to help maintain the time and date updated in
case of a failure of the external power supply.
Note: immediately after connecting the external supply, the device will perform an
automatic calibration, which may result deviated if it takes place while any type of
pressure is being made over the front panel. In case of an unexpected behaviour in
touch recognition, it will be necessary to disconnect and connect the device back,
avoiding making pressure over the panel, in order to perform a new calibration.
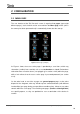
After the connection of the external power supply, the screen will blink for an instant. A
few seconds later, a welcome screen containing the Zennio logo and the “Loading…”
label will be shown. Once the load process ends, the Status page will come up (see
Figure 2).
Figure 2 Status Page
This screen is divided into boxes, which contain the following information:
The “KNX” box shows the individual address assigned to the screen (in case
of no assignment, this will show as “x.x.x”).