
Operation Manual


Z41 Pro
http://www.zennio.com Tecnical Support: http://support.zennio.com
6
1 Profile Page (optionally), which lets the user modify, directly from the user
interface, parameters such as the brightness, contrast and colour pattern of
the screen, and the sound of the button press beeps.
1 Configuration Page (optionally), which contains the time/date setting, the
built-in temperature probe calibration and the alarm log, among others.
Note: Z41 3.x supports Latin, Arab, Chinese, Korean, Japanese, Greek, Cyrillic and
Hebrew characters for the on-screen labels that may be customisable. However, only
certain combinations are possible within the same parameterisation:
Latin and Arab characters,
Latin, Chinese, Korean and Japanese characters,
Latin, Greek, Cyrillic and Hebrew characters.
1.3 INSTALLATION
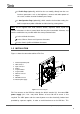
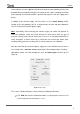
Figure 1 shows the connection outline of Z41 Pro:
Figure 1 Schematic diagram
Z41 Pro connects to the KNX bus through the built-in terminal (2). An external DC
power supply (12v / 24v / 29v) which delivers at least 150 mA of current is also
required. The KNX power and the external power must be electrically isolated and
provided by separate supplies, in order to avoid interference to the KNX bus. This
1. Internal temperature probe.
2. KNX connector.
3. Input connectors.
4. Battery.
5. Prog./Test button.
6. Prog./Test LED.
7. Ethernet connector.
8. Magnet.
9. Mini-USB connector.
10. External power supply.
1
2
3
4
5
6
7
8
9
10