Installation / Operating Guide | Warranty Model Numbers | H 1 9 F 3 4 D T | H20F34DT | H24F34DT || H25F34D T || Concierge TM TVs table of contents page © Copyright 2005, Zenith Electronics Corporation 5
For Customer Support/Service please call: 1-888-865-3026 RECORD THE MODEL NUMBER The model and serial number of the ConciergeTM TV are located on the back of the cabinet. For future reference, we suggest that those numbers be recorded here: www.zenith.com MODEL NO.____________________________________ SERIAL NO.____________________________________ WARNING RISK OF ELECTRIC SHOCK DO NOT OPEN WARNING: TO REDUCE THE RISK OF ELECTRIC SHOCK DO NOT REMOVE COVER (OR BACK). NO USER SERVICEABLE PARTS INSIDE.
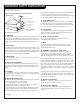
IMPORTANT SAFETY INSTRUCTIONS This product has been manufactured and tested with yuur safety in mind. Howerver, improper use can result in potential electrical shock or fire hazards. To avoid defeating the safeguards that have been built into the new product, please read and observe the following safety points when installing and using the new product, and save them for future reference.
IMPORTANT SAFETY INSTRUCTIONS (Continued from previous page) Example of Grounding According to National Electrical Code Instructions Ground Clamp Antenna Lead in Wire result in damage and will often require extensive work by a qualified technician to restore the product to its normal operation. e. If the product has been dropped or the cabinet has been damaged. f. If the product exhibits a distinct change in performance. 21.
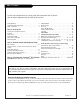
Table of Contents Use the steps outlined below as a setup guide and to determine the TV features that will require adjustment for the needs of the end user Safety Warnings . . . . . . . . . . . . . . . . . . . . . . . . . . . 2 Important Safety Instructions . . . . . . . . . . . . . . . . . . 3 Table of Contents . . . . . . . . . . . . . . . . . . . . . . . . . . 5 Step 1. Hook Up TV TV and other Equipment Hookups Antenna . . . . . . . . . . . . . . . . . . . . . . . . . . . . . . . . 6 Cable service . .
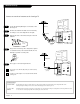
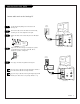
Antenna Hook Up Connect an over-the-air antenna to the Concierge TV TV Back 1 Locate the Antenna/Cable jack on the back of the Concierge TV. 2 Connect the antenna wire that runs from the wall, according to one of the diagrams to the right. 3 Antenna Flat Wire (300 ohm) ANTENNA CABLE Remove the back of the remote and put in two AA batteries. SPEAKER OUT Super Port VIDEO IN M.P.I. Back of Remote 4 AUDIO IN TV Back Panel (Expanded View) 300/75 ohm Adapter Plug in the TV.
Cable Service Hook Up (CATV) Connect cable service to the Concierge TV 1 Locate the Antenna/Cable jack on the back of the Concierge TV. 2 Connect the cable service wire that runs from the wall, according to one of the diagrams to the right. 3 Remove the back of the remote and put in two AA batteries. TV Back Cable TV Wall Jack ANTENNA CABLE RF Coaxial Wire (75 ohm) Super Port SPEAKER OUT VIDEO IN M.P.I. AUDIO IN Back of Remote TV Back Panel (Expanded View) 4 Plug in the TV.
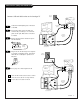
Antenna With VCR Hook Up Antenna Connect an off-air antenna and VCR to the Concierge TV Flat wire (300 ohm) 1 Locate the Antenna/Cable jack on the back of the VCR. 2 Connect the antenna wire that runs from the antenna, according to one of the diagrams to the right. Make other connections as needed. 3 Remove the back of the remote and put in two AA batteries. VCR Back AV Panel output switch 3 4 In TV Back 300/75 ohm Adapter ANTENNA CABLE Super Port M.P.I.
Cable Service (CATV) with VCR Hook Up Cable TV Wall Jack Connect a VCR and Cable service to the Concierge TV VCR Back VCR Back AV Panel Output Switch 3 4 In 1 Locate the Antenna/Cable jack on the back of the VCR. 2 Connect the cable service wire that runs from the wall, according to one of the diagrams to the right. Make other connections as needed. 3 Remove the back of the remote and put in two AA batteries. TV Back ANTENNA CABLE Plug in the TV.
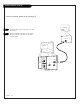
External Speaker Hook Up Connect an external speaker to the Concierge TV Speaker back 1 Locate the Audio In jack on the back of the external speaker. 2 Connect a standard audio cable from the Speaker Out jack on the TV, to the Audio In jack on the external speaker. Audio In TV Back ANTENNA CABLE Super Port M.P.I.
Auto Program (Channel Search) SETUP MENU Use Auto Program to specify Antenna or cable service incoming signal source and automatically store all of the channels that are found by the channel search 1 Using an Installer remote control, press the POWER key to turn on the Concierge TV. 2 Press the MENU key to show the SETUP MENU. 3 Using SELECT on the remote control, highlight AUTO PROGRAM on the screen. AUTO PROGRAM ADD/DEL/BLNK CH.
Front Panel Controls Use the front control panel to access the menus or just operate the TV VOL CAPTION VOL CH CH OFF ON H20F34DT Note: Item 11 Key Defeat, in the installer’s menu allows the installer to: Set Menu Option 11, Key defeat to “0” - Front panel controls give access to menus. Set Menu Option 11, Key defeat to “1” - Menus not available with front panel controls. power channel H19F34DT volume captions 1 Press POWER to turn on your TV.
Guest’s Remote Key Functions A brief overview of the keys on the guest’s remote and what their function POWER Turns TV On or Off. CC (CLOSED CAPTIONING) Press to access closed captions. Press ENTER to exit. VOLUME LEFT/RIGHT Adjusts the sound level. ENTER Press to view the Channel/Time display or to remove any on-screen display or menu. MUTE Turns sound Off and On, while the picture remains. POWER FLSH FLASHBK (FLASHBACK) Returns to the last channel viewed.
Installer Remote Key Functions An overview of the keys on the LP702 installer’s remote and what they do POWER Turns TV On or Off. CC (CLOSED CAPTIONING) Press to access closed captions. Press ENTER to exit. MUTE Turns sound Off and On, while the picture remains. POWER BK MUTE FLSH CC FLASHBK (FLASHBACK) Returns to the last channel viewed. /FM TV TV/FM Selects TV or Radio on TVs equipped with FM radio. VOLUME LEFT/RIGHT Adjusts the sound levels.
On-Screen Menus Overview Descriptions of the menus and on-screen displays on the TV available to the installer Using the Menu button on the installer’s remote, the installer can access all the menus below. Menu Name Page Description ON-SCREEN MENUS SETUP MENU Adjusts the basic characteristics of the TV Auto Program 11 Automatically finds and stores active channels in memory to scroll through using Channel Up/Down.
Channel Add/Delete/Blank SETUP MENU AUTO PROGRAM ADD/DEL/BLNK CH. LABELS CLOCK SET TIMER CAPTIONS LANGUAGE Fine-tuning the guest’s channel selection list 1 Press the MENU key on an Installer’s remote so the SETUP MENU appears. CH 44 ADDED POWER BK MUTE FLSH 2 CC Press SELECT repeatedly to go to the Add/Del/Blnk option. /FM TV 3 Using either the NUMBER keypad and ENTER or the Channel Up/Down arrows on the remote, select a channel.
Setting Up Channel Labels Customizing the channel selection names Overview Channel Labels help the user identify the channel or network being viewed. In the Setup menu with the CH. LABELS option highlighted, use the Adjust Left/Right arrows to scroll through the available channel labels, such as, A & E, AMC, ESPN, HBO, etc. These are a series of alphabetically organized preset labels from which you can choose the more common networks. Use any of these or create custom labels.
Set the Clock SETUP MENU AUTO PROGRAM ADD/DEL/BLNK CH. LABELS CLOCK SET TIMER CAPTIONS LANGUAGE TO SET CLOCK CLOCK MENU AUTO CLOCK SET TIME ZONE DAY. SAVING AUTO OFF ON USE SELECT TO CHOOSE USE ADJ TO CHANGE SETUP MENU AUTO PROGRAM ADD/DEL/BLNK CH.
On/Off Timer Setup SETUP MENU Set up On/Off Timers Note: On/Off Timers operate independently of each other. 1 AUTO PROGRAM ADD/DEL/BLNK CH. LABELS CLOCK SET TIMER CAPTIONS LANGUAGE TIMER ON TIME 9:00 AM OFF TIME 7:00 PM ON/OFF TIMER TO SET TIMER On the optional HP602 Installer’s remote, press MENU repeatedly until the Setup menu appears. ON POWER BK MUTE FLSH CC 2 /FM Press SELECT repeatedly to highlight the Timer option, press the Right arrow.
Captions (Caption/Text Set Up) Set up Closed Caption/Text options for the user SETUP MENU AUTO PROGRAM ADD/DEL/BLNK CH. LABELS CLOCK SET TIMER CAPTIONS LANGUAGE TO SET CAPTIONS CAPTIONS SETUP QUICK/MUTE OPER. MODE SEL. CC TYPE CC CAPTION CC ON MUTE CAPTION LOCK PRESS SELECT TO CHOOSE PRESS ADJ TO CHANGE CAPTION 1 CAPTION 2 CAPTION 3 CAPTION 4 TEXT 1 TEXT 2 TEXT 3 TEXT 4 ON, OFF ON, OFF ON, OFF SETUP MENU AUTO PROGRAM ADD/DEL/BLNK CH.
Language SETUP MENU Choose the language the on-screen menus will appear in 1 Press the MENU key on the remote control so the Setup menu appears. 2 Use the SELECT key on the remote control, to highlight Language on your screen. 3 4 AUTO PROGRAM ADD/DEL/BLNK CH. LABELS CLOCK SET TIMER CAPTIONS LANGUAGE ENGLISH POWER BK MUTE FLSH CC /FM TV Use the Right/Left ADJ arrow to choose one of the following options: English, Spanish, or French. E LUM VO Press ENTER to return to TV viewing.
Video Menu VIDEO MENU CONTRAST BRIGHTNESS COLOR TINT SHARPNESS PICTURE PREF Use the Video menu to customize the picture appearance 1 PRESET Press the MENU key repeatedly until the Video menu appears. Your options are: • Contrast: Adjusts the level of difference between white and black in the TV picture. The more contrast, the brighter the picture appears. POWER BK MUTE FLSH CC /FM TV • Brightness: Increases or decreases amount of white in the TV picture.
Installer Parental Control Menu If used, this optional feature can “block” undesirable programming from appearing on the TV Parental Control offers the user a wide variety of options and settings that restrict or “block” the programming that can appear on the TV. Parental control allows the user the capability of defining which program rating they consider acceptable, to the younger or more sensitive viewer.
Installer Parental Control Menu After you have read the preceding page, follow instructions below to set up and activate Parental Control.
Other Menus & On-Screen Displays Press the remote keys indicated below to access these menus and displays ALARM MENU TIME NOW 6:10 AM VOLUME SLEEP TIMER 3:11 PM OFF TIMER PRESS TIMER PRESS DIGITS TO SET TIME TIMER TO SELECT AM/PM Volume Display Press VOLUME. Shows currently selected sound setting. Alarm Menu Press ALARM. Sets a time the TV will turn itself on. (Clock must be set.) Ch 25 - PBS 7:15 PM OLD TIME MOVIES LENGTH 01:00 TIME LEFT 00:36 Channel/Time/XDS Display Press ENTER.
Managing the Channel Banks The TV has four channel banks, where the administrator or installer can store groups of TV channels Note: Channel banks set up requires an installer’s remote with “Source” or “Bank” keys like the Zenith MBR3447, or a similar remote. PLANNING THE CHANNEL BANKS Generally, TV channels are grouped into “program packages” with terms that are proposed to the end user. The user then opts for a package. Below is an example of how TV channels may be grouped.
Managing the Channel Banks Examples of typical channel banks charts Figure 1. Typical channel banks after running Auto Program B Purpose A N K 1 2 3 4 5 6 7 8 9 Channel Number 10 11 12 13 14 15 16 17 18 19 20 21 22 23 24 25 1 A A A A A A A A A A A A A A A 2 A A A A A A A A A A A A A A A 3 A A A A A A A A A A A A A A A 4 A A A A A A A A A A A A A A A A = Active - - Channel was found during AUTO PROGRAM Figure 2.
Managing the Channel Banks PLAN YOUR CHANNEL BANKS BY FILLING IN THESE CHARTS (or use photocopies).
Installer’s Menus Use the Installer Menu to set up or change operational settings See descriptions of the Installer items on the following pages... Accessing the Installer’s Menu Installer’s menu items can be accessed by using the optional LP702 installer’s remote control. Just press and hold MENU (about 8 seconds) until the display changes, then press 9, 8, 7, 6, then ENTER. To exit the Installer’s Menu, press ENTER again. Any changes you make will be stored in nonvolatile memory.
Installer Menus Installer Menu Items 26-I through 63-I Menu Item Function 26-I. NOT USED 27-I. NOT USED 28-I. CH. OVER RIDE 0/1 1 29-I. OLD OCV 0/1 0 OCV should set to 1. 30-I. ACK MASK 0/1 0 M.P.I. communication parameter. 31-I. POLL RATE 20 - 169 94 M.P.I. communication parameter. 32-I. TIMING PULSE 186 - 227 207 M.P.I. communication parameter. 33-I. NOT USED 34-I. CAMPORT EN. 0/1 1 Set to 1 to enable the front AUX (Camport) input. 35-I. NOT USED 36-I.
Installer Menus Installer Menu Items 64-I through 86-I Menu Item Value Range Default Value Brief Description of Function and Comments 64-I. Function FOR. PTL. M. 0-7 6 Custom foreground color for the V-Chip (Parental Control) menu. 65-I. BCK. PTL. M. 0-7 4 Custom background color for the V-Chip (Parental Control) menu. 66-I. EN. SRC. COL. 0/1 0 Set to 1 to enable custom color for the Source menu. 67-I. FOR. SRC. M. 0-7 3 Custom foreground color for the Source menu. 68-I. BCK. SRC.
Installer Menus Installer Menu Items 3-I through 13-I: Detailed Descriptions 3-I. BAND/AFC (Band/Automatic Frequency Control) There are 8 possible settings for this option: 0 5 6 7 = = = = Broadcast Fixed CATV Fixed HRC Fixed ICC Fixed 4 1 2 3 = = = = Broadcast AFC CATV AFC HRC AFC ICC AFC Channels are accessed faster when fixed modes are used. The AFC (search modes) should only be used when some channels are not on nominal frequencies. NOTE: BAND is automatically set by AUTO PROGRAM.
Installer Menus Installer Menu Items 14-I through 34-I: Detailed Descriptions Scan mode 0 1 Characteristics Channel up/down keys change channels only. Channel down below the lowest channel (or channel up higher than the highest) and TV turns off. 14-I. STRT CH IN SM When set to 1, installs TV on/off event below the start channel at TV turn on. 15-I. SLEEP TIMER When set to 1, the SLEEP TIMER feature may be used (but no message is displayed prior to turn-off).
Installer Menus Installer Menu Items 35-I through 60-I: Detailed Descriptions 35-I. NOT USED 36-I. NOT USED 37-I. REAR Y/C EN. Set to 1 to enable the rear S-Video input. Set to 0 to disable the rear S-Video input. 51-I. DIS. VCHIP M. Set to 1 to disable the Parental Control menu. Parental Control menu will not appear. Set to 0 to enable the Parental Control menu. 52-I. DIS. SOURCE M. Set to 1 to disable the Source menu. Source menu will not appear. Set to 0 to enable the Source menu. 38-I.
Installer Menus Installer Menu Items 61-I through 82-I: Detailed Descriptions 61-I. FOR. VIDEO M. (Video Menu Foreground Color) 0 = Black 3 = Yellow 6 = Cyan 1 = Red 4 = Blue 7 = White 2 = Green 5 = Violet 62-I. BCK. VIDEO. COL. (Video Menu Background Color) 0 = Black 3 = Yellow 6 = Cyan 1 = Red 4 = Blue 7 = White 2 = Green 5 = Violet 63-I. EN. PTL. COL. Set to 1 to enable custom color settings for the V-Chip menu. Set to 0 to disable custom color settings for the V-Chip menu. 64-I. FOR. PTL. M.
Installer Menus Installer Menu Items 83-I through 86-I: Detailed Descriptions 83-I. HANDSHK TIME Adds an additional delay to the handshake time which is 64 msec, thus relaxing M.P.I. timing requirements to be compatible with PC based Windows controlled systems, range is 0 - 5. Set to 0 to retain standard 64 msec delay. Set to 1 - 5 to increase @ 16 msec ea., the delay up to 144 msec. 84-I. PERMANENT BLK Allows Parental Control blocking schemes to be permanent by removing the blocking hours function.
LT2000 QuickSet II Programmer Use the Zenith LT2000 QuickSet II “Clone” Programmer to copy the setup from a “Master” TV then quickly transfer the setup to duplicate TVs must be the same model number as the master TV Teach Other TV Typical MPI Connections Learn Master TV Typical MPI Connections TV Back TV Back Antenna Antenna ANTENNA CABLE ANTENNA CABLE RF Coaxial Wire (75ohm) SPEAKER OUT SPEAKER OUT Super Port VIDEO IN M.P.I. AUDIO IN RF Coaxial Wire (75 ohm) Super Port VIDEO IN M.P.I.
Clone Selection Menu Choices Typical Clone Programmer on-screen menus THE CLONE HAS CONTROL OF THE TV THE CLONE IS VERSION THE TV IS VERSION THE SW IS REVISION CLONE CLOCK= TV CLOCK= XX XX XX CLONE SELECTION MENU (1) LEARN FROM TV (2) TEACH TO TV (3) SET CLONE CLOCK FROM TV (4) SET TV CLOCK FROM CLONE (5) DISPLAY TV SETUP (6) DISPLAY CLONE SETUP XX:XX XX:XX -PRESS ANY KEY TO CONTINUE. -DISCONNECT CLONE WHEN DONE. -TO CHANGE MENU ITEMS, PRESS CHANNEL KEYS OR DIGITS.
Clone Selection Menu Choices Operation Notes Disconnect the Clone from the TV when you are finished; automatically switching it off. The real-time clock continues to run when the main circuits are switched off. Reset Clone After Static Shock After replacing exhausted batteries, or if the programmer behaves strangely after a static shock, use a paper clip or similar instrument inserted through the small hole marked ”RESET” to activate the internal reset switch and restore normal operation.
Parental Control Menu This optional feature can be used to “block” undesirable programming from appearing on your TV. This TV offers the user a wide variety of options and settings that restrict or “block” the programming that can appear on the TV. Parental control allows the user the capability of defining which program rating they consider acceptable, to the younger or more sensitive viewer. It can be preset and turned either on or off by the user who specifies the secret 4-number code, the password.
Parental Control Menu After you have read the preceding page, follow instructions below to set up and activate Parental Control 5 9 20 32 44 AUX CH CC CHANNEL PREVIEW ------------------- CONTENT BLOCK DIALOG LANGUAGE TV-MA SEX SCENES VIOLENCE F VIOLENCE NO RATING TO BLOCK TO SELECT, ENTER TO QUIT FOR PARENTAL CONTROL PRESS CC TO RETURN 1 Press CH PREVIEW. 2 Use CHANNEL Up/Down to highlight PARENTAL CONTROL. 3 4 Press ADJ Right arrow to go to Parental Control menu.
Parental Control Menu Typical Parental Control Menu Structure AGE BLOCK SETUP MENU GENERAL CHILDREN VIDEO MENU PARENTAL CONTROL AUX SOURCES MPAA RATING AGE BLOCK CONTENT BLK SET HOURS SET PASSWORD LOCK ON OFF UNBLOCKED PRESS CC TO RETURN CONTENT BLOCK DIALOG LANGUAGE SEX SCENES VIOLENCE F VIOLENCE NO RATING TO BLOCK TO BLOCK UNBLOCKED PRESS CC TO RETURN Unblocked Blocked TO BLOCK Unblocked G and Above PG and Above PG-13 and Above R and Above NC-17 and Above X Unblocked TV-G and Above TV-PG and
Menus & On-Screen Displays Press the remote keys indicated below to access these menus and displays ALARM MENU TIME NOW 6:10 AM VOLUME OFF TIMER PRESS TIMER PRESS DIGITS TO SET TIME TIMER TO SELECT AM/PM Volume Display Press VOLUME. Shows currently selected sound setting. Rating: TV-14 SLEEP TIMER 3:11 PM Alarm Menu Press ALARM. Sets the time the TV will automatically turn itself on. Ch 25 - PBS 7:15 PM OLD TIME MOVIES LENGTH 01:00 TIME LEFT 00:36 Channel/Time Display Press ENTER.
Maintenance Routine TV cabinet and screen cleaning Careful and regular cleaning can extend the the useful service life of the TV. Be sure to turn the power off and pull out the plug before you begin any cleaning. Screen Cleaning 1. Here’s a great way to keep the dust off the screen for a while. Wet a soft cloth in a mixture of lukewarm water and a little fabric softener or dish washing detergent. Wring the cloth until it’s almost dry, and then use it to wipe the screen. 2.
Troubleshooting SYMPTOM POSSIBLE SOLUTIONS Snowy picture and unclear sound. • Check antenna connection or location • Check cable input. • Check to see if the TV/VCR button on VCR has the TV selected Multiple images or ‘ghost shadows.’ • Check antenna direction and/or location. • Check cable input • Make sure the wire from the antenna to the TV is properly connected. Interference: Sharp lines across the screen and poor sound.
Glossary A list of definitions for words found in this guide. 75 OHM RF CABLE The wire that comes from an off-air antenna or cable service provider. The end looks like a hex-shaped nut with a wire sticking through the middle. It screws onto the threaded jack on the back of the TV. 300 TO 75 OHM ADAPTER A small device that connects a two-wire 300 ohm antenna to a 75 ohm RF jack. They are usually about an inch long with two screws on one end and a round opening with a wire sticking out on the other end.
Notes PAGE 47
Your Zenith TV Warranty Direct-View Color TV Welcome to the Zenith family! We believe that you will be pleased with your new Zenith TV. Please read this warranty carefully, it is a “LIMITED WARRANTY” as defined under Federal Law. This warranty gives you specific legal rights, and you may also have other rights that vary from state to state within the U.S.A.