Model number : P60W26 Serial number : PLASMA DISPLAY PANEL Please read this operating guide carefully before using the Monitor. Keep the operating guide with the Monitor. For future reference, write down the serial number on the back of the Monitor in the space provided below.
The explanation about colored dots may be present on PDP screen The PDP which is the display device of this product is composed of 0.9 to 2.2 million cells and a few cell defects can occur in the manufacture of the PDP. Several colored dots visible on the screen would be acceptable, in line with other PDP manufacturers and would not mean that the PDP is faulty. We hope you will understand that the product which corresponds to this standard is regarded as acceptable.
Table of Contents First step WARNINGS ..............................................................4 SAFETY INSTRUCTIONS........................................5 Monitor Overview Front Panel Controls ................................................8 Connection Panel Overview .....................................9 Remote Control Key Functions/Accessories ..........10 Monitor Installation .................................................12 Equipment Connections and Setup VCR Setup............................
WARNINGS WARNING RISK OF ELECTRIC SHOCK DO NOT OPEN WARNING: TO REDUCE THE RISK OF ELECTRIC SHOCK DO NOT REMOVE COVER (OR BACK). NO USER SERVICEABLE PARTS INSIDE. REFER TO QUALIFIED SERVICE PERSONNEL. The lightning flash with arrowhead symbol, within an equilateral triangle, is intended to alert the user to the presence of uninsulated “dangerous voltage” within the product’s enclosure that may be of sufficient magnitude to constitute a risk of electric shock to persons.
Safety instructions Monitor Overview SAFETY INSTRUCTIONS Important safeguards for you and your new product 8. Transporting Product The safety and operating instructions should be retained for future reference. A product and cart combination should be moved with care. Quick stops, excessive force, and uneven surfaces may cause the product and cart combination to overturn. 2. Follow Instructions 4. Heed Warnings Sleep timer 3.
SAFETY INSTRUCTIONS (Continued from previous page) The openings should never be blocked by placing the product on a bed, sofa, rug, or other similar surface. This product should not be placed in a built-in installation such as a bookcase or rack unless proper ventilation is provided or the manufacturer’s instructions have been adhered to. 11. Power Sources This product should be operated only from the type of power source indicated on the marking label.
19. Servicing 20. Damage Requiring Service 23. Wall or Ceiling Mounting The product should be mounted to a wall or ceiling only as recommended by the manufacturer. The product may slide or fall, causing serious injury to a child or adult, and serious damage to the product. 24. Heat The product should be situated away from heat sources such as radiators, heat registers, stoves, or other products (including amplifiers) that produce heat. Sleep timer Picture & Sound Special features a.
Front Panel Controls ON/OFF INPUT SELECT ON/OFF VOLUME Main power button Power standby indicator Illuminates red in standby mode, Illuminates green when the Monitor is turned on INPUT SELECT VOLUME INPUT SELECT button Sub power button VOLUME (F,G) buttons Remote control sensor 8
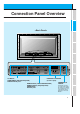
Safety instructions Monitor Overview Connection Panel Overview Connections Basic operation R AUDIO L (MONO) VIDEO AV INPUT S-VIDEO PB PR PR COMPONENT (480i/480p/720p/1080i) (DVD/DTV INPUT) (+) R ( ) R AUDIO L RGB-PC INPUT (VGA/SVGA/XGA/SXGA) RGB-DTV INPUT (480p/720p/1080i) AUDIO INPUT RS-232C ( ) L (+) EXTERNAL SPEAKER (8Ω) AC INPUT (+) R ( ) R AUDIO L RGB-PC INPUT (VGA/SVGA/XGA/SXGA) RGB-DTV INPUT (480p/720p/1080i) RS-232C ( ) L (+) EXTERNAL SPEAKER 8Ω AC INPUT Special
Remote Control Key Functions/Accessories - When using the remote control aim it at the remote control sensor on the Monitor. power on button sleep button (Refer to p. 35) power on system off sleep mute mute button switches the sound on or off. 2 1 number buttons 3 5 4 6 8 7 9 video/pc menu 0 video/pc button up vol enter vol down pip button (Refer to p. 26) pip twin picture input select position input select button (Refer to p. 27, 30) ratio button (Refer to p.
Safety instructions Monitor Overview video/pc button on the remote control No function VIDEO S-VIDEO RGB COMPONENT Connections Each press of this button changes the mode as shown below. system off button Basic operation menu button Sleep timer enter button up/down buttons vol buttons Picture & Sound twin picture button (Refer to p. 29) When pressed displays DW on screen. position button (Refer to p. 27) Special features freeze button (Refer to p. 42) easy sound button (Refer to p.
Monitor Installation - It is recommended that this product only be used at an altitude of less than 6562 feet (2000m) to get the best quality picture and sound. - This plasma display is designed to be mounted horizontally (wide viewing). - Your P60W26 (Monitor) can be installed on a wall as shown below, or on a desktop pedestal as shown on the next page. Wall mount and stands are optional, and are not supplied with the monitor.
Safety instructions Monitor Overview Desktop Pedestal Installation Connections Basic operation Sleep timer INPUT SELECT ON/OFF VOLUME Picture & Sound • The Monitor can be installed on a desk as shown above. (For further information, refer to the optional ‘Desktop Stand Installation and Setup Guide’.) • Speakers shown are optional, and shown for illustration only. Special features b. 4inch 4inch 1.18inch Others ( Pedestal mount minimum allowable clearances for adequate ventilation ) 4inch 2.
VCR Setup - As shown below, when connecting the Monitor to a VCR, match the colors of AV input jacks on the Monitor with the output jacks on the VCR: Video = yellow, Audio (Left) = white, Audio (Right) = red. - If you have a mono VCR, connect the audio cable from the VCR to the AUDIO(L/MONO) input of the Plasma Monitor. - If you connect an S-VIDEO VCR to the S-VIDEO input, the picture quality is improved, compared to connecting a regular VCR to the Video input.
Safety instructions Monitor Overview AV INPUT Y S-VIDEO PB PR COMPONENT (480i/480p/720p/1080i) (DVD/DTV INPUT) (+) R ( ) R AUDIO L RGB-PC INPUT (VGA/SVGA/XGA/SXGA) RGB-DTV INPUT (480p/720p/1080i) AUDIO INPUT RS-232C Connections R AUDIO L (MONO) VIDEO ( ) L (+) EXTERNAL SPEAKER (8Ω) AC INPUT Basic operation R AUDIO L (MONO)VIDEO AV INPUT S-VIDEO Y PB PR (+) R ( ) R AUDIO L RGB-PC INPUT (VGA/SVGA/XGA/SXGA) RGB-DTV INPUT (480p/720p/1080i) AUDIO INPUT RS-232C ( ) L (+) EXTERNAL SPE
Cable TV Setup - After subscribing to a cable TV service from a local provider and installing a converter, you can watch cable TV programming. This monitor cannot display TV programming without a TV tuner or cable TV converter box. Speakers shown for illustration only.
- As shown below, when connecting the Monitor to an external source, match the colors of AV input jacks on the Monitor with the output jacks on the audio/video equipment: Video = yellow, Audio (Left) = white, Audio (Right) = red.
DVD Setup How to connect a DVD (digital video disk player) • Connect DVD video inputs to Y, PB, PR of COMPONENT (480i/480p/720p/1080i) (DVD/DTV INPUT) and audio inputs to Audio jacks of AV INPUT.
Safety instructions Monitor Overview DTV Setup - To watch digitally broadcast programs, purchase/connect a digital SET-TOP BOX. - You can select only the 16:9 picture format in DTV 720p/1080i mode. How to connect a user-supplied Digital Set-top Box • You can use either the Monitor’s COMPONENT (Y, Pb, Pr) inputs or the single RGB-DTV INPUT for video connections, depending on your Set Top Box connectors. Then, make the corresponding Audio connections. See the diagram below for either set up.
PC Setup - You can easily connect the Plasma Display to your PC for outstanding image and sound. - Use the Monitor to display images and sound from a PC Computer source. Setup Instructions to Connect a PC to your Monitor Default monitor. • The Monitor can not be used for Plug and Play functionality. • If your PC computer is equipped with a sound card, adjust the sound output on the PC. • It is recommended that the resolution output of the PC should be set to 1280 x 720 to get the best quality picture.
Safety instructions Monitor Overview Monitor Image Display Specifications Resolution 640x350 720x400 1024x768 1152x864 1280x960 1280x1024 Special features 1152x870 Picture & Sound 1280x720 Sleep timer 832x624 Basic operation 800x600 Connections 640x480 Horizontal Vertical Frequency (KHz) Frequency (Hz) 31.468 70.09 37.861 85.08 31.469 70.08 37.927 85.03 31.469 59.94 66.66 35.000 37.861 72.80 37.500 75.00 43.269 85.00 45.913 90.03 53.011 100.04 64.062 120.00 35.156 56.25 37.879 60.31 72.18 48.
PC Mode Feature Check (Overview) - Select RGB first, see page 11. - Make sure the PC and monitor are both turned on. - Use the monitor’s remote control to make adjustments. menu up 1 Press the menu button to show menus on screen. 2 Press the up/down button to select menus. • Each press will cycle through the different menus as shown below.
Safety instructions Monitor Overview PC Mode Adjustments Auto adjustment - Automatically adjusts picture position and eliminates any image shaking. READY Connections Press the menu button and then press the up/down button to select SPECIAL menu. Press the vol ( G ) button. menu up Basic operation vol down 1 Press the up/down button to select SCREEN and then press the vol ( G ) button. G G G G TO SET G Sleep timer up SPECIAL LANGUAGE ARC SCREEN SCREEN TRANSPARENCY PIP/DW SET ID COLOR TEMP.
PC Mode Adjustments Adjusting horizontal / vertical position manually - Only adjust V-POSITION and H-POSITION in DTV or component 480p/720p/1080i. READY Press the menu button and then press the up/down button to select SPECIAL menu. Press the vol ( G ) button. menu up vol down 1 Press the up/down button to select SCREEN and then press the vol ( G ) button. up SPECIAL LANGUAGE ARC SCREEN SCREEN TRANSPARENCY PIP/DW SET ID COLOR TEMP.
• If the picture isn’t clear after auto adjustment and especially if the characters are still trembling, then adjust the picture phase manually. • When watching PIP/TWIN PICTURE, the SCREEN menu option is not available. READY Connections Press the menu button and then press the up/down button to select SPECIAL menu. Press the vol ( G ) button. menu up Basic operation vol down 1 Use the up/down button to select SCREEN and then press the vol ( G ) button.
Picture In Picture (PIP) function - PIP lets you view 2 different inputs (sources) on your monitor screen at the same time. One source will be large, and the other source will show a smaller inset image. - Select RGB input source before pressing PIP. - This function works only in the following resolutions; 640x480, 800x600, 1024x768 (only in Vertical frequency 60 Hz) - When you select RGB or DTV for main picture in PIP/Twin picture, you can watch video, cable TV or DVD for sub picture.
Safety instructions Monitor Overview Selecting the source input signal input select Press the input select button in PIP mode. VIDEO S-VIDEO Connections • Each time you press input select button, you toggle VIDEO, S-VIDEO and COMPONENT. COMPONENT COMPONENT source only works in 480i mode. F VIDEO Basic operation PIP INPUT G Sleep timer Moving the Sub (inset) picture Picture & Sound position Press the position button in PIP mode.
Picture In Picture (PIP) function Selecting PIP sound options - To select main or sub (inset) sound - This function only works with the following resolutions; 640x480, 800x600, 1024x768 (only in Vertical frequency 60 Hz) - To use this function, connect PC/DTV video output to RGB-PC INPUT/RGB-DTV INPUT and connect PC/DTV audio outputs to AUDIO INPUT. - SOUND SELECT is always the main picture sound (SOUND[M]) regardless of prior sound choice.
- As the name suggests, this mode splits the screen into 2, allowing 2 sources to be shown on the monitor screen at the same time. Each source is given half the screen. - Select RGB input source. - This function works only in the following resolutions; DTV 480p/720p/1080i, RGB 640x480 (only in Vertical frequency 60 Hz) - With TWIN PICTURE active, not all picture formats can be used for the main/sub picture. Connections twin picture Press the twin picture button.
Twin picture mode Selecting a source for the Twin picture input select Press the input select button in TWIN PICTURE mode. • Each time you press input select button, you toggle VIDEO, S-VIDEO and COMPONENT. VIDEO S-VIDEO COMPONENT COMPONENT source only works in 480i input signal.
Safety instructions Monitor Overview Using the remote control Installing batteries Connections • Open the battery compartment cover on the back of the remote control and insert the batteries with correct polarity, match “+” with “+”, and match “-” with “-”. • Install two 1.5V “AA” alkaline batteries. Don’t mix used batteries with new batteries. Basic operation Sleep timer Notes for using the remote control Don’t place the remote control near a heater or damp place.
Turning on the Monitor - When using the remote control, aim it at its sensor on the Monitor. Turning on the Monitor just after installation 1 Connect power cord correctly. 2 Press the main ON/OFF button on the Monitor. At this moment, the Monitor is switched to standby mode. Press the or INPUT SELECT button on the Monitor or press the power on or video/pc button on the remote control and then the Monitor will be turned on.
READY menu Connections Press the menu button and then press the up/down button to select SPECIAL menu. Press the vol ( G ) button. Safety instructions Monitor Overview Selecting language for the menus up vol down Press the up/down button to select LANGUAGE and then press the vol ( G ) button. Basic operation 1 SPECIAL G ˙–„ G ENGLISH ESPAÑOL PORTUGUÊS FRANÇAIS G G G G Sleep timer LANGUAGE ARC SCREEN TRANSPARENCY PIP/DW SET ID COLOR TEMP.
Checking features - Use the remote control to make adjustments. - Select VIDEO input source menu up 1 Press the menu button. 2 Press the up/down button. • Each press will cycle through the menus shown below. down PICTURE APC DRP CONTRAST BRIGHTNESS COLOR TINT SHARPNESS D MOVE E GNEXT G G 100 50 50 0 50 G G G G G AEXIT SOUND DASP AVL TREBLE BASS BALANCE D MOVE E GNEXT G G 50 50 0 G G G AEXIT SPECIAL LANGUAGE ARC SCREEN TRANSPARENCY PIP/DW SET ID COLOR TEMP.
Safety instructions Monitor Overview Setting Sleep Timer Sleep Timer turns the Monitor off after a preset time sleep F --- G F 10 G F 20 G F 30 G F 120 G F 90 G F 60 G Connections Press the sleep button to set sleep time. Each time you press sleep button, the next preset setting time is changed as follows: F 240 G SLEEP F 30 Basic operation F 180 G G Sleep timer • To release sleep time setting, press the sleep or vol button repeatedly to select F --- G.
Auto picture control Use APC to set the Monitor for the best picture appearance - APC is not available in RGB or PIP/TWIN PICTURE modes. APC (Auto Picture Control) apc 1 Press the apc button. 2 Press the apc or vol buttons to select your desired picture condition. APC F CLEAR G • Each press of vol buttons changes the screen display as shown below. CLEAR SOFT USER • You can also select CLEAR, SOFT or USER in the PICTURE menu. User refers to adjustments you made to the picture menu items.
Safety instructions Monitor Overview Adjusting picture appearance - PIP and Twin picture inset settings are not adjustable. READY Connections Press the menu button and then press the up/down button to select PICTURE menu. Press the vol ( G ) button. Basic operation menu up vol down Example : Changing the contrast. Press the up/down button to select CONTRAST and then press the vol ( G ) button.
DRP (Digital Reality Picture) DRP improves image outlines in dark screens. - This function works in video, component 480i mode. READY Press the menu button and then press the up/down button to select PICTURE menu. Press the vol ( G ) button. menu up vol down 1 Press the up/down button to select DRP and then press the vol ( G ) button. PICTURE APC DRP CONTRAST BRIGHTNESS COLOR TINT SHARPNESS up G G 100 50 50 0 50 G CLEAR SOFT G G G G vol down 2 Press the up/down button to select CLEAR or SOFT.
Safety instructions Monitor Overview Adjusting sound Manual setting READY menu Connections Press the menu button and then press the up/down button to select SOUND menu. Press the vol ( G ) button. up vol down SOUND DASP AVL TREBLE BASS BALANCE G G 50 50 50 0 G G G Sleep timer Example : Adjustment treble Use the up/down button to select TREBLE and then press the vol ( G ) button.
Auto Sound Control DASP (Digital Auto Sound Processing) • This function lets you enjoy the best sound without any manual adjustment because the Monitor automatically selects the appropriate audio tone levels based on the program content. easy sound 1 Press the easy sound button. 2 Press the easy sound or vol button to select a sound setup. DASP F USER G • Each press of easy sound or vol buttons changes the screen display as shown below.
This feature maintains an equal volume level; even if you change channels. READY Connections Press the menu button and then press the up/down button to select SOUND menu. Press the vol ( G ) button. menu Safety instructions Monitor Overview AVL (Auto Volume Leveler) up vol Basic operation down 1 SOUND DASP AVL TREBLE BASS BALANCE G G 50 50 0 G ON OFF G Sleep timer Press the up/down button to select AVL and then press the vol ( G ) button.
Using Still function - This feature isn’t available for RGB input source. - Use with A/V or COMPONENT video inputs. freeze 1 Press the freeze button. • The image displayed is frozen(still). • The sub picture is stilled in PIP or Twin picture mode. • In PIP or TWIN PICTURE modes, the sub (inset) picture is frozen. 2 To return to normal viewing, press the freeze button again. Tips • If still picture is on the screen for more than 5 minutes, the image becomes dark.
- This function works only in the video mode. - Use this option if there are a trembling or instability of a video tape on screen during viewing the video. READY Connections Press the menu button and then press the up/down button to select SPECIAL menu. Press the vol ( G ) button. up Basic operation menu vol down SPECIAL LANGUAGE ARC SCREEN G TRANSPARENCY PIP/DW SET ID COLOR TEMP. G G G TV VCR Sleep timer 1 Use the up/down button to select SCREEN and then press the vol ( G ) button.
Adjusting OSD Transparency To make the menus clear or opaque READY Press the menu button and then press the up/down button to select SPECIAL menu. Press the vol ( G ) button. menu up vol down 1 Press the up/down button to select TRANSPARENCY and then press the vol ( G ) button. SPECIAL LANGUAGE ARC SCREEN TRANSPARENCY G PIP/DW SET ID COLOR TEMP. G G G G 5 G G up vol down 2 Press the vol buttons to adjust OSD transparency. • The adjustment range of TRANSPARENCY is 0 ~ 5.
- You should be adjust color temperature in PC mode again although color temperature is adjusted in other input source. - To initialize adjusted value, select ‘0’ in RED, GREEN and BLUE. READY Connections Press the menu button and then press the up/down button to select SPECIAL menu. Press the vol ( G ) button. menu up Basic operation vol down Press the up/down button to select COLOR TEMP. and then press the vol ( G ) button. SPECIAL LANGUAGE ARC SCREEN TRANSPARENCY PIP/DW SET ID COLOR TEMP.
Setting picture format - You are available to 16:9 or 4:3 in RGB-PC and 16:9 is only available in RGB-DTV (720p/1080i). - If 4:3 mode is used for a long time, the outline of the image may remain on the screen after you change to the 16:9 screen. - Don’t display 4:3 picture format or TWIN PICTURE for more than 10 hours continuously. - You are available to 16:9 or 4:3 in RGB-PC and 16:9 is only available in RGB-DTV (720p/1080i). ratio Press the ratio button to select a desired picture format.
- Connect the RS-232C input jack to an external control device (such as a computer or an A/V control system) and control the Monitor’s functions externally. - When you connect a control (RS-232C) cable to this monitor, use control cable attached the ferrite core. If you do not do this, this monitor will not conform to mandatory CISPR22 (EN55022) standards. • Connect the serial port of the control device to the RS-232C jack on the Monitor back panel.
External Control Device Setup Type of connector : D-Sub 9-pin male No. 1 2 3 4 5 6 7 8 9 Pin name No connection RXD (Receive data) TXD (Transmit data) DTR (DTE side ready) GND DSR (DCE side ready) RTS (Ready to send) CTS (Clear to send) No Connection 1 5 Pin No.4 and Pin No.6 must be connected on monitor side. 9 6 * Use a null modem cable. Wire the 7-Wire cable so that each pair of data lines cross between the two devices.
Safety instructions Monitor Overview RS-232C configurations 2 3 5 4 6 7 8 3 2 5 6 4 8 7 DB 9 DB 9 TXD RXD GND DSR DTR CTS RTS RXD TXD GND DTR DSR RTS CTS PC PDP 2 3 5 4 6 7 8 3 2 5 4 6 7 8 DB 9 DB 9 TXD RXD GND DTR DSR RTS CTS Sleep timer PDP Basic operation RXD TXD GND DTR DSR RTS CTS PC Connections 3-wire configuration (Not standard) 7-wire configuration (Standard RS-232C cable) Control line 3-Wire Cable Configuration • When using a 3-Wire cable configuration there is no control li
External Control Device Setup SET ID • Use this function to specify a monitor ID number. READY Press the menu button and then press the up/down button to select SPECIAL menu. Press the vol ( G ) button. menu up vol down 1 Use the up/down buttons to select SET ID and then press the vol ( G ) button. SPECIAL LANGUAGE ARC SCREEN TRANSPARENCY PIP/DW SET ID G COLOR TEMP.
• Baud rate : 2400 bps (UART) • Data length : 8 bits • Parity : None • Stop bit : 1 bit • Communication code : ASCII code Transmission [Command][ ][Set ID][ ][Data][Cr] * If the command interval is interrupted for more than 4 seconds, only Command 1 will be recognized. Be careful when using the power command. OK Acknowledgement Sleep timer Command Reference List * [Command] : To control PDP set. : You can adjust the set ID to choose * [Set ID] desired monitor ID number in special menu. See page 50.
External Control Device Setup 01. Power (Command:p) 03. Aspect Ratio (Command:r) G To control Power On/Off of the Monitor. G To adjust the screen format. You can also adjust the screen format using the ratio button on remote control or in the Special menu. Transmission [p][ ][Set ID][ ][Data][Cr] Data 0 : Power Off 1 : Power On * Example : Power on for set ID No.3.
09. Color (Command:c) G To adjust volume. You can also adjust volume with the volume buttons on remote control. G To adjust the screen color. You can also adjust color in the Picture menu. Transmission Transmission [c][ ][Set ID][ ][Data][Cr] [v][ ][Set ID][ ][Data][Cr] Data Min : 0 ~ Max : 64 * Refer to ‘Real data mapping’ as shown below. Acknowledgement [Set ID][:][OK][x][Data][x] Connections [Set ID][:][OK][x][Data][x] Data Min : 0 ~ Max : 64 * Refer to ‘Real data mapping’ as shown below.
External Control Device Setup 12. OSD select (Command:d) 14. PIP / DW (Command:z) Transmission G To control PIP (Picture-in-Picture) or twin picture (DW). You can also control PIP/DW using the pip/twin picture button on remote control or in the Special menu. [d][ ][Set ID][ ][Data][Cr] Transmission G To select OSD (On Screen Display) on/off.
Transmission 18. Change into Remote control adjustment mode (Command:j) G To control the Monitor with the remote control while the cable is still connected. Transmission [u][ ][Set ID][ ][Data][Cr] Data 0 : Main picture sound 1 : Sub picture sound Acknowledgement Data 0 : Main picture sound 1 : Sub picture sound * COMPONENT source only works in 480i input signal.
Note 56
- Early malfunction can be prevented. Careful and regular cleaning can extend the amount of time you will have with your new Monitor. Be sure to turn the power off and unplug the power cord before you begin any cleaning. Connections Cleaning the screen Safety instructions Monitor Overview Maintenance Basic operation 1. Here’s a great way to keep the dust off your screen for a while. Wet a soft cloth in a mixture of lukewarm water and a little fabric softener or dish washing detergent.
Troubleshooting check list • Check whether the Monitor is turned on. No picture & No sound Picture OK & No sound • Power cord inserted into wall outlet? • Plug another product’s power cord into the wall outlet where the Monitor’s power cord was plugged in. • Press the VOLUME (G) button. • Sound muted? Press MUTE button. • Check to see if there is any object between the Plasma Display and the remote control causing obstruction.
Safety instructions Monitor Overview Product specifications Height (inches / mm) 34.8 / 883 Depth (inches / mm) 3.9 / 99 Weight (pounds / kg) 154.3 / 70 Power requirement 120V, 60Hz Resolution 1280 x 720 (Dot) Color 16,770,000 (256 steps of each R, G and B) Temperature (In operation) 0 ~ 40°C Humidity (In operation) under 80% Picture & Sound 57.