machine numbers I A25AI2D I A27AI2D r th ch tv amfll operating q uide / warranty
"x RECORDYOUR MODEL NUMBER | (Now, while you can see it) / The model and serial number of your new TV are located on the back of the TV cabinet. For your future convenience, we suggest that you record these numbers here: MODEL NO. SERIAL NO. J ,WARNING WARNI NG: TO REDUCETHE RISK OF ELECTRICSHOCK DO NOT REMOVECOVER(OR BACK). I'40 USERSERVIGAELE _ARTSINSIDE. REFERTO QJALIFIED SERVICEPERSONNEL.
,.STA,,A*,ON I OE*T,N S*A"'EO I PAGE 3 • This page wilt "; dire(_ you to INPORTANTH which page to go to for Use this page to decide where you need to begin your set up. First, find the line proper hook- below that best describes what you want to do, then go to that page number. ' If you are using an antenna and no other equipment, go to .................. up of your Entertainment Machine. page 4 J lw- mmlmm r- If you have cable and no other equipment, go to .........................
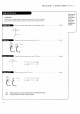
PAG E I ..ST,,,,T,O, I STA"OA"O f Connect off-air antenna your EnterLainment Hook up your Entertainment Machine. Machine Removethe back of the remote and put in two AAA batteries. Antenna _,' i!F_--q, jJ_ i back i "_ -'_4i! i - back of _! j_l!_ (expanded view) -PLug in your TV. Do not plug it into a switched outlet. Go to page 8 to Auto your Entertainment Program Machine. • [_ \ \ / If you have a 75 ohm RF cable, then you don't need ,1 / Antenna any adapters! Remember, when screw
,.S*ALLA*'ON I S*A.OARO I PAGE Connect cable to your Entertainment Machine Hook up your Entertainment Cabl.eTV watt jack Machine. Remove the back of the remote and put in two AAA batteries. if-_ ""_" ill remote ,J i TV back p_ne[ _> Plug ifi your TV. Do not p[ug it into a switched out[et. Your Entertainment (expanded Audio In _. view) Video _-_ Machine is designed to operate on household current, 220-volt 60 Hertz AC. Do not attempt Current.
PAGE 61,.STA''AT,ON I ST, NOA"O f - Connect your off-air antenna and VCR to your Entertainment Hook up your Entertainment Machine. Machine. Remove the back of the remote and put in two AAA batteries. \ I _ back of ;_ PLug in your TV. Do not plug it into a switched outlet. Go to page 8 to Auto Program your Entertainment Machine. Remember, Antenna CabLe when screwing RF cables onto jacks, dockvdse tightens, and counterclockwise [oosens. (Rfghty dgh_, le]_t loose.v.
,NS.A''A,,ON I .ANOA,O I PAGE , Connect your MCRand CabLeto your Entertainment Machine. Hook up your Entertainment Machine. Remove the back of the remote and pL_t in two AAA batteries. f.1_ i _ back of _I_, •,-!,-_ remote ii i- PLug in your TV. Do not p[ug it into a switched outlet. Go to page 8 to Auto Program your Entertainment Machine. Cable IV watt jack Leave your VCRand your television tuned to chonnel three and use the cable box to change channels.
PA E8 I ,.S,A'LAT,O. I QU,CK S,A., Use Auto Program to automatically find and store all of the stations awli[able With the remote contro[ in hand,. press the POWERkey to turn on your Entertainment Machine. in _9ur area. Press the MENU key so the Setup menu appears. \ Using the UP/DOWN arrows on the remote control select Auto Program on your_creen. PYess a RIGHT or LEFT arrow to reach the Auto Program screen. Using the UP!DOWN arrows, choose either Cable TV or Off-Air Antenna on your screen.
O E.AT,O. I BUTTO. F"NCT'O"S I PAOE ' PRG (PROGRAM) A quick Ust of aLLthe buttons on your remote and what they do. POWER Turns TV On or Off. Programs your remote to operate' other products. See page 23. LED INDICATOR LIGHT Light_'; whe_ keys are pressed. FLASHBK (FLASHBACK) Return.to the J CABLE/VCR/AUX/TV Last Ch-an _'[_vie w-_cl. Switch between available input sources. AUX is for any optional CHANI_EL device. (UP/DOWN) FLip through aw_iLabte channels.
PAGE I010PE.,T'O" I BUTTO" FU"CT'O"S ffAn examp[e of using the panel on the front of your Ente_dnment Machine. Here's an example of how to use the front panel to work with menus: Access the Setup Menu by press- i i i ! i ing MENU on the front pane[. II Using the CHANNEL Up!Down i \i i t keys, setect Language on your screen. E.I i ..................................... i Press the VOLUME Right/Left arrows to adjust the Language you want your on-screen menus to z appear in. / \ / / Repeat
Op RAT,ON I tV I PAGE " Introdudng you to the basi(_ of your Entertainment Machine. Channel or Video (Indicates Source) On ,_;omemodels A!V input is designated the lowest/one Up/Down above the highest. buttons as a channel that is one below You'll have to use the Channel to access it. The Time/Channel display will read "Video" 10:55 CH 12 STEREO --- Time --- Audio Mode in place of a chan_eL number.
AOE 121OPt.AT,ON ITVFU"OA"E"TA'S f -leLpon combining your Entertainment l_achine with more equipment. There area number of ways you can choose to integrateyour EntertainmentMachine with the restofyour equipment. ChanneLs can be changed using the television, the VCR, or the cable box, with advantages to each. USING THE TELEVISION AS THE TUNER preservesallyour channellabeb;(not available on some models).Italso reducesthe number of keys on the remote controlyou need to worryabout.
OPE.AT,O. I .ENOS I AOE Descriptions of the menu options found Function Go to page What it is for in the Setup Menu. Setup Menu Auto Program AutomaticaLLy finds and stores active channels to flip through AutoProgram using Channel Up/Down. ,:h. Add/Del Ch. Add/Del ManuaLLy pick and choose which active channels wiLL appear when flipping 14 18_I J Timer Setup ,gets the cuFrent time on your Entertainment 15 -Machine. Timer Setup _ through usincl. GhanneL Up/Down.
AGE 14I OPt'AT'O" I " "US f Customize your channeL seLection. -Z-Z----/ \ / Press the MENU key on the remote \ so the Setup menu appears. f Select the Ch. Add/Delete menu using the UP/DOWN arrows. r ° ii E Using either the NUMBER key pad or the CHANNEL UP/DOWN arrows on the remote, se[ect a channel (If adding a de[eted channel you _{[[ need to use t_e number pad.) r- Using the RIGHT/LEFT arrows, pick whether that channe[ is Added or Deleted.
OPt.AT,ON I .ENUS I PAG _1 Set the dock iI on your Entertainment Machine. Press the MENU key on the remote control so the setup menu appears. Using the UP/DOWN arrows on the remote controL, select Crock Set on your screen. Press a RIGHT or LEFT arrow to adjust the time. Press the TINER button J to select AM or F_. i \\ Press ENTER or QUIT to return to "IV viewing. L YoucQnuse the NUhlBERpod to simply type in the time (AM orPM isstill selected withthe Timerkey). _, :i I j "! \\ \\ ".........
PAGE I0 10P "'T'O" I "E"US f /_utomatica[[y turn your Ente_inment Machine on Press the MENU key on the or Off- remote control so the Setup menu / / t © I appears. i Using the UP/DOWN arrows on the remote control select Timer J Setup on your screen. Press a RIGHT/LEFT arrow. The :-'- Timer Setup screel_ -Mll appea_. Sieep Timer: Use the RIGHT/LEFT arrows to adjust the length of time until the TV shuts down (se[ect a countdown minutes from ten to four hours).
o,.,:.A-,-.o,,, t ,,,,,:NUS I PAGE Turnon dosed captioning or textthat appearsatthe bottomof \ Press the MENU key on the remote control so the Setup 0 menu appears. yourscreen. Using the UP/DOWN arrows on the remote controL, select Captions/Text on your screen. Press a RIGHT/LEFT arrow to choose.an_.of:the.foL[owin op_ons::Off, Caption I, J g Eaptiog'_2, Captiorr 3, Caption 4, Text I, Text 2, Text 3 or Text 4. Press ENTER or QUIT to return to TV viewing.
PAGE 18I OPE"'T'O" I "E"US F Choose between stereo sound and mono sound. Press the MENU key on the remote control so the Setup menu appears. Using the UP/DOWN arrows on the remote control se[ect Audio FLASHBK ) i I'#IUTE Mode on your screen. Press a RIGHT/LEFT arrow to _tect options: either of _e fo[Lowinq Stereo or Mono. PressENTERor QUIT to return to TV viewing. Not all programming is broadcast in stereo sound.
OPE.AT'ON IMENUS I,>AGE 19 Choosethe Languageyou want alLthe menus to Press the MENU key on the remote control appear in. so the Setup menu appears. Using the UP/DOWN arrows on the remote controt, select Language on your screen. Press a RIGHT/LEFT arrow to ch oose_any,_:the_foLLowi ng options_ EngUsh, Spanish, or French. Press ENTERor QUIT to return to regular TV viewing.
PAGE 2010P .A,'O. I M NUS Use the Video . menu to I customize how your Press the MENU key twice picturelooks. and the Video menu wi[[ appear. Your options are: o i Contrast: AdJusts the revel of difference between white and b[ack in the TV picture. The more contrast, brighter t the the picture appears. • Brightness: Increases or decreases f- amount of white in the TV picture. • ---\ \ \ _CHANNEL'> • Cotor:Adjusts _ve[sofartco[ors inthe ,V picture.
OPERATION I MENUS I PAGE Program your remote to work with a vast rangeof ..... "Q"_ _f\ " The device you want to program should be off. <5 2ri __l-_a brand name devices. On the charton page 27, find the bjpe of deviceyou're programming, and then findthe brand name. Make a note of the three-digit itsoon. J code, you't[ need Pressa rglhOtd the kKb Key.its recesse_so itdoesn'tget pushed accidentatty. Use a sma[l object. , i When the indicatorlightturns on, you can re[easethe button.
'AGE " I O E.AT,O. I .E.US f Control the votumeon yourhome audio system _thout Find the code that operates your amplifier. changing modes. Test it to make sure it's the correct one by folowing the procedure in the "Programming Your Remote" page. Program your audio system into the CABLE or AUX mode. Select the mode i_which you want volume to appear (e.g. TV). Press and hold PRG on your remote until the indicator light stays lit. Press 4-9-9; then ENTERon the remote.
O"E"A"O" I "'NUS I PAGE 2, -N Controlup to seven different deviceswith Refer to the chart on page 25 to your remote! find the type and brand name of the device you're programming. Press and ho|d the PRG key until the indicator light turns on. Press the AUX key and the I on the NUMBER key pad at the same time(f_o_x.+_)a. " Using t_e NUMBER.key pad, enter the thTee-digit code for the device you've selected. Press ENTERto save the code. Aim the remote at the device and press POWER.It should turn off.
pAG I OPE.AT,O. I . NOS f Usethe remote control to search a[[ possibte codes. Turn on the device you're programming for the remote control Press and hold the PRG key until the indicator [ight turns on. Press the key for the device you are trying to program (CABLE, VCR, AUX, TV) Type the code 0-0-0 (zero-zerozero), then press the ENTER key right away. Aim the remote at the correct device and push the POWER button. Alow a second to pass, then push the POWER button again.
,E,E.E.C, I ..O0.A..,.° CO°ES I PAOE Find the codes you need to program your remote. On Admiral. ....... A,tventura 116 133 TViVCR 103 . .. Genera[ EI.ectric GoLdstar ....... Go[dstar TViVCR . . 153 ...... 136 114 161 103 147 104 !19 " .... 103 129 104 110 114 117 r- 116 ....... 149 EaewooTV/VCR 148 '" Ward .......... .......... 125 KMC .......... 103 KTV .......... 103 Kurazai 121 ........ Lodgenet 121 Logik LXI 159 ....... 119 Magnavox TV/VCR Phitco ......
PAGE 20I .E,ERE.CE I PROORA""'"O COOES /" Hnd the codes you need to programyour remote. On this page: Cable, Satellite, Video Disc PLayers,CD Playe's, Tape Allegro ........ 358 362 Kate Vision Allegro A!B Switch 361 Tune_ and Gemini ........ 305 Amplifiers. General. Electric... 367 Genera[ Instrument 304 305 306 307 310 308 318 309 Decks an_ Audio Nacom 331 338 ..... ........ Nagnavox ........ Jerro[d 302 365 ........ 303 366 .......
REFERENCE ! PROGRAMMING CODES I PAGE 27 A complete List of button functions for TV Mode Zenith Code 101 VCR Mode Zenith Code 201 Cable Mode Zenith Code 353 AUX Mode Zenith Code 401 IV On/Off VCR On/Off Cable Box On/Off AUX On/Off Setects CabLe Selects Cable Selects Cable Selects Cable VCR SeLects VCR Selects VCR Selects VCR Selects VCR AUX Setects Aux SelectsAUX SelectsAux SelectsAUX Selects IV SelectsTV SelectsIV SelectsTV TV FLashback VCR FLashback Cable Flashback AUX Fr
PAGE 28I . 'E" NCE I "A'"TENANCE Caring for your Entertainment Machine. Early malfunctions can be prevented. Careful and regular cleaning can extend the amount of time you will have _ith your new Entertainment Machine. Be sure to turn the power off and pull out the plug before you begin any cleaning. 1. Here's a great way to keep the dust off your screen for a while. Wet a soft cloth in a mixture Of luke-- warm water and a Little fabric softener or dish washing detergent.
.EFE.E.CE I T.OOB'ES.OOT,.G I F'AGE 29" Some quick and easy tips to fixing .€_MPTOMS problems SOLUTIONS yourself. Sno_J picture and Lousy sound. .MultipLe images or 'ghost shadows" • Check your antenna connection or Location. • Check your antenna direction and/or Location. • Make sure the wire from your antenna to your Entertainment Machine is properly connected. ]interference: Sharp Lines across the screen and Lousy sound. Normal picture but no sound. The .
PAGE 30I REFERENCE I OLOSSARY f A complete Listof definitions for WOl"dsfound in this guide. 75 OHM RF CABLE The wirethat comes from an off-air antenna or cableseMce provider. The end Lookslikea hex-shapednut with a wirestickin G through the middle. It screws onto the threaded jack on the back of your 1V. 300 TO 75 OHM A smaLL device that connects a two-wire 300 ohm antenna to a ADAPTER 75 ohm RFjack.
FE E.CE I O'OSS''Y I PAGE .]ACK A connection on the back of a TV, VCR, or any other A/V device. MONO SOUND Mono (monaura[) sound is one channel of sound. On more than one speaker, aLLthe speakers play the same audio. OUTPUT Refers to the jack that sends a signal out of a VCR, DVD, or other A/V device. SECOND AUDIO Second Audio Programming (SAP) is another, separate, audio channel PROGRAMMING/SAP avaitabte with some programming.
PAOE 32I .E""ENC I '"°EX f Find what want you quickly. FEATURE Amp[ifier PAGE Vo[ume Override ......................... Antenna ................................... 24 4, 6 Audio Mode Menu .............................. 20 Auto Find ................................... 26 Auto Program AUX+I, ................................. AUX+2, AUX+3 ........................... 9 25 r- Basic Television Batteries Button Operation ...................... ................................
STEREO SURROUND SOUND SPEAKERS For use with any Surround Sound compatible TV. These speakers create a sound so real, it's as if you were part of the action. The convenient, space-saving shelf design make these speakers an ideal addition to any Home Theater System. The contemporary black finish complement any room. cv5oooONLY $224.95 ""st''' SHIPPING _ HANDLING l REPLACEMENT REMOTE Broken or Lost remote? Perhaps you would just Like the convenience of having a second remote on hand.
Direct-View Color TV " Welcome to the warranty careful,l,y it is a "lIMITED Zenith family! We believe under that vary from state to state and you may also have other fights ZENITH that you wil,[ be pleased with WARRANTY" as defined your new Zenith Entertainment Federal. Law. This warranty within Machine. gives you specific Please read this legal, righ=s, the U.S.A.