ZEN ‘BRIGHTON’ FAR INFRARED SAUNA INSTRUCTION MANUAL 1
INDEX Important safety information 3 Sauna Components 4 Installation instructions 5-7 Operation 8 Trouble Shooting 9-10 Maintenance 11 Warranty 11-12 2
PLEASE READ AND FOLLOW ALL INSTRUCTIONS 1. The door of the heated room do not include any locking or latching system which could cause entrapment inside the sauna. 2. CAUTION: Hyperthermia occurs when the internal temperature of the body reaches a level several degrees above the normal body temperature of 37 ℃ (98.6°F). The symptoms of hyperthermia include an increase in the internal temperature of the body, dizziness, lethargy, drowsiness, and fainting.
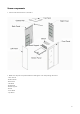
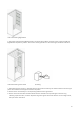
Sauna components 1. Structure of Infrared Sauna. See FIG-1 1. Make sure all parts are present before installing the unit. See packing list below.
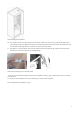
2. Place the bottom board in the desired location of your sauna, and make sure which side is the front and which side is the back. See FIG-3. FIG-3 Placing Bottom Panel FIG-4 Assembling Back Panel 3. Align the Back Panel with Bottom Panels corresponding battens; make sure they are on the same line. One person should hold the back panel while the other person continues the next step. See FIG-4 4.
FIG-7 Assembling Right Panel 6. Align the Front Panel with Bottom Panel’s corresponding battens, and then screw it with the Left and Right Panels respectively. Notes: Take caution of the glass door to avoid damage. See FIG-8 and FIG-6 . FIG-8 Assembling front board Screwing 7. Assembling bench support - Slide the bench support down vertically into the slot within back and right panel. then locate bench support and slide into place. 8.
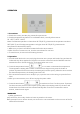
FIG-9 Setting the Top Panel 10. During the course of putting down the Top Panel, make sure all the wires (mentioned above) and connecting plugs are slipped through the corresponding holes of the Top Panel. All these wires will be led into connecting with the controller on the internal top panel. 11. See FIG-10. Connect all the wires and connectors to the corresponding outlets on the Top Panel. Please be sure all the plugs are connected tightly. FIG-10 Connecting wire on the top board 12.
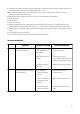
OPERATION 1. Precautions a. Check the circuitry and the plug meets all requirements. b. Set the temperature and time to a comfortable level, normally 60 minutes at 50 - 65℃(122 ºF -140 ºF) Note: If ambient temperature is lower than 18.3℃ (65 ºF), please set the temperature at about 50℃ (122 ºF); and if ambient temperature is higher than 18.3℃ (65 ºF), please set the temperature at about 65℃ (140 ºF). c. Make sure you have had sufficient water before the sauna session. d.
c. While in the sauna, do not touch the light bulb. If the bulb needs to be changed, switch it off and wait until the sauna is shut off and the bulb is cool. d. Do not spray water on the far-infrared tube. This activity may result in electric shock or damage to the heater elements. e. Do not use the infrared sauna if you have any of the following conditions: • Open wounds • Eye diseases • Severe sunburns • Elderly and weak people, especially those suffering from a disease, pregnant women and infants.
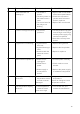
PROBLEM POSSIBLE REASON COUNTER MEASURE 3 Infrared Heater not heating up * The heater is broken * The wire junction or the heater’s wire is loose * The circuit board of the relay is not working * Replace with a new heater of the same specifications * Check the connection / junction and if it loose or broken, replace it * Replace the circuit board 4 Odour coming from sauna * The circuits problems * The temperature has gone over the high cut off range and the power supply may need to be replaced * P
USER MAINTENANCE INSTRUCTIONS CLEANING AND MAINTENANCE Cleaning Do not use liquid or aerosol cleansers inside the sauna. Unplug the sauna room from the wall outlet before cleaning. Use plain water and a soft cloth for cleaning. Do no use benzene, alcohol or strong cleaning chemicals on sauna. NOTE: Use of chemicals will damage the wood and any natural protection layer inherent in the wood. Transportation and storage 1. Avoid exposure to rain, snow or strong collisions during transport. 2.
have products repaired by one of Vitality 4 Life’s Service Centres. Please contact Vitality 4 Life for further information. 4. Do not send the product back to the service centre without return authorization form. 5. In no event shall our liability exceed the retail value of the product. We make no warranty with respect to parts from a source other than Vitality 4 Life. All exchanged or substitute parts and products replaced under warranty service will become the property of Vitality 4 Life.