
User Manual
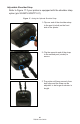


Table Of Contents
- Proprietary Statements
- Document Conventions
- Introduction to the ZQ220 Printer
- Printer Overview
- Getting Ready to Print
- Battery
- Removing the Battery
- Removing the Battery Tape Insulator
- Installing the Battery
- Battery Safety
- Charger Safety
- Charging the Battery
- AC-to-USB Charger
- Loading Media Procedure
- Operator Controls
- Standard User Controls
- LCD Control Panel
- Information Screen
- Configuration Screen
- Buttons
- Power-Up Sequences
- Verify the Printer is Working
- Printing a Configuration Report
- Connecting the Printer
- Cable Communication
- USB Communications
- Zebra Setup Utilities
- Wireless Communications with Bluetooth
- Bluetooth Networking Overview
- Bluetooth Security Modes
- Bluetooth Minimum Security Modes
- Setting Up the Software
- Designing Labels
- Using Pre-Printed Receipt Media
- Black Mark Dimensions (Receipt Media)
- Label Areas
- Label Design Examples
- Keep-Out Areas
- Near Field Communication (NFC)
- NFC Use Cases
- Wearing the Printer
- Swivel Belt Clip
- Adjustable Shoulder Strap
- Soft Case
- Preventive Maintenance
- Extending Battery Life
- General Cleaning Instructions
- LCD Control Panel Indicators
- Troubleshooting Topics
- Troubleshooting Tests
- Printing a Configuration Label
- Communications Diagnostics
- Specifications
- Appendix A
- Appendix B
- Appendix C
- Appendix D
- Appendix E
- Appendix F
- Appendix G
- Appendix H

41
ZQ220 User Guide
Adjustable Shoulder Strap
Refer to Figure 17 if your printer is equipped with the shoulder strap
option (p/n SG-MPV-SDSTP1-01).
Figure 17 • Using the Optional Shoulder Strap
1. Clip one end of the shoulder strap
to the post (circled) on the front
side of the printer.
2. Clip the opposite end of the strap
to the second post (circled) to
secure.
3. The printer will hang securely from
both clips and the strap can be
adjusted to be longer or shorter in
length.