
User Manual

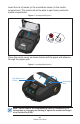


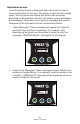

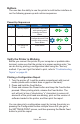


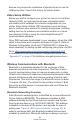
Table Of Contents
- Proprietary Statements
- Document Conventions
- Introduction to the ZQ220 Printer
- Printer Overview
- Getting Ready to Print
- Battery
- Removing the Battery
- Removing the Battery Tape Insulator
- Installing the Battery
- Battery Safety
- Charger Safety
- Charging the Battery
- AC-to-USB Charger
- Loading Media Procedure
- Operator Controls
- Standard User Controls
- LCD Control Panel
- Information Screen
- Configuration Screen
- Buttons
- Power-Up Sequences
- Verify the Printer is Working
- Printing a Configuration Report
- Connecting the Printer
- Cable Communication
- USB Communications
- Zebra Setup Utilities
- Wireless Communications with Bluetooth
- Bluetooth Networking Overview
- Bluetooth Security Modes
- Bluetooth Minimum Security Modes
- Setting Up the Software
- Designing Labels
- Using Pre-Printed Receipt Media
- Black Mark Dimensions (Receipt Media)
- Label Areas
- Label Design Examples
- Keep-Out Areas
- Near Field Communication (NFC)
- NFC Use Cases
- Wearing the Printer
- Swivel Belt Clip
- Adjustable Shoulder Strap
- Soft Case
- Preventive Maintenance
- Extending Battery Life
- General Cleaning Instructions
- LCD Control Panel Indicators
- Troubleshooting Topics
- Troubleshooting Tests
- Printing a Configuration Label
- Communications Diagnostics
- Specifications
- Appendix A
- Appendix B
- Appendix C
- Appendix D
- Appendix E
- Appendix F
- Appendix G
- Appendix H

22
ZQ220 User Guide
Insert the roll of media (in the orientation shown) in the media
compartment. The media roll will be able to spin freely inside the
media compartment.
Figure 4 • Loading Media (cont.)
Close the media cover as shown below and the paper will advance
through the paper path.
Figure 5 • Loading Media (cont.)
Close Media
Cover
Pull Media out of
Printer
Note • Please refer to the Programming Guide (P1099958-001) for
information on changing the setting to adjust the media feed length
via a Set-Get-Do (SGD).