ZQ220 Mobile Printer User Guide P1102927-001 Rev.
Contents Proprietary Statements....................................................... 5 Document Conventions...................................................... 7 Introduction to the ZQ220 Printer...................................... 8 Unpacking and Inspection...................................................................9 Reporting Damage..............................................................................9 ZQ220 Technology...................................................................
Information Screen............................................................................25 Configuration Screen .......................................................................26 Buttons..............................................................................................27 Power-Up Sequences.......................................................................27 Verify the Printer is Working..............................................................
Printing Specifications.......................................................................52 Memory and Communications Specifications...................................52 Label Specifications..........................................................................53 Physical, Environmental and Electrical Specifications......................53 CPCL Font and Bar Code Specifications and Commands................54 Printer Dimensions...........................................................................
Proprietary Statements Copyright © 2018 ZIH Corp and/or its affiliates. All rights reserved. ZEBRA and the stylized Zebra head are trademarks of ZIH Corp., registered in many jurisdictions worldwide. All other trademarks are the property of their respective owners. Information in this document is subject to change without notice. For further information regarding legal and proprietary statements, please go to: COPYRIGHTS AND TRADEMARKS: For complete copyright and trademark information, go to www.zebra.
“Made for iPod”, “Made for iPhone”, and “Made for iPad” mean that an electronic accessory has been designed to connect specifically to iPod, iPhone, or iPad, respectively, and has been certified by the developer to meet Apple performance standards. Apple is not responsible for the operation of this device or its compliance with safety and regulatory standards. Please note that the use of this accessory with iPod, iPhone, or iPad may affect wireless performance.
Document Conventions The following graphic icons are used throughout the documentation set. These icons and their associated meanings are described below. Caution • Warns you of the potential for electrostatic discharge. Caution • Warns you of a potential electric shock situation. Caution • Warns you of a situation where excessive heat could cause a burn Caution • Advises you that failure to take or avoid a specific action could result in physical harm to you.
Introduction to the ZQ220 Printer This user guide gives you the information you will need to operate the ZQ220 Mobile Printer. The printer uses some of the latest technologies such as USB charging (Type-C connector), an embedded Dual Mode Bluetooth 2.1 + EDR/4.1 Low Energy module, Near Field Communication (NFC) and Made for iPhone® (MFi). MFi printers provide Apple co-processor (MFi) support which allows an Apple device such as an iPhone or iPad® to authenticate and connect over Bluetooth®.
Unpacking and Inspection • Check all exterior surfaces for damage. • Open the media cover (see “Loading Media Procedure” on page 21) and inspect the media compartment for damage. In case shipping is required, save the carton and all packing material. Zebra Technologies Corporation 475 Half Day Road, Suite 500 Lincolnshire, IL 60069 USA T: +1 847.634.6700 or +1 800.423.0442 In the Americas contact: Zebra Technologies Corporation 475 Half Day Road, Suite 500 Lincolnshire, IL 60069 USA T: +1 847.634.
ZQ220 Technology The ZQ220 printer uses several technologies made popular in other Zebra Mobile Printer product lines, as well as newer, state-of-theart technologies. Battery The printer uses a 2-cell Li-Ion battery pack (p/n BTRY-MPV24MA1-01) with a charge time of under four (4) hours using a 10W USB charger or cigarette-to-USB adapter.
Printing Technology The ZQ220 printer uses the Direct Thermal method to print human-readable text, graphics, and barcodes. It incorporates a sophisticated print engine for optimal printing under all operational conditions. Direct thermal printing uses heat to cause a chemical reaction on specially treated media. This reaction creates a dark mark wherever a heated element on the printhead comes in contact with the media.
Made for iPhone (MFi) The ZQ220 printer supports communication with Apple devices running iOS 10 or later over a standalone Bluetooth 4.1 radio. Near Field Communication (NFC) The printer supports a passive NFC tag which complies with the “Android Standard Tag format” because Android devices are the most common found on the market today.
Printer Overview Figure 2 • Overview of Features 1 13 2 3 12 4 5 11 10 6 9 7 8 1. Platen Roller 2. Back Side Sensor 3. Front Side Sensor 4. Latch Release Lever 5. Tear Bar 6. USB Port 7. Feed Button 8. Strap Posts 9. Configure Button 10. Power Button 11. LCD Display 12. Printhead 13. Media Cover 14. Belt Clip 15. Battery 16. MAC Address Label 17. QR Code 18. Print Touch Icon (pg.
Note • Scanning the QR code with a smartphone will provide printer specific information at www.zebra.com/zq220-info. Note • Tapping the Zebra Print Touch™ icon with a Near Field Communication (NFC) enabled smartphone will provide instant access to printer-specific information. For more information about NFC and Zebra products, go to http://www.zebra.com/nfc. Bluetooth pairing applications via NFC is also possible. See the Zebra Legacy SDK for more information.
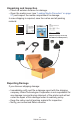
Getting Ready to Print Battery Installing/Removing Battery & Battery Tape Insulator Important • Batteries are shipped in sleep mode to preserve their maximum capacity while in storage prior to initial use. Plug in the USB adapter (see “AC-to-USB Charger” on page 19) to wake it up before using for the first time. Removing the Battery 1. If a belt clip is present on the bottom of the printer, rotate it such that it provides clearance for the battery. 2. Depress the latch on the battery pack where indicated.
Removing the Battery Tape Insulator The battery tape insulator is designed to cover the battery contacts and allow the printer to be shipped with the battery installed. Battery Tape Insulator 1. Pull up on the tape insulator tab located on the bottom of the battery pack. 2. Peel back the tape insulator and remove it from the top of the battery pack. Discard upon removal. Caution • Battery can explode, leak or catch fire if improperly charged or exposed to high temperature.
Installing the Battery 1. Locate the battery compartment on the bottom of the printer (where indicated). 2. Swivel the belt clip (if present) to access the battery compartment. 3. Insert the battery into the printer as shown. (It is not possible to insert the pack in the incorrect orientation.) 4. Rock the battery into the compartment as shown until it locks in place.
Battery Safety Caution • Avoid accidental short circuiting of any battery. Allowing battery terminals to contact conductive material will create a short circuit which could cause burns and other injuries or could start a fire. Important • Always refer to the Important Safety Information data sheet shipped with each printer and the Technical Bulletin shipped with each battery pack. These documents detail procedures to ensure maximum reliability and safety while using this printer.
Charging the Battery AC-to-USB Charger Important • You must charge the battery fully before using the printer for the first time. Adapter Plugs Install the adapter plug into the Power Supply by hooking the top edge into the adapter’s receptacle cavity and rotating it until it snaps into place. Note • Verify that the adapter plug shipped with your Printer is the correct one for your region.
AC-to-USB Charger (cont.) 1. Connect the male end of the AC-to-USB adapter into an appropriate power outlet using the appropriate plug for your region. 2. Connect one end of the USB charging cable to the adapter (as shown). 3. Rotate the rubber door on the side of the printer to access the USB port. 4. Connect the other end of the USB cable to the port on the side of the printer. 5. The printer will power-on and begin charging.
Loading Media in the Printer Loading Media Procedure Press the Latch Release Lever on the side of the printer as shown in “1” below. The Media Cover will open automatically. Rotate the Media Cover back completely as shown in “2”, exposing the media compartment. Figure 3 • Opening the Printer Media Cover Media Compartment Latch Release Lever 1 Note • The printers also have the option to use media spacers (p/n KIT-MPV-MD3SPR1-5) which are placed in the media compartment and allow the printer to accept 76.
Insert the roll of media (in the orientation shown) in the media compartment. The media roll will be able to spin freely inside the media compartment. Figure 4 • Loading Media (cont.) Close the media cover as shown below and the paper will advance through the paper path. Figure 5 • Loading Media (cont.) Pull Media out of Printer Close Media Cover Note • Please refer to the Programming Guide (P1099958-001) for information on changing the setting to adjust the media feed length via a Set-Get-Do (SGD).
Operator Controls The ZQ220 printer comes equipped with a three-button user interface for menu navigation (see “Figure 6 • Control Panel” on page 23). The printer also features an OLED display which stays lit while the printer is powered on to indicate to the user that the printer is on. Standard User Controls The standard controls have three (3) buttons that perform the following user functions. • The Power Button turns the printer on and off.
LCD Control Panel The LCD control panel allows the user to view content in one of three modes: Operation Screen mode; Information Screen mode; and Configuration Screen mode. The default mode which the user sees upon powering up the printer is Operation Screen mode. This mode is the display shown when the printer is idle, printing and/or receiving data and has no need to convey information beyond icons shown on the display.
Information Screen The Information Screen is displayed when text must be used to convey information to the user. The display is split into two viewing areas: The top portion will display the same icons previously described on the Operation Screen; the bottom portion will display text messages. There are two (2) types of messages that can be displayed on the Information Screen as described below. 1. Timed Messages: These messages will appear for a specific period of time, and then be removed.
The following User Activity Messages are supported by the printer: DOWNLOAD FW DOWNLOAD FAILED PAIRING: 123456 PAIRING ONGOING PAIRING ACCEPTED PAIRING REJECTED PAIRING FAILED PAIRING SUCCESS HEAD OVERTEMP HEAD UNDERTEMP BATTERY TOO LOW MEDIA OUT HEAD OPEN CHARGE ERROR NO PRINTING BATTERY LOW PRINTER READY When the Information Screen is used to display text messages, it replaces the Operation Screen. When the text message has been acknowledged, the printer will return to the Operation Screen.
Buttons The user has the ability to use the printer’s multi-button interface to run the following power-up and runtime sequences. Power-Up Sequences Seq.
The report indicates model, serial number, baud rate, and more detailed information on the printer’s configuration and parameter settings. (See “Troubleshooting Tests” on page 48 for sample printouts and a further discussion on how to use the configuration label as a diagnostic tool.) Connecting the Printer The printer must establish communications with a host terminal which sends the data to be printed. Communications occur in four (4) basic ways: • Via a cable using USB 2.0 protocols.
Cable Communication Caution • The printer should be turned off before connecting or disconnecting a communications cable. The standard cable connection for the printers is a USB 2.0 communication and charging cable. One end of the cable has a USB Type-A connector while the other end is USB Type-C. USB Communications The small Type C connector on the USB cable plugs into the printer. The connector is not keyed and therefore can be plugged in in either direction.
devices may require the installation of special drivers to use the USB connection. Consult the factory for further details. Zebra Setup Utilities Before you start to configure your printer for use on a Local Area Network (LAN), you will need some basic information which will enable you to establish the network configuration for your printer.
the background, ready to respond to connection requests. One device (known as the client) must request/initiate a connection with another. The second device (the server) then accepts or rejects the connection. A Bluetooth enabled printer will normally act as a slave creating a miniature network with the terminal sometimes referred to as a “piconet”. Discovery identifies Bluetooth devices that are available for pairing whereby the master device broadcasts a discovery request and devices respond.
Each mode, except for Just Works, has Man-In-The-Middle (MITM) protection, meaning no third device can view the data being passed between the two devices involved. The SSP mode is usually negotiated automatically based on the capabilities of both the master and slave. Lower security modes can be disabled via the bluetooth.minimum_security_mode SGD. The bluetooth.minimum_security_mode SGD sets the lowest security level at which the printer will establish a Bluetooth connection.
Note • For detailed information on Bluetooth, please refer to the Bluetooth Wireless User Guide (P1068791-002) at: http://www.zebra.com/us/en/support-downloads.html In addition, the printers support a “scan and pair” function via a handheld device and the MAC Address label on the bottom of the printer (see “Figure 8 • BT Communications” on page 33). The ZQ220 printer also features passive Near Field Communication (NFC) technology.
Setting Up the Software The printer uses Zebra’s CPCL Programming language which was designed for mobile printing applications. CPCL is fully described in the CPCL Programming Guide (p/n P1073699-001) available on‑line at https://www.zebra.com/manuals. You can also use ZebraDesigner Pro v2, Zebra’s Windows® based label creation program which uses a graphical interface to create and edit labels in either language.
Figure 10 • Journal Media 1.59 mm 1.59 mm Media Feed Direction f Sa in int r eP ne o gZ Figure 11 • Black Bar Label Media CPCL Label Height 1.25 mm Black Bar 1.59 mm 1.59 mm Media Feed Direction ne Zo g n i int Pr e f Sa Black Bar 1.25 mm “H” Max Label Height = “H” = 2.
Using Pre-Printed Receipt Media The ZQ220 printer supports alignment of pre-printed receipts by using the out of paper sensor located near the printhead. Black Mark Dimensions (Receipt Media) The reflective media black marks (or black bar/marks) should extend past the centerline of the roll on the front side of the paper. • Minimum mark width: 0.59 in. (15 mm) perpendicular to the edge of the media, and centered within the width of the roll. • Mark length: 0.19 - 0.24 in. (4.8 - 6.
Label Design Examples This section shows examples of labels with and without problems. Figure 13 • Label Design Examples ACME COLLEGE ACME COLLEGE PARKING PARKING VIOLATION VIOLATION GOOD LABEL DESIGN PROBLEM LABEL DESIGN The dark color, pre-printed text and graphics are in the path of the black bar at the bottom of the receipt. The center path to the black bar is free of dark color, pre-printed text and graphics.
Keep-Out Areas At times, incomplete printing of text and/or graphics appear because minimum margins are not provided during label design. The recommended minimum margins, or “keep out areas” are shown in Figure 14. Figure 14 • Keep Out Areas * 0.59 in. (15 mm) * * * * * Receipt Paper with Black Bars Continuous Receipt Paper (without Black Bars) * Maintain a minimum “keep out area” of 1/16 in. (1.59 mm) from the two outer edges of the paper roll and from the black bars.
Figure 15 • Near Field Communication (NFC) Pairing http://www.zebra.com/nfc NFC Use Cases • Bluetooth Pairing – used to cause a tablet, smart phone or terminal to automatically pair with the printer via a Bluetooth connection, within the bounds of the security profile being used. This shall contain the BT address and serial number of the printer.
Wearing the Printer Swivel Belt Clip The ZQ220 printer has a plastic swivel belt clip included as a standard feature. To install or remove the belt clip: 1. Remove the battery pack. 2. Slide the belt into the slot on the bottom of the printer. 3. Reinstall the battery pack. To use the belt clip: Hook the belt clip over your belt, and ensure that the clip is securely attached to the belt. The belt clip will pivot to allow you to move freely while wearing the printer.
Adjustable Shoulder Strap Refer to Figure 17 if your printer is equipped with the shoulder strap option (p/n SG-MPV-SDSTP1-01). Figure 17 • Using the Optional Shoulder Strap 1. Clip one end of the shoulder strap to the post (circled) on the front side of the printer. 2. Clip the opposite end of the strap to the second post (circled) to secure. 3. The printer will hang securely from both clips and the strap can be adjusted to be longer or shorter in length.
Soft Case The ZQ220 printer has a soft case option (p/n SG-MPV-SC31-01) that also allows you to carry the printer using the shoulder strap. Figure 18 • Using the Soft Case 1. Lift up the top flap of the soft case which is secured with Velcro. Insert the printer in the case with the bottom of the printer facing forward in this orientation. 2. Turn the case around to access the LCD display and user controls which are visible through the plastic window.
Preventive Maintenance Extending Battery Life • Never expose the battery to direct sunlight or temperatures over 40° C (104° F) when charging. • Always use a Zebra charger designed specifically for Lithium‑Ion batteries. Use of any other kind of charger may damage the battery. • Use the correct media for your printing requirements. An authorized Zebra re-seller can help you determine the optimum media for your application.
Cleaning Area Method Interval Printhead Use a Zebra cleaning pen to swab the thin gray line on the printhead, cleaning the print elements from the center to the outside edges of the printhead. After every five rolls of media (or more often, if needed). When using linerless type media, cleaning is required after every roll of media.
Figure 19 • Cleaning (Linered) Platen Roller Back Side Sensor Front Side Sensor Printhead Elements Tear Bar Figure 20 • Cleaning (Linerless) Scraper Platen Roller Platen Holder Printhead Elements Media Compartment 45 ZQ220 User Guide
LCD Control Panel Indicators The printer’s display shows several icons which indicate the status of various printer functions (See “Information Screen” on page 25). Check the indicator status, then refer to the Troubleshooting topic referenced in the chart to resolve the problem. Troubleshooting Topics 1. No power: • Check that battery is installed properly. • Recharge or replace battery as necessary. Caution • Always dispose of batteries properly.
7. Reduced battery charge life: • If battery is older than one year, short charge life may be due to normal aging. • Check battery health. • Replace battery. 8. displayed: • Data icon is normal while data is being received. 9. or displayed: • Check that media is loaded and that the media cover is closed and securely latched. 10. Communication error: • Check baud rate. • Replace cable to terminal. 11. Label jam: • Open head release latch and media cover. • Remove and reinstall media. 12.
Troubleshooting Tests Printing a Configuration Label To print out a listing of the printer’s current configuration, follow these steps: 1. Turn the printer off. Load the media compartment with journal media (media with no black bars printed on the back). 2. Press and hold the Feed Button. 3. Press and release the Power button and keep the Feed button pressed. When printing starts, release the Feed button.
Additionally, a file with a “.dmp” extension containing the ASCII information will be created and stored in the printer’s memory. It can be viewed, “cloned” or deleted using the ZebraNet Bridge application. (Refer to the ZebraNet Bridge Enterprise documentation for more information.) To terminate the Communications Diagnostics Mode and re-turn the printer to normal operations: 1. Turn the printer OFF. 2. Wait 5 seconds. 3. Turn the printer ON.
Figure 21 • Configuration Label Printhead Test XXXXXXXXXXXXXXXXXXXXXXXXXXXXXX Sensors: (Adj) Front Bar:0 Head Temperature: 28 C Voltage:7.18V Resident Fonts: Font Sizes Chars ------- ----- ----0 0- 6 20-FF 1 0 20-80 2 0- 1 20-59 3 0 64-2E 4 0- 7 20-FF 5 0- 3 20-FF 6 0 20-44 7 0- 1 20-FF (ICON .CPF) 0 (GBUNSG16.CPF) 0 (DEJAVU12.CPF) 0 (DEJAVU14.CPF) 0 (DEJAVU16.CPF) 0 (DEJAVU20.CPF) 0 File Directory: File Size --------------- -------INDEX .WML 853 INFO_TIM.WML 394 INFO_ACK.WML 361 CONFIG .
XXX cs Figure 21a • Configuration Label (cont.) Sensors: (Adj) Front Bar:0 Head Temperature: 28 C Voltage:7.18V Resident Fonts: Font Sizes Chars ------- ----- ----0 0- 6 20-FF 1 0 20-80 2 0- 1 20-59 3 0 64-2E 4 0- 7 20-FF 5 0- 3 20-FF 6 0 20-44 7 0- 1 20-FF (ICON .CPF) 0 (GBUNSG16.CPF) 0 (DEJAVU12.CPF) 0 (DEJAVU14.CPF) 0 (DEJAVU16.CPF) 0 (DEJAVU20.CPF) 0 File Directory: File Size --------------- -------INDEX .WML 853 INFO_TIM.WML 394 INFO_ACK.WML 361 CONFIG .WML 2352 BTPAIR .WML 1217 ICON .
Specifications Note • Printer specifications are subject to change without notice. Printing Specifications Parameter ZQ220 Print Width Up to 72 mm (2.91 in.) Print Speed 63.5 mm (2.5 in.)/second Printhead Burn Line to Tear Edge Distance 4.8 mm (0.19 in.) Printhead Life 390K inches of paper feed MTBF when using Zebra media. Print Density 203 dots/in.
Label Specifications Parameter ZQ220 Media Width Standard:80 mm +/- 0.75 mm (3.15 in. +/- 0.02 in.) *Optional: 76.2 mm +/- 0.65 mm (3 in. +/- 0.025 in.) *Optional: 58 mm +/- 0.65 mm (2.28 in. +/- 0.025 in.) *Optional: 50.8 mm +/- 0.65 mm (2 in. +/- 0.025 in.) Min/Max Label Length 12.5 mm (0.5 in.) minimum (Unconstrained max length in line print mode) Black Bar Sensor to Printhead Burnline Distance 16 mm (0.63 in.) +/0.635 mm (0.025 in.) Media Thickness (except Tag) 0.058 to 0.1575 mm (2.28 to 6.
CPCL Font and Bar Code Specifications and Commands Standard Fonts SWIS721.CSF - CPCL scalable font; DEJAVU12.CPF - PreScaled fonts; DEJAVU14.CPF - Pre-Scaled fonts; DEJAVU16. CPF - Pre-Scaled fonts; DEJAVU20.CPF - Pre-Scaled fonts; English/Latin9 built in EZ320; MUTOS16.CPF - Utah, Vietnamese, 16x16 bitmap; CTUNMK24.CPF - M Kai; Traditional Chinese, 24x24 bitmap; NSMTTC16.CPF - New Sans MT; Traditional Chinese, 16x16 bitmap.
Figure 22 • Printer Dimensions 58.8 mm (2.31 in.) Height 129.5 mm (5.09 in.) 114.5 mm (4.5 in.
Printer Accessories Region Part # Description NALA PWR-WUA5V12W0US AC to USB Adaptor; ZQ3 (US) EU PWR-WUA5V12W0GB AC to USB Adaptor; ZQ3 (UK) EU PWR-WUA5V12W0EU AC to USB Adaptor; ZQ3 (EU) LA PWR-WUA5V12W0BR AC to USB Adaptor; ZQ3 (BR) AP PWR-WUA5V12W0IN AC to USB Adaptor; ZQ3 (IN) AP PWR-WUA5V12W0KR AC to USB Adaptor; ZQ3 (KR) WW CHG-AUTO-USB1-01 Cigarette to USB Adapter; ZQ3 WW BTRY-MPV-24MA1-01 Spare 2450 mAh battery for ZQ220/ZQ120 WW KIT-MPV-MD3SPR1-5 Spacers for ZR138/ZQ12
Appendix A USB Cables Part Numbers P1081545; ASSY,CABLE,USB A TO C Pin 1 Pin 4 A1 B12 A12 A1 A1, B1, A12, B12 A6 A7 A4, B4, A9, B9 Type-C Plug Wire Type-A Plug Pin # Signal Name Wire # Signal Name Pin # Signal Name A1,B1, A12,B12 GND 1 GND_PWrt1 4 GND A4,B4,A9, B9 VBUS 2 PWR_VBUS1 1 VBUS A5 CC See Note 1 B5 VCONN A6 Dp1 3 UTP_Dp 3 D+ A7 Dn1 4 UTP_Dn 2 D- Shield Braid Shield Shell Shield - Notes: 1.
Appendix B Media Supplies To insure maximum printer life and consistent print quality and performance for your individual application, it is recommended that only media produced by Zebra be used. Advantages include: • • • • Consistent quality and reliability of media products. Large range of stocked and standard formats. In-house custom format design service. Large production capacity which services the needs of many large and small media consumers including major retail chains world wide.
Appendix D Serial and PCC Number Locations Serial Number Barcode PCC Barcode Important • Due to compliance and customs restraints, an integrator may not be able to ship a printer purchased in one country to another country based on the limitations imposed by regional SKUs. The country code identified in the printer SKU determines the area of the world in which the printer can be used.
Appendix E Battery Disposal The EPA certified RBRC® Battery Recycling Seal on the Lithium-Ion (Li-Ion) battery supplied with your printer indicates Zebra Technologies Corporation is voluntarily participating in an industry program to collect and recycle these batteries at the end of their useful life, when taken out of service in the United States or Canada.
Appendix F Alert Messages The printers will display the following alert messages on the Information Screen to inform the user of various performance conditions that might occur with the ZQ220. Event Type English Phrase Download Firmware User Activity Download FW Download Failed User Activity Download Failed BT Pairing PIN Timed – 30 seconds. Configuration button accepts pairing pin. If timeout expires, go to BT Pairing Failed Alert.
Appendix G Using Zebra.com The following examples illustrate the search function on Zebra’s website for finding specific documents and downloads. Example 1: Finding the User Guide. Go to http://www.zebra.com/us/en/support-downloads.html Type the appropriate printer name in search box. Type Printer Name (i.e., ZQ220) Click on “Manuals” tab on the printer main page.
Click on the dropdown menu to choose your language, and then click on the download button next to the selected manual.
Appendix H Product Support To contact product support in your region, go to: https://www.zebra.com/contact. When calling with a specific problem regarding your printer, please have the following information on hand: • Model number/type (e.g., ZQ220). • Unit serial number.
Index Getting Ready to Print 15 H Home Menu Screen 26 A I Accessories 40–65, 56 Appendix A, USB Cables 58 Appendix B, Media Supplies 59 Appendix C, Maintenance Supplies 59 Appendix D, Parameters Menus 60 Appendix E, Battery Disposal 61 Appendix F, Alert Messages 62 Appendix G, Using Zebra.
Specifications, printing 52 Status Bar Icons 25 T Troubleshooting, tests 48 Troubleshooting, topics 46 V Verify printer is working 27 W Wearing the Printer 40 Z Zebra Setup Utilities 30 ZPL Font and Bar Code Specifications and Commands 55 ZQ220 Accessories 56 66 ZQ220 User Guide
Zebra Technologies Corporation 3 Overlook Point Lincolnshire, IL 60069 USA P: +1 847.634.6700 or F: +1 847.913.