=HEUD1HW %ULGJH (QWHUSULVH Printer Management 8VHU *XLGH
© 2005 ZIH Corp. The copyrights in this manual and the software described therein are owned by ZIH Corp. Unauthorized reproduction of this manual or the software may result in imprisonment of up to one year and fines of up to $10,000 (17 U.S.C.506). Copyright violators may be subject to civil liability. All product names and numbers are Zebra trademarks, and Zebra, the Zebra logo, ZPL, ZPL II, ZebraNet, and ZebraLink are registered trademarks of ZIH Corp. All rights reserved.
&RQWHQWV Proprietary Statement . . . . . . . . . . . . . . . . . . . . . . . . . . . . . . . . . . . . . . . . . . . . . . v END USER LICENSE AGREEMENT . . . . . . . . . . . . . . . . . . . . . . . . . . . . . . . . . . . . . . .v Preface . . . . . . . . . . . . . . . . . . . . . . . . . . . . . . . . . . . . . . . . . . . . . . . . . . . . . . . . . . . xi Contacts . . . . . . . . . . . . . . . . . . . . . . . . . . . . . . . . . . . . . . . . . . . . . . . . . . . . . . . . . . . . . . . xii Support . .
Contents 3 • Getting Started . . . . . . . . . . . . . . . . . . . . . . . . . . . . . . . . . . . . . . . . . . . . . . . . . 19 Overview . . . . . . . . . . . . . . . . . . . . . . . . . . . . . . . . . . . . . . . . . . . . . . . . . . . . . . . . . . . . . . Search Window and Printer Discovery . . . . . . . . . . . . . . . . . . . . . . . . . . . . . . . . . . . . Group Management Window . . . . . . . . . . . . . . . . . . . . . . . . . . . . . . . . . . . . . . . . . . . Resource Management Window . .
Contents Download (from Resource window) . . . . . . . . . . . . . . . . . . . . . . . . . . . . . . . . . . . . . . . . . Firmware. . . . . . . . . . . . . . . . . . . . . . . . . . . . . . . . . . . . . . . . . . . . . . . . . . . . . . . . . . . Objects . . . . . . . . . . . . . . . . . . . . . . . . . . . . . . . . . . . . . . . . . . . . . . . . . . . . . . . . . . . . View and Edit Text Objects . . . . . . . . . . . . . . . . . . . . . . . . . . . . . . . . . . . . . . . . . . . . . Status Icons . .
Contents iv ZebraNet Bridge Enterprise User Guide 13743L-001 Rev.
3URSULHWDU\ 6WDWHPHQW This manual contains proprietary information of Zebra Technologies Corporation and its subsidiaries (“Zebra Technologies”). It is intended solely for the information and use of parties operating and maintaining the equipment described herein. Such proprietary information may not be used, reproduced, or disclosed to any other parties for any other purpose without the expressed written permission of Zebra Technologies.
Proprietary Statement of the installable Software on one hard disk or other storage device for one computer (a “Computer”), and you may access and use that Software as installed on that Computer so long as only one copy of such Software is in operation. If you are an organization rather than an individual, you may authorize personnel associated with your business to use the Software, but only one person at a time on one Computer at a time.
Proprietary Statement U.S. Government Restricted Rights. All Software provided to the U.S. Government pursuant to solicitations issued on or after December 1, 1995 is provided with the commercial rights and restrictions described elsewhere herein. All Software provided to the U.S. Government pursuant to solicitations issued prior to December 1, 1995 is provided with RESTRICTED RIGHTS as provided for in FAR, 48 CFR 52.227-19 (JUNE 1987) or DFARs, 48 CFR 252.227-7013 (OCT 1988), as applicable.
Proprietary Statement ENTIRETY, THEY WILL BE LIMITED TO THE DURATION OF NINETY (90) DAYS. WITHOUT LIMITING THE GENERALITY OF THE FOREGOING, ZEBRA DOES NOT WARRANT THAT THE OPERATION OF THE SOFTWARE WILL BE UNINTERRUPTED OR ERROR FREE.
Proprietary Statement Injunctive Relief. You acknowledge that, in the event you breach any provision of this Agreement, Zebra will not have an adequate remedy in money or damages. Zebra shall therefore be entitled to obtain an injunction against such breach from any court of competent jurisdiction immediately upon request without posting bond. Zebra’s right to obtain injunctive relief shall not limit its right to seek further remedies. Entire Agreement.
Proprietary Statement Notes • ___________________________________________________________________ __________________________________________________________________________ __________________________________________________________________________ __________________________________________________________________________ __________________________________________________________________________ __________________________________________________________________________ _____________________________________
3UHIDFH This section provides you with contact information, document structure and organization, and additional reference documents. Contents Contacts . . . . . . . . . . . . . . . . . . . . . . . . . . . . . . . . . . . . . . . . . . . . . . . . . . . . . . . . . . . . . . .xii Document Conventions . . . . . . . . . . . . . . . . . . . . . . . . . . . . . . . . . . . . . . . . . . . . . . . . . . xiii Enterprise Edition. . . . . . . . . . . . . . . . . . . . . . . . . . . . . . . . . . . . . . . . . . .
Preface Contacts Contacts You can contactZebra Technologies at any of the following: Visit us at: http://www.zebra.com Our Mailing Addresses: Zebra Technologies Corporation 333 Corporate Woods Parkway Vernon Hills, Illinois 60061.3109 U.S.A Telephone: +1 847.634.6700 Fax: +1 847.913.
Preface Document Conventions Document Conventions The following conventions are used throughout this document to convey certain information: Alternate Color (online only) Cross-references contain links to other sections in this guide. If you are viewing this guide online, click the blue text to jump to its location. Files and Directories All file names and directories appear in Courier New font. For example, the Zebra.tar file and the /root directory.
Preface Enterprise Edition Illustration Callouts Callouts are used when an illustration contains information that needs to be labeled and described. A table that contains the labels and descriptions follows the graphic. Figure 1 provides an example. Figure 1 • Sample Figure with Callouts Menu Bar Toolbar Enterprise Edition The features of the ZebraNet Bridge Enterprise licensed edition are identified with the icon shown to the left of this text.
,QWURGXFWLRQ This chapter provides a detailed high-level overview of ZebraNet Bridge Enterprise. Contents Overview . . . . . . . . . . . . . . . . . . . . . . . . . . . . . . . . . . . . . . . . . . . . . . . . . . . . . . . . . . . . 2 Activate Product. . . . . . . . . . . . . . . . . . . . . . . . . . . . . . . . . . . . . . . . . . . . . . . . . . . . . . . 5 Register Product . . . . . . . . . . . . . . . . . . . . . . . . . . . . . . . . . . . . . . . . . . . . . . . . . . . . . .
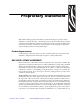
Introduction Overview Overview ZebraNet Bridge Enterprise is a centralized printer management application for Zebra printers. ZebraNet Bridge Enterprise provides real-time monitoring and configuration of your ZebraLink-enabled printers and ZebraNet print servers in a single, easy-to-use application.
Introduction Overview 6HDUFK ZLQGRZ *URXS 0DQDJHPHQW ZLQGRZ 3ULQWHU 6WDWXV LFRQV 5HVRXUFHV ZLQGRZ 3URILOH 0DQDJHPHQW ZLQGRZ The Search window allows you to search your network for Zebra printers with ZebraNet print servers.
Introduction Overview &RQWHQW ZLQGRZ $OHUW %DU The Content window allows you to access these tabs: • Contents tab — allows you to view and change settings. • Events tab — allows you to monitor current alerts. • Status tab • Quick Status — the Quick Status panel gives you a high-level status of a given print server. • Detailed Status — the Detailed Status panel, when you select Refresh, provides you with a detailed status of a given printer.
Introduction Activate Product Activate Product To access full ZebraNet Bridge Enterprise functionality, you must enter the product serial number into the ZebraNet Bridge Enterprise application. The serial number can be found on the back of and inside the ZebraNet Bridge Enterprise storage sleeve. To enter the product serial number, complete these steps: 1. From the menu bar, select Help > Activate Product. The dialog in Figure 3 opens. Figure 3 • Activate Product 2.
Introduction Register Product Register Product Registering your license of ZebraNet Bridge Enterprise with Zebra is the best way for you to receive service and support and product update information for your Zebra product. You must register your product in order to create a technical service request, get repair warranties, and other benefits. To enter the register your product, complete these steps: 1. From the Menu Bar select Help > Registration.
Introduction Feature Matrix Feature Matrix The full functionality of ZebraNet Bridge Enterprise is enabled with a serial number key (available from your Zebra value-added reseller). The following matrix outlines the functionality of ZebraNet Bridge Enterprise (not enabled with a serial number) and ZebraNet Bridge Enterprise with full functionality. Table 1 • Features Matrix Feature Free Edition Licensed Edition Description Application Heartbeat ³ ³ Controls how often status updates are provided.
Introduction Feature Matrix Table 1 • Features Matrix Free Edition Feature Licensed Edition Description Alert Filtering - Severity ³ ³ Allows you to view and sort events by printer name, printer IP address, time, event type, and event severity. Set Alert Severity Levels ³ ³ Allows you to determine the severity level of specific alerts. File Editing ³ ³ Retrieves and changes files that reside on printers. Firmware Download - 1:1 ³ ³ Downloads firmware to a single printer.
Introduction Feature Matrix Table 1 • Features Matrix Free Edition Feature Licensed Edition Description ³ Copies objects from one printer to many printers or a group of printers. ³ Copies alerts, settings, and objects from one printer to another printer. Copy All - 1:Group or Many ³ Copies alerts, settings and objects from one printer to many printers or a group of printers. Create Printer Profile ³ Allows you to create and save a printer profile for deployment and backup configuration.
Introduction Functionality Functionality This table identifies the main functionality found in ZebraNet Bridge Enterprise. Table 2 • ZebraNet Bridge Enterprise Functionality 10 Feature Description Discovery Automatic discovery of printers on a network. View and Change Settings View all printer and print server settings, and change selected printer and print server settings. This feature allows you to change multiple settings before commit, confirm, and send changes.
Introduction Requirements Requirements This section lists the minimum printer and print server hardware requirements for use with ZebraNet Bridge Enterprise Printer Management. Printer These are the supported Zebra printers: Printers with X.10 and higher firmware All X.
Introduction Requirements Notes • ___________________________________________________________________ __________________________________________________________________________ __________________________________________________________________________ __________________________________________________________________________ __________________________________________________________________________ __________________________________________________________________________ _________________________________
,QVWDOO This chapter provides information on how to install ZebraNet Bridge Enterprise. Contents System Requirements . . . . . . . . . . . . . . . . . . . . . . . . . . . . . . . . . . . . . . . . . . . . . . . . . . . 14 Installation . . . . . . . . . . . . . . . . . . . . . . . . . . . . . . . . . . . . . . . . . . . . . . . . . . . . . . . . . . . . 15 13743L-001 Rev.
Install System Requirements System Requirements This section identifies the minimum requirements for the ZebraNet Bridge Enterprise. Workstation • • • 500 MHz processor 128MB RAM 200MB hard-disk space Operating System • • • • Windows NT® 4.
Install Installation Installation This section provides you with steps on how to install the ZebraNet Bridge Enterprise Printer Management application. To install ZebraNet Bridge Enterprise from a CD, complete these steps: 1. Insert the CD into your computer CD ROM drive. A splash screen opens with a status bar working. 2. When the splash screen is done loading, the dialog box in Figure 4 opens. Figure 4 • Installation 3. Click Next>. The dialog box in Figure 5 appears.
Install Installation 4. Read the license agreement. 5. To accept, enable the I accept the terms in the license agreement option button, and click Next>. The dialog in Figure 6 opens. Figure 6 • Installation Destination 6. Do you want to change the destination location for where the ZebraNet Bridge Enterprise resides? If... Then... No Click Next > and continue with step 7. Yes 1. Click Change. 2. Navigate to the location you want. 3. Select OK, verify the location, and click NEXT >. 7.
Install Installation Figure 7 • Destination Confirmation 8. Is all the information in the Destination Confirmation dialog correct? If... Then... No 1. Yes 1. From the dialog, click < Back button, and make the necessary changes. 2. Click Install. 3. Continue to step 8 Click Install. 2. Continue to step 9. Figure 8 • Install Complete 9. Click Finish. 13743L-001 Rev.
Install Installation Notes • ___________________________________________________________________ __________________________________________________________________________ __________________________________________________________________________ __________________________________________________________________________ __________________________________________________________________________ __________________________________________________________________________ ______________________________________
*HWWLQJ 6WDUWHG This chapter provides you with information and instructions on how to work with the most frequently used ZebraNet Bridge Enterprise features. The flow of these instructions are arranged in the typical sequence of events. Contents Overview . . . . . . . . . . . . . . . . . . . . . . . . . . . . . . . . . . . . . . . . . . . . . . . . . . . . . . . . . . . Set System Preferences . . . . . . . . . . . . . . . . . . . . . . . . . . . . . . . . . . . . . . . . . . . . . . .
Getting Started Overview Overview This section provides you with an overview to help you understand the intended functionality of the graphical user interface (GUI), which includes: • Search window and Printer discovery • Group Management window • Resource Management window • Profile Management window Search Window and Printer Discovery The Search window provides you with the ability to search for printers in a variety of ways. The Search window is the easiest way to find Zebra printers on your network.
Getting Started Set System Preferences Set System Preferences System Preferences, including alert notification and heartbeat, printer resolving, and discovery options, control how ZebraNet Bridge Enterprise works in your network environment. Printer display and view filter events control what ZebraNet Bridge Enterprise displays within the application. These settings are all configurable from the Preferences menu on the menu bar.
Getting Started Set System Preferences 3. Choose the event security you need. Your choices are: Never (default), Info, Warning, Urgent. 4. When you are finished, click OK. Note • Event security levels for alerts can be configured in the View Filter – Events tab of the System Settings dialog. For details see Figure 13, View Alert Filter Settings, on page 25. System Heartbeat The System Heartbeat controls how often ZebraNet Bridge Enterprise updates the printers status icon and quick status.
Getting Started Set System Preferences Printer Options Tab Important • Non-printable characters or XML characters (<, >, /) should not be used in the printer’s system or host name. Printer Display Options ZebraNet Bridge Enterprise allows you to view your printers in the way that is most familiar and useful to you in your network environment. The default setting is to display printers by IP Address, but other selections include: • IP Address • Host Name • IP Address (Host Name) • Host Name (IP Address).
Getting Started Set System Preferences 3. When you are finished, click OK. Printer Resolving ZebraNet Bridge Enterprise can resolve printers by IP Address or by Host Name. The default setting is to resolve printers by IP address. To change printer resolving, complete these steps: 1. From the menu bar, select Preferences > System Settings, and then select the Printer Options tab. The dialog in Figure 12 opens, Figure 12 • Printer Options tab 2.
Getting Started Set System Preferences View Filter – Events tab ZebraNet Bridge Enterprise allows you to capture alerts sent using TCP and SNMP. In addition, ZebraNet Bridge Enterprise allows you to filter events by event severity. To change event filter severity levels, complete these steps: 1. From the menu bar, select Preferences > System Settings, and then View Filter – Events tab. The dialog in Figure 13 opens.
Getting Started Set System Preferences Discovery Options Tab Depending on your network topography, you may wish to change time-out intervals, or retries to discovery, for your networked Zebra printers. ZebraNet Bridge Enterprise allows you to change time-out intervals and retries for printer discovery as well as heartbeat retries. This ensures that you will always be able to identify your Zebra printers on your network. To change discovery options, complete these steps: 1.
Getting Started Search Window and Printer Discovery Search Window and Printer Discovery Discovery allows you to search a variety of ways, including: • local broadcast • subnet • directed broadcast • multicast • IP address Default View The Search window includes a default local search. Upon opening ZebraNet Bridge Enterprise the local search is populated with printers found in a local broadcast. Before You Begin Before you begin you need to decide how you plan to search.
Getting Started Search Window and Printer Discovery How to Create a Local Broadcast Search Group Local broadcasts send a discovery request to the local broadcast address of 255.255.255.255 to find printers in the same local network as the requesting computer. The local broadcast search populates itself. To perform a local broadcast search, complete these steps: 1. In the Search window, right-click Searches, and select New Search. The dialog in Figure 15 opens: Figure 15 • Local Broadcast Search 2.
Getting Started Search Window and Printer Discovery How to Create a Subnet Search Group The Subnet search sends a discovery request to each address in the specified subnet. Example • A request to 192.168.2.* sends a request to: 192.168.2.1 through 192.168.2.254. This use is useful for networks that disable broadcast packets from being sent across routers. However, this increases network traffic. The Subnet search requires you to type in the first three octets of the subnet.
Getting Started Search Window and Printer Discovery How to Create a Directed Broadcast Search Group Directed broadcasts send a discovery request to the broadcast address of the specified subnet. Note • If performing a broadcast search does not work, it could mean that the broadcast packets are disabled across the routers. As an alternative, try multicast or subnet search. The directed broadcast search requires you to type in the first three octets of the subnet, followed by 255, such as 192.168.2.255.
Getting Started Search Window and Printer Discovery How to Create a Multicast Search Group Multicast uses the multicast address to send a discovery address to all Zebra Printers across as many routers as specified by the hop count. This may return a large number of printers in some installations. Note • This feature may be disabled on some routers. See your network administrator to determine if a search failure was due to this feature being disabled.
Getting Started Search Window and Printer Discovery Example • The following request sends a discovery request to printers at IP addresses in the range of 10.3.5.20 through 10.3.5.47: 10.3.5.20-47 This avoids sending unnecessary traffic to non-printing devices. To perform a IP address search, complete these steps: 1. In the Search window, right-click Searches, and select New Search. The dialog in Figure 19 opens. Figure 19 • IP Address 2. In the Search Group Name text-box, type in the search name. 3.
Getting Started Search Window and Printer Discovery Gleaning In your search results you may discover a printer with the IP address 0.0.0.0. This is a printer with a print server that has not automatically acquired an IP address through DHCP. To assign an IP address to a printer in the Search window with a 0.0.0.0. IP address, complete these steps: 1. Right click on the printer and from the drop-down and select Set IP Address. 2. In the dialog box, enter the desired IP address and then click OK.
Getting Started Group Management Window Group Management Window The Group Management window allows you to manage single and groups of Zebra printers. You can dynamically group like printers, or printers by location, to help you manage your Zebra printer network. In addition, printers might reside in more than one group. Example • If you wanted all the printers that are out on the manufacturing floor in a subfolder called Manufacturing, you could rename the New Group folder to Manufacturing.
Getting Started Group Management Window Copy Search Groups Entire search groups can be copied to the Group Management window to make set up of large groups of printers easier. To copy a search group, complete these steps: 1. From the Group Management window, find the search group you want to copy. 2. Right-click and select Copy. 3. Find the group you want to paste this group into, right-click, and select Paste > Group. 4. You will want to rename this copied group.
Getting Started Group Management Window Add Printers You can add networked or locally connected printers from the Group Management window. A printer can be added either to the group folder or to a group subfolder. To add a networked printer, complete these steps: 1. In the Group Management window, right-click on a group. 2. Select New > Printer. The dialog in Figure 20 opens. Figure 20 • Add Printer Wizard 3. Select Network (IP Address), and click Next. The dialog in Figure 21 opens.
Getting Started Group Management Window Figure 21 • Add Printer Wizard 4. Input the IP Address of the printer you wish to add. 5. Select the print server type and input the port number for communicating with your Zebra printer. Note • The default port for Zebra tabletop and desktop printers is port 9100. The default port for Zebra Mobile printers is port 6101. 6. Click Finish. 7. The printer is added to the selected group in the Group Management window.
Getting Started Group Management Window Figure 22 • Add Printer Wizard 3. Select Local Port (COM, LPT, USB, et cetera), and click Next. The dialog in Figure 23 opens. Figure 23 • Local Port Selection Note • If you have a driver installed on a local port, that port will not be available in the drop-down list. A message will display in the dialog that notifies you of unavailable ports. 38 ZebraNet Bridge Enterprise User Guide 13743L-001 Rev.
Getting Started Group Management Window 4. Select the port location of your printer from the drop-down list. If you select… Then… An LPT or USB port Click Finish. A COM port The dialog in Figure 24 opens. Figure 24 • Port Configuration 5. Adjust the COM port settings to match those being used by your PC and printer, and then click Finish. The printer is added to the selected group in the Group Management window.
Getting Started Group Management Window Preferences You may set up communications preferences separate from the application preferences for individual printers using the Printer Preferences functionality in ZebraNet Bridge Enterprise. In addition, individual notes may be added to each printer (i.e. the date of a firmware upgrade or other identifying data about the printer). To set individual printer communication preferences, complete these steps: 1.
Getting Started Group Management Window Figure 26 • Add Printer Wizard in Printer Preferences 4. Change communications settings (i.e. Port Number) and click Finish. To create a printer note, complete these steps: 1. In the Group Management window, right-click on a printer. 2. Select Preferences, click on the Notes tab. The dialog in Figure 27 opens. Figure 27 • Notes tab 13743L-001 Rev.
Getting Started Group Management Window 3. Enter notes in the text area and click on OK. Note • The text in the Notes section is saved with the application. This information is not sent to the printer. Delete Printers/Groups From the Group Management window you can delete printers or groups of printers. Important • Use this feature carefully. Printers and groups are immediately deleted from the Group Management window. To delete a printer, complete these steps: 1.
Getting Started Resource Management Window Resource Management Window The default location for the folders in the Resource window is c:\program files\ZebraLink\ZebraNet Bridge\Resources. You can change the location of the Resource Management window. To change the location of the Resources window, complete these steps: 1. From the menu bar, select Preferences > Map Resource Directory. 2. Select the system folder to be used for Resources or make a new folder. 3. When you are finished, click OK.
Getting Started Resource Management Window Scripts Scripts have special functionality within ZebraNet Bridge Enterprise. Placing files in the Scripts directory of the Resource Management window makes the files available by rightclicking on a printer and selecting Actions > Scripts. This is useful for repetitive actions or specific functionality that is not included within the application.
Getting Started Profile Management Window Profile Management Window Printer profiles may be created for a golden printer or for critical printers on your network. Printer profiles are created by making a copy of an existing printer. Ideally, the source printer will have an optimal configuration – a combination of printer settings, files, formats, or graphics – that you wish to save.
Getting Started Profile Management Window To copy a printer profile to an existing printer, complete these steps: 6. Right-click on a printer profile in the Profile Management window. 7. Select Copy. The application will open a progress dialog, read the printer information and create the printer profile. 8. The printer profile is placed in the Profile Management window. The printer profile will be addressed in the Profile Management window as follows: • The profile for printer 10.3.10.
Getting Started Profile Management Window 3. Name the printer profile file and browse to your desired location (the default location is the ZebraNet Bridge Enterprise root directory). Click on Save. To import a printer profile into ZebraNet Bridge Enterprise, complete these steps: 4. Right-click on the Profiles folder in the Profile Management window. 5. Select Import Printer Profile. The dialog in Figure 30 opens. Figure 30 • Import Printer Profile 6.
Getting Started Profile Management Window 9. The imported printer profile is placed in the Profile Management window. The printer profile will be addressed in the Profile Management window as follows: • The profile for printer 10.3.10.100 will be called (Based on) 10.3.10.100 in the Profile Management window. Note • Printer profiles have a .zpp extension. 48 ZebraNet Bridge Enterprise User Guide 13743L-001 Rev.
3ULQWHU 0DQDJHPHQW This chapter tells you how to use ZebraNet Bridge Enterprise to best manage your printers. Contents Change Settings . . . . . . . . . . . . . . . . . . . . . . . . . . . . . . . . . . . . . . . . . . . . . . . . . . . . . Copy Configurations . . . . . . . . . . . . . . . . . . . . . . . . . . . . . . . . . . . . . . . . . . . . . . . . . . Download (from Resource window) . . . . . . . . . . . . . . . . . . . . . . . . . . . . . . . . . . . . . . . Status Icons . . . . . . . . . . . .
Printer Management Change Settings Change Settings This section shows you how to make changes to settings and how to copy and paste settings from one device to another using ZebraNet Bridge Enterprise. These are the settings you can change: • Printer • Print server • Alerts For changes to take place, you must save the changes, which is done using the right-click feature.
Printer Management Change Settings Change Print Server Settings To change the settings of a print server, complete these steps: 1. From the Group Management window, expand the printer you want to change the print server settings on. 2. Select a print server subfolder, and then double-click that subfolder. 3. Change the settings accordingly. 4. To save the settings, select the printer, right-click, and select Save. A warning is shown to confirm you want to save changes. 5.
Printer Management Copy Configurations Copy Configurations This section shows you how to copy printer and print server configurations from one printer to another. Configuration components that can be copied from one printer to another include: • Printer settings • Print server settings • Software objects (files, fonts, graphics) • Alerts Copy Printer Settings This option copies the settings from one printer to another. Important • Only copy settings and objects from the same printer models.
Printer Management Copy Configurations Copy Objects This option copies objects stored in one printer’s memory to another printer. Objects include fonts, graphics, and files. Important • Download files the printers through the Resources window. Files from printers with firmware older than x.13.0.6 are not compatible with newer printers. For best results, only copy objects between printers with the same firmware version. Note • Converted .
Printer Management Copy Configurations Copy All This option copies all printer settings and print server settings, objects, and alerts to the target printer. Important • Use this option only when you are setting up new printers or when the source and target printers are identical. For example, two printers of the same model type with the same firmware. To copy and paste an entire printer configuration from one printer to another, complete these steps: 1.
Printer Management Download (from Resource window) Download (from Resource window) Downloading is done from the Resources window to a printer or a group of printers. This section assumes that files have already been copied to the Resources window. Firmware This section tells you how to download firmware to a printer using ZebraNet Bridge. If you need a new version of firmware, you can go out to our Web site to download firmware it from out Web site at www.zebra.com/firmware.
Printer Management Download (from Resource window) 3. From the Group Management window, select the printer you want to download files to. 4. Right-click on the target printer and select Paste > Send copied files to printer(s). A confirmation dialog opens and gives you a prompt to download or not. 5. Do you want to download the object to the target printer(s)? If... Then... No Click No. Yes 1. 2. Click Yes. When the download is complete, click Exit.
Printer Management Status Icons Status Icons Status icons provide at-a-glance status information about your printers and print servers. The color key for status icons is: • Green indicates that there are no errors. • Yellow indicates caution. • Red indicates that there are errors. • White indicates that the printer cannot be detected. • Light blue indicates that the ZebraNet Print Server is in download mode. Monitor Status The Status tab provides status of your Zebra printers.
Printer Management Status Icons Figure 32 • Status tab opened Important • To minimize network traffic, the status bar called out in Figure 32 is updated only when you click the Refresh button on the tool bar. 3. Quick Status is immediately viewable and can be updated when you click Refresh. 4. To view the Detailed Status, click Refresh in the Detailed Status panel. Figure 33 shows the Detailed Status panel. 58 ZebraNet Bridge Enterprise User Guide 13743L-001 Rev.
Printer Management Status Icons Figure 33 • Detailed Status Important • The Detailed Status cannot be updated when there is an active connection to port 9100 on the printer. 5. To view Port Status, click Refresh. 13743L-001 Rev.
Printer Management Monitor Alerts Monitor Alerts Alerts give you the ability to manage your Zebra printer and print server by immediately notifying System Administrators of printer or print server errors or conditions. When a printer or print server has an error, the given device sends out alerts and the alerts are written to a log file in ZebraNet Bridge Enterprise. As soon as ZebraNet Bridge Enterprise logs an alert, the alert is visually available in the Events tab.
Printer Management Monitor Alerts Clear Alerts Log Alerts are displayed in the event tab of the Content window. When the number of unsolicited alerts increases significantly, alerts may be difficult to view and the application may slow when loading the alert log file. To set individual printer communication preferences, complete these steps: 1. From the menu bar, select Tools > Clear Alert Log. The dialog in Figure 34 opens. Figure 34 • Clear Alert Log 2.
Printer Management Hard Actions Hard Actions This section provides you steps on how to perform the following actions: • Default the Printer to Factory Defaults on page 62 • Default the Print Server to Factory Defaults on page 62 • Reset the Printer on page 62 • Reset the Print Server on page 62 If the settings on your printer or print server get corrupted, you have the option to reset these devices to the factory defaults and start from scratch.
Printer Management Hard Actions Print a Configuration Label A configuration label displays significant information about a printer. Information on a printer’s configuration label can also be found in ZebraNet Bridge Enterprise in the printer’s settings, Content tab. To print a printer configuration label, complete these steps: 1. From the Group Management window, select the printer you want. 2. Right-click and select Action > Print Printer Config Label. 13743L-001 Rev.
Printer Management Hard Actions Notes • ___________________________________________________________________ __________________________________________________________________________ __________________________________________________________________________ __________________________________________________________________________ __________________________________________________________________________ __________________________________________________________________________ ___________________________
7RROV This chapter describes the ease-of-use tools and wizards included in ZebraNetBridge Enterprise. Contents Tools. . . . . . . . . . . . . . . . . . . . . . . . . . . . . . . . . . . . . . . . . . . . . . . . . . . . . . . . . . . . . . . . . Font Import Tool . . . . . . . . . . . . . . . . . . . . . . . . . . . . . . . . . . . . . . . . . . . . . . . . . . . . . . Graphics Conversion Wizard . . . . . . . . . . . . . . . . . . . . . . . . . . . . . . . . . . . . . . . . . . . .
Tools Tools Tools In addition to right-click functionality, ZebraNetBridge Enterprise provides tools and wizards to aid in deploying and managing your printers. These tools can be found in the Tools menu of the menu bar as shown in Figure 35. Figure 35 • Tools Menu Font Import Tool True Type (TTF) fonts must be converted for your Zebra printer to recognize. This conversion process may be accomplished within ZebraNetBridge Enterprise.
Tools Tools Figure 36 • Font Import Tool 2. Click on the Browse button. The dialog in Figure 37 opens. Figure 37 • Open Font to Import 3. Browse to the location of the font you wish to import and click Open. 13743L-001 Rev.
Tools Tools 4. Select the conversion type in the Type of Conversion drop down menu. The drop down menu in Figure 38 opens. Figure 38 • Type of Conversion Note • All ZPL printers may use TrueType conversion. ZPL printers with firmware version X.13 or greater may use the TTF Direct Binary conversion type. The Printer Destination section designates the location and name of the file on your printer. The default destination is E:, memory which is the user available flash memory location. 5.
Tools Tools 6. Enter a name for the font. The Select Target Printer(s) part of the dialog, Figure 39, designates to which printers you wish to download fonts. This is not a requirement, but allows you to complete the conversion of the font and the download to the printer in one step. The dialog in Figure 39 opens. Figure 39 • Add Printer Wizard 7. Highlight printers in the Available Printers area and click on Add Selected> or click on Add All >> to move printers into the Selected Printers area. 8.
Tools Tools Graphics Conversion Wizard The Graphics Conversion Wizard allows you to convert many popular graphics formats into a format that can be downloaded to, stored on, and used by the printer. Formats that may be converted include: • Bitmap Graphic - *.bmp • Joint Photographics Expert Group - *.jpg: • Portable Network Graphic - *.png • Tagged Image File Format - *.tif To convert a graphics file, complete these steps: 1. On the Tools menu right-click and select Graphics Conversion Wizard.
Tools Tools Note • Although ZebraNetBridge Enterprise attempts to convert any size graphic, graphics should be kept below 1024 x 768 pixels.. The dialog in Figure 41 opens. Figure 41 • Graphics Display Dialog 4. Click Next. The dialog in Figure 42 opens. Figure 42 • Graphics Rotation Dialog 13743L-001 Rev.
Tools Tools 5. Select the desired rotation in degrees and click Next. The dialog in Figure 43 opens. Figure 43 • Graphics Size Dialog 6. A check box to preserve aspect ratio of the graphic is checked by default. Enter the desired size in pixels. 7. To view changes, click Apply Resizing. 8. If you are dissatisfied with the results, click Reload Original Image. 9. To continue, click Next. The dialog in Figure 44 opens. 72 ZebraNet Bridge Enterprise User Guide 13743L-001 Rev.
Tools Tools Figure 44 • Printer File 10. Enter the desired printer memory location (for example E:) and enter a name for the font. 11. Select the desired compression. The default is *.GRF (Uncompressed). 12. To continue, click Next. The dialog in Figure 45 opens. 13743L-001 Rev.
Tools Tools Figure 45 • Select Output Dialog 13. Click the Save button. 14. Browse to the desired save location (the default is the Resources\graphics directory in the Resource Management window), name the file, and click Save. The dialog in Figure 46 opens. 74 ZebraNet Bridge Enterprise User Guide 13743L-001 Rev.
Tools Tools Figure 46 • Conversion Successful Dialog 15. To close the dialog, click Finish or check the Convert Another Image box to return to the first Graphics Conversion Wizard screen. 13743L-001 Rev.
Tools Tools Wireless Setup Wizard The Wireless Setup Wizard is used for initial setup of your Zebra printer with a ZebraNet Wireless Print Server. This setup requires that the printer be connected to the local PC using a serial null modem cable. For initial setup of a ZebraNet Wireless Print Server, complete these steps: 1. On the Tools menu, right-click and select Wireless Setup Wizard. The dialog in Figure 47 opens. Figure 47 • Wireless Setup Wizard 2.
Tools Tools Figure 48 • Local Port Dialog 3. Change or confirm serial communication settings. 4. To continue, click Next. The dialog in Figure 49 opens. Figure 49 • Network IP Selection 13743L-001 Rev.
Tools Tools 5. Enable the DHCP or Static radio button. If… Then… You select Static you are required to enter the static IP Address, Default Gateway, and Subnet Mask. Your printer has an additional ZebraNet 10/100 or PrintServer II Ethernet adapter you can configure the IP address by clicking the Wired IP Config. button. The dialog in Figure 50 opens. Figure 50 • Network IP Selection Dialog 6. Enable the DHCP or Static radio button.
Tools Tools Figure 51 • Wireless Settings Dialog 8. Enter the appropriate wireless security settings, and click Next. 9. For advanced wireless settings, click the Advanced Options button. The dialog in Figure 52 opens. Figure 52 • Advanced Wireless Settings 13743L-001 Rev.
Tools Tools 10. Enter advanced settings. When you are finished, click OK. The ZPL commands based on your selections in the Wireless Setup Wizard are displayed for your review. See dialog in Figure 53. Figure 53 • ZPL for Wireless 11. To send the ZPL commands to the printer, click Finish. 80 ZebraNet Bridge Enterprise User Guide 13743L-001 Rev.
Tools Tools Copy Printer Wizard The Copy Printer Wizard allows you to copy printer settings, objects and alerts from one printer or printer profile to many printers. The printers do not have to be in the same group management group. To copy printer settings from one printer to many printers, complete these steps: 1. On the Tools menu right-click, and select Copy Printer Wizard. The dialog in Figure 54 opens. Figure 54 • Source Printer Selection 2.
Tools Tools Figure 55 • Target Printer Selection Wizard 3. Select the desired target printer from the available printers on the left. 4. To select multiple printers, hold the Shift key down and click on the printers. 5. To move printers into the Selected Printers area, click Add Selected> or click on Add All >>. 6. To remove printers for the Selected Printers area, highlight printers in the Selected Printers Area and click on
Tools Tools Figure 56 • Settings, Objects, and Alerts Selection 8. This dialog displays the preferred download settings for the source and target printers you have selected. ZebraNetBridge Enterprise will only allow downloads as follows: If… Settings Objects Alerts Print Server Same printer-type, same firmware ³ ³ ³ ³ Same printer-type, different firmware ³ ³ No ³ Different printer-type, different firmware No ³ No ³ 9. To download selections to selected printers, click Finish.
Tools Tools Notes • ___________________________________________________________________ __________________________________________________________________________ __________________________________________________________________________ __________________________________________________________________________ __________________________________________________________________________ __________________________________________________________________________ _______________________________________________
$ 0HQX DQG 7RRO %DUV This chapter describes the ease-of-use tools and wizards included in ZebraNetBridge Enterprise. Contents Toolbar . . . . . . . . . . . . . . . . . . . . . . . . . . . . . . . . . . . . . . . . . . . . . . . . . . . . . . . . . . . . . . . 86 Menu Bar . . . . . . . . . . . . . . . . . . . . . . . . . . . . . . . . . . . . . . . . . . . . . . . . . . . . . . . . . . . . . 88 13743L-001 Rev.
Menu and Tool Bars Toolbar Toolbar The toolbar provides quick access to some of the most common functions in ZebraNet Bridge Enterprise. These functions are also available through the menu bar. Figure 57 shows the toolbar and each button for you to use.
Menu and Tool Bars Toolbar Table 3 • ZebraNet Bridge Enterprise Tool Bar buttons Toolbar Button Description Expand Tree Collapse Tree Refresh Save Delete New Search New Group New Printer New Text File Font Import Tool Graphics Conversion Wizard Wireless Setup Wizard Copy Printer Wizard Printer Web Page Application Documentation 13743L-001 Rev.
Menu and Tool Bars Menu Bar Menu Bar This section provides you with examples of the menus. The functionality of the menu options are called out. When a menu option is not accessible it is because that option is not available in the window you are currently in. Example • In Figure 58, the menu options Group and Printer are unavailable. Figure 58 • File menu Figure 59 • Edit menu Figure 60 • View menu 88 ZebraNet Bridge Enterprise User Guide 13743L-001 Rev.
Menu and Tool Bars Menu Bar Figure 61 • Tools menu Figure 62 • Preferences menu Figure 63 • Help menu 13743L-001 Rev.
Menu and Tool Bars Menu Bar Notes • ___________________________________________________________________ __________________________________________________________________________ __________________________________________________________________________ __________________________________________________________________________ __________________________________________________________________________ __________________________________________________________________________ _______________________________
% )UHTXHQWO\ $VNHG 4XHVWLRQV This appendix provides you with frequently asked questions regarding ZebraNet Bridge Enterprise. 13743L-001 Rev.
Frequently Asked Questions FAQ FAQ Question Answer I copied my printer settings to another printer and now only a portion of the label prints out. Why? If your labels begin to print on a portion of the label, you might have cloned a 200 dpi printer setting to a 300 or 600 dpi printer. Why do some application dialog boxes appear strange (fonts too big, etc.)? In some instances, the application uses system fonts for its dialog boxes.
Frequently Asked Questions FAQ Question Answer When I drag a group in the Group Management window to another group with the same name it copies the group instead of moving it. When dragging a group to another group, the normal behavior is that the group that has been dragged is moved into the target group (mimics windows behavior). However, if the target group has the same name as the dragged group, the drop performs a copy instead of a move.
Frequently Asked Questions FAQ Notes • ___________________________________________________________________ __________________________________________________________________________ __________________________________________________________________________ __________________________________________________________________________ __________________________________________________________________________ __________________________________________________________________________ ____________________________
& 'UDJ DQG 'URS 'HIDXOWV The table in this appendix describes the default actions enlisted by ZebraNet Bridge Enterprise when you use the drag and drop function. 13743L-001 Rev.
Drag and Drop Defaults Default Drag and Drop Functionality Table 4 describes the default actions enlisted by ZebraNet Bridge Enterprise Table 4 • Drag and Drop Functions Target 96 Source Resource Directory Files from Clipboard Paste file(s) Paste file(s) N/A Paste File(s) to each printer Files from Resource Directory Paste file(s) Paste file(s) N/A Paste File(s) to each printer Printer Create printer profile clone all with confirm dialog N/A Add printer to group Group N/A N/A N/A Cop
' &RS\ &RQILJXUDWLRQ 3DUDPHWHUV This appendix provides you with the commands the application uses to communicate with the target printer and print server. Contents Print Server Commands. . . . . . . . . . . . . . . . . . . . . . . . . . . . . . . . . . . . . . . . . . . . . . . . . . 98 Wireless . . . . . . . . . . . . . . . . . . . . . . . . . . . . . . . . . . . . . . . . . . . . . . . . . . . . . . . . . . . . . 101 Printer Commands . . . . . . . . . . . . . . . . . . . . . . . . . . . . . . . . . . .
98 ZebraNet Bridge Enterprise User Guide Using Net Protocols Subnet Mask 1.3.6.1.4.1.683.6.3.1.4.4.0 1.3.6.1.4.1.683.6.3.1.4.3.0 Time-out Checking IP Address 1.3.6.1.4.1.683.6.3.1.4.1.0 1.3.6.1.4.1.683.6.3.1.4.8.0 TCP/IP Enabled 1.3.6.1.4.1.683.6.3.1.2.0 Default Gateway SNMP Trap Community Name 1.3.6.1.4.1.683.3.5.0 1.3.6.1.4.1.683.6.3.1.4.2.0 SNMP Set Community Name System Description 1.3.6.1.2.1.1.6.0 1.3.6.1.4.1.683.3.4.0 System Name 1.3.6.1.2.1.1.5.
13743L-001 Rev. A 06/28/2005 SMTP Server Address SMTP PS Domain Web Admin Name Web Password HTTP Port Updates URL POP3 Server Address POP3 Polling Interval POP3 User Name POP3 Password 1.3.6.1.4.1.683.6.3.1.4.23.0 1.3.6.1.4.1.683.6.3.1.4.39.0 1.3.6.1.4.1.683.6.3.1.4.26.0 1.3.6.1.4.1.683.6.3.1.4.27.0 1.3.6.1.4.1.683.6.3.1.4.30.0 1.3.6.1.4.1.683.6.3.1.4.32.0 1.3.6.1.4.1.683.6.3.1.4.35.0 1.3.6.1.4.1.683.6.3.1.4.36.0 1.3.6.1.4.1.683.6.3.1.4.37.0 1.3.6.1.4.1.683.6.3.1.4.38.
100 Name Alert 1 destination IP Address Alert 2 destination IP Address Alert 3 destination IP Address Alert 4 destination IP Address Alert 5 destination IP Address Alert 1 Printer Mask for each Alert 1 - 5. Alert 2 Printer Mask has 5 separate PS alerts. Online, Offline Alert 3 Printer Mask Paper out, Head open, and General printer Alert 4 Printer Mask error Alert 5 Printer Mask OID 1.3.6.1.4.1.683.6.3.1.4.10.1.2.1, 1.3.6.1.4.1.683.6.3.1.4.10.1.2.2, 1.3.6.1.4.1.683.6.3.1.4.10.1.2.3, 1.3.6.1.4.1.683.6.
13743L-001 Rev. A 06/28/2005 encryption mode encryption index encryption key 1 encryption key 2 encryption key 3 encryption key 4 Leap Mode leap username leap password authentication type preamble tx power tx antenna rx antenna 1.3.6.1.4.1.10642.2.851.1.4.40.8.0, 1.3.6.1.4.1.10642.2.851.1.4.40.9.0, 1.3.6.1.4.1.10642.2.851.1.4.40.10.0 1.3.6.1.4.1.10642.2.851.1.4.40.11.0, 1.3.6.1.4.1.10642.2.851.1.4.40.12.0, 1.3.6.1.4.1.10642.2.851.1.4.40.13.0, 1.3.6.1.4.1.10642.2.851.1.4.40.14.0 1.3.6.1.4.1.10642.2.
Copy Configuration Parameters Printer Commands Printer Commands Table 7 shows the ZPL commands you can execute using the various functions within ZebraNet Bridge: : Table 7 • ZPL Commands Description 102 ZPL Command Change Memory Letter Designation ^CM Early Warning Media ^JH Set Auxiliary Port ^JJ Set Dots per Millimeter ~JM Change Backfeed Sequence ~JS Head Test Interval ^JT Set Ribbon Tension ^JW Define Language ^KL Define Printer Name ^KN Define Password ^KP Label Length ^LL L
Copy Configuration Parameters Printer Commands Table 7 • ZPL Commands Description ZPL Command Set ZebraNet Alert ^SX Set ZPL Mode ^SZ Tear-off Adjust Position ~TA Printer Sleep ^ZZ 13743L-001 Rev.
Copy Configuration Parameters Printer Commands Notes • ___________________________________________________________________ __________________________________________________________________________ __________________________________________________________________________ __________________________________________________________________________ __________________________________________________________________________ __________________________________________________________________________ ____________
,QGH[ A G alerts copy, 53 monitor, 60 set, 60 group directed broadcast how to create, 30 IP address how to create, 31 local broadcast how to create, 28 multicast how to create, 31 subnet how to create, 29 group management window about, 20 groups how to create, 34, 35 GUI components, 2 C components, 2 configurations copy, 52 contact information, xii contacts, xii conventions, xiii copy alerts, 53 objects, 55 print server settings, 52 printer settings, 52 customer support, xii D document conventions, xi
Index O S objects copy, 55 search window about, 20 setting alerts, 60 settings change, 50 change print server, 51 change printer, 50 copy print serverer, 52 copy printer, 52 status icons, 57 monitor, 57 support, xii support information, xii P preferences set system, 21 printer discovery about, 20 printers how to add, 36 how to copy, 35 product improvements, v proprietary statement, v R related documents, xiv requirements operating system, 14 print server, 11 printer, 11 workstation, 14 resources windo
Zebra Technologies Corporation 333 Corporate Woods Parkway Vernon Hills, Illinois 60061.3109 U.S.A. Telephone: +1 847.634.6700 Facsimile: +1 847.913.8766 Zebra Technologies Europe Limited Zebra House The Valley Centre, Gordon Road High Wycombe Buckinghamshire HP13 6EQ, UK Telephone: +44 (0) 1494 472872 Facsimile: +44 (0) 1494 450103 Customer Order # 13743L-001 Manufacturer Part # 13743L-001 Rev. A © 2005 ZIH Corp.