
Technical information

58 PrintServer II User and Reference Guide
Getting Started
Setting up a ZebraNet Connect IP
6HWWLQJXSD=HEUD1HW&RQQHFW,3
ZebraNet Connect IP allows you to send jobs to PrintServers that use Dynamic IP
addresses (DHCP). It also notifies you of printer errors, such as paper out or head
open. When print jobs are printed through ZebraNet Connect IP, they are sent directly
to PSII and are not routed through a network server, resulting in a reduction of network
traffic.
If you have printing problems while using the ZebraNet Connect IP printing port, you
may check the status of the port or change its settings through the printer Properties
dialog.
For Windows 95/98, select Port Settings under the Details tab.
For Windows NT 4.0 or Windows 2000, select Configure Port under the Ports tab.
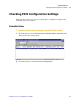
:LQGRZV17:LQGRZV
If you are using the Windows NT 4.0 or Windows 2000 operating system, use the
following procedure to set up a printer port for the PSII.
1 From the task bar, select Start>Settings>Printers.
2 Select the Windows printer to use when printing with the PSII.
3 From the menu bar, select File>Properties.
4 To add a ZebraNet Connect IP port, in the Ports tab select Add Port.
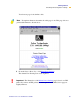
5 From the list of Available Printer Ports, select ZebraNet Connect Monitor as the
type of port to add, and click New Port.
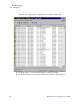
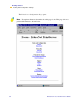
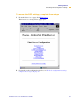
Note • The DHCP feature of ZebraNet Connect IP can rediscover a PSII on the local
subnet, even when its IP address might be changing (e.g., when using DHCP for IP
address resolution). The
PSII is relocated by its port name as configured through
ZebraNet View (the default name is Serial Number-Port Number). This feature is
enabled on the local subnet only. A non-local PSII device is not rediscovered if the
IP address changes.
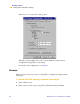
Note • If ZebraNet Connect IP monitor is not listed, verify that the ZebraNet
Connect IP software has been properly installed. To do this, you need to reinstall the
software and choose Modify.