
Technical information


Getting Started
Assigning an IP Address
PrintServer II User and Reference Guide 41
7RVHWWKHGHIDXOWJDWHZD\FRPSOHWHWKHVHVWHSV
These steps are Optional.
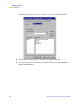
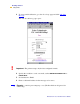
1 From the ZebraNet View menu bar, select PrintServer>Configuration.
2 Click the TCP/IP tab.
3 From the Print Server Configuration>TCP/IP tab, in the Default GateWay text-
box, type in your default gateway.
4 Confirm it is accurate, and click OK.
,QDQRQ:LQGRZVHQYLURQPHQW
These steps can be used with all printers. However, the liquid crystal display (LCD)
instructions are for printers with an LCD.
7RDVVLJQDQ,3DGGUHVVIURPWKHSULQWHU/&'FRPSOHWHWKHVH
VWHSV
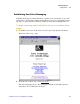
1 Turn on the printer and allow 2 minutes for all systems to complete the self test. If
you do not have a network cable in the port, the PSII prints the configuration label
when it is ready.
2 On the printer front panel, press SETUP/EXIT.
3 On the printer front panel, press PREVIOUS twice until you reach the network
settings menu item.
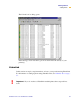
4 You can edit any of the following network settings in order to communicate with
any PSII in your network environment.
• ip resolution (dynamic, permanent) The printer menu item IP
RESOLUTION must be set to PERMANENT if attempting to assign the IP
address from the front panel.
• default gateway (default setting of 000.000.000.000)
!
Important • Your PSII must have firmware 6.3 and higher and your Zebra printer
must have firmware x.10 or higher with an LCD.
!
Important • To change any of these settings, you need to use the default password:
1234.