
Technical information


24 PrintServer II User and Reference Guide
Installation
Internal PSII
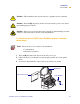
9 With the PSII device, take the cable and PSII board, go to the electronics side of
the printer and plug the parallel port socket of the PSII board into the parallel port
plug on the main logic board.
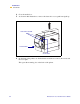
10 Snap the standoffs through the holes on the
PSII board.
Be sure the PSII is in securely.
11 With the PSII board connected onto the main logic board, feed the connector
through the mounting slot on the back of the printer.
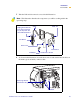
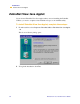
12 As shown in this illustration, put the I/O board and plate together, then connect the
cable into the plug on the I/O board:
.
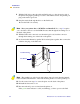
13 Use the screws from step 6 to screw the plate onto the back of the printer.
14 Reinstall the electronics cover.
15 Reconnect the AC power cord and turn the printer on.
If the green status indicator is solid (not blinking), you have power to the PSII.
Note • Does your printer have a PCMCIA card installed? If so, step 11 requires
you to feed the connector over the PCMCIA card, then through the mounting slot on
the back of the printer.
Note • The parallel port on the back of the printer cannot be used when the internal
PSII is installed. The hardware of the PSII mounting bracket covers the parallel port.
,2%RDUG
,2%RDUG3OXJ
3ODWH