
Technical information


Installation
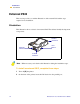
External PSII
PrintServer II User and Reference Guide 13
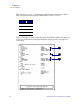
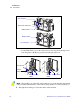
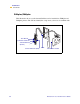
This illustration calls out the location of the parallel port and provides an enlarged
illustration of the parallel port:
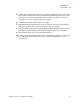
3 Secure the wire locks.
4 On the back of the PSII, insert a live 10BASE-T cable into the Ethernet connector.
5 Turn on the printer.
A red status indicator blinks during the Power On Self Test (POST) and changes to
green when the initialization is finished.
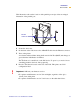
The Test button is a small hole on the
PSII device. To press it, you need to insert
something small into the hole, like a paperclip.
6 Press the Test button located on the side of the
PSII. This prints out a PSII
configuration label.
!
Important • DPI and your firmware version:
For printers with firmware version 7.01 and higher, regardless of the dpi, a
2-inch (5 cm) label prints
For printers with firmware version 7 and lower, see the table that follows.
3DUDOOHO
&RQQHFWRU