
Specifications
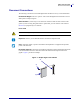
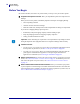
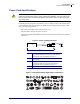
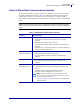

Table Of Contents
- About This Document
- Printer Setup
- Wireless Configuration
- 105SL and 105SLPlus
- HC100
- PAX4 Series
- S4M
- Xi Series and RXi Series
- Z Series and RZ Series
- ZE500 Series
- ZT200 Series
- ZT400 Series
- Select a Site for the Printer
- ZT400 Series General Specifications
- ZT400 Series Compliance Information
- FCC Compliance Statement
- M6e-Micro RFID Radio Installation Instructions
- FCC Radiation Exposure Statement
- Canadian DOC Compliance Statement
- Industry Canada (IC) Warning
- Brasil — Aviso da Anatel
- European Regulatory Information
- Japan Restricted Frequencies
- Taiwan Restricted Frequencies
- Korean Compliance Statement
- NCC
- Mexico — NOM-121-SCT1-2009
- WLAN Radio Specification
- Bluetooth 2.1 + EDR Radio Specification
- RFID Radio Specification

Printer Setup
Connect the Printer to a Power Source
16
P1050133-005 12/10/2013
Connect the Printer to a Power Source
The power supply in the printer automatically detects the applied line voltage and works in the
100 to 240 VAC, 47 to 63 Hz range.
The AC power cord must have a three-prong female connector on one end that plugs into the
mating AC power connector at the rear of the printer. If a power cable was not included with
your printer, refer to Power Cord Specifications on page 15.
To connect the printer to a power source, complete these steps:
1. Toggle the printer power switch to the off (O) position.
2. Plug the power cord into the AC power connector on the rear of the printer.
3. Plug the other end of the power cord into a power outlet near the printer.
4. Turn on (I) the printer.
The control panel LCD and lights activate, indicating that the printer is booting up.
Caution • For personnel and equipment safety, always use an approved three-conductor
power cord specific to the region or country intended for installation. This cord must use an
IEC 320 female connector and the appropriate region-specific three-conductor grounded
plug configuration.