Reference Guide 14103L-003
© 2009 ZIH Corp. The copyrights in this manual and the software and/or firmware in the label printer described therein are owned by ZIH Corp. Unauthorized reproduction of this manual or the software and/or firmware in the label printer may result in imprisonment of up to one year and fines of up to $10,000 (17 U.S.C.506). Copyright violators may be subject to civil liability. This product may contain ZPL®, ZPL II®, and ZebraLink™ programs; Element Energy Equalizer® Circuit; E3®; and Monotype Imaging fonts.
mySAP Business Suite This section provides detailed instructions on how to work in ZebraDesigner™, the label design application for use with mySAP Business Suite™™. Contents Introduction to mySAP Business Suite™ Zebra Device Types . . . . . . . . . . . . . . . . . . . . . 4 User Specific Settings . . . . . . . . . . . . . . . . . . . . . . . . . . . . . . . . . . . . . . . . . . . . . . . . . . . . 7 Installation of ZebraDesigner™ Zebra Device Types and Code Pages. . . . . . . . . . . . . . .
mySAP Business Suite Introduction to mySAP Business Suite™ Zebra Device Types Introduction to mySAP Business Suite™ Zebra Device Types SAP AG created files, for mySAP Business Suite™, supplied with ZebraDesigner™: ZLB_ZEB.PRI, S9162.CPA (for Scalable fonts - IBM™ CP850) ZEBRA.FOR (Sample Form) ZLB_ZEBU.PRI (for Andale and Swiss 721 fonts - Unicode UTF-8) All versions of mySAP Business Suite™ later than 4.6d should use LB_ZEB rather than upload ZLB_ZEB. This will avoid the need for code page migration.
mySAP Business Suite Introduction to mySAP Business Suite™ Zebra Device Types Other requirements vary if printing will be done directly from mySAP applications using SAPscript. These approaches and requirements are described below: SAPscript Users (upload Method) ZebraDesigner™ is the ideal tool for graphically designing labels and automatically generating Zebra Programming Language (ZPL®) and SAPscript so label formats can be loaded into mySAP applications for output.
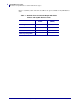
mySAP Business Suite Introduction to mySAP Business Suite™ Zebra Device Types Below is a summary table of the Unicode UTF-8 font options available for mySAP Business Suite: Table 1 • Available Fonts for Unicode Output with Zebra Printers and mySAP Business Suite Worldtype Andale Swiss 721 (EMEA) Unicode UTF-8 Unicode UTF-8 22MB 166K Number of characters Thousands Approximately 932 SAPscript Compatible Yes Yes Code Page Size 14103L-003 ZebraDesigner™ for mySAP™ Business Suite Reference Guid
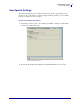
mySAP Business Suite User Specific Settings User Specific Settings The instructions and dialog boxes in this document are the result of specific SAP system settings. If some of the dialog boxes that are displayed differ from what you see, it is likely because your settings need to be changed. Be sure your settings reflect these: 1. In transaction /nso10 or /nse71, select Settings >PC Editor or Settings > Form Painter. A dialog box similar to this opens: © SAP AG 2006. All rights reserved. 2.
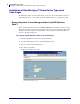
mySAP Business Suite Installation of ZebraDesigner™ Zebra Device Types and Code Pages Installation of ZebraDesigner™ Zebra Device Types and Code Pages The illustrations below are from mySAP Business Suite™ version 4.6C. All later versions of SAP will use the same or very similar operations and transactions to configure the system.
mySAP Business Suite Installation of ZebraDesigner™ Zebra Device Types and Code Pages To install a Zebra Code Page, do the following: 1. In the command line text box just below the menu bar, type /nSA38. A dialog box similar to this opens: © SAP AG 2006. All rights reserved. 2. Click 01/19/2010 or press Enter.
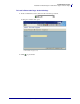
mySAP Business Suite Installation of ZebraDesigner™ Zebra Device Types and Code Pages To upload the code page file into the SAP printing system, from the ABAP/4: Execute Program dialog box (below): 1. In the Program field, type RSTXCPAG. 2. Click or press F8. A dialog box similar to this opens: © SAP AG 2006. All rights reserved.
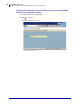
mySAP Business Suite Installation of ZebraDesigner™ Zebra Device Types and Code Pages Select Code Page In the Upload/Download of Character Set Definitions (Code Pages) dialog box, complete the fields as follows: 1. In the Character set number field, type in the code page. For example, 9162. 2. Select File system: GUI. A dialog box similar to this opens: © SAP AG 2006. All rights reserved. 3. Select Upload (file-> R/3). 4. Select Update/delete when uploading. 5.
mySAP Business Suite Installation of ZebraDesigner™ Zebra Device Types and Code Pages To load code page from local PC, do the following: 1. The Import from a Local File dialog box prompts for character set file name and its location. A dialog box similar to this opens: © SAP AG 2006. All rights reserved. 2. Use the browse button to locate the file, such as S9162.CPA in the File name entry text box. 3. Zebra supplies this file with ZebraDesigner™.
mySAP Business Suite Installation of ZebraDesigner™ Zebra Device Types and Code Pages Install the Zebra Driver The next series of steps outline the import procedure of the device type definition file. For example, ZLB_ZEB.PRI to the mySAP Business Suite™ printing system. To import the device type definition, do the following: 1. To execute the Program Execution transaction SA38, at the command line type /nSA3. 2. Click or press Enter. 3.
mySAP Business Suite Installation of ZebraDesigner™ Zebra Device Types and Code Pages In the SAPscript Export to Dataset / SAPscript Import from Dataset dialog box (below), do the following: A dialog box similar to this opens: © SAP AG 2006. All rights reserved. 5. Select Device Type. 6. In the Object name text box, type the device type. For example, ZLB_ZEB. 7. In the Mode (EXPORT/IMPORT) text box, type IMPORT. 8. Select From/on frontend (or File system: GUI on older releases). 9.
mySAP Business Suite Installation of ZebraDesigner™ Zebra Device Types and Code Pages Allocate a Development Class You must either allocate a development class to this or make it a local object. The development class is only required if you want to transport this object to other R/3 systems (local objects can’t be transported to other R/3 systems). This is done from this dialog box: © SAP AG 2006. All rights reserved. You can enter a Development class and click , or press Enter.
mySAP Business Suite Installation of ZebraDesigner™ Zebra Device Types and Code Pages A dialog box similar to this opens: © SAP AG 2006. All rights reserved. Note • If a WARNING SP6X message is shown, scroll down to the bottom and you should see "spooler informed of change". Important • The above drivers do not support native SAPscript commands. The above drivers only support SAPscript generated and uploaded by ZebraDesigner™.
mySAP Business Suite Using the mySAP Business Suite™ Zebra Device Types with Output devices / Print Queues Using the mySAP Business Suite™ Zebra Device Types with Output devices / Print Queues Before you can use a printer (device type) in mySAP Business Suite™ you must create and configure a print queue (output device). To create and configure a print queue (output device), do the following: 1. To initiate the Spool Administration program (SPAD), type /nSPAD in the transaction command line. 2.
mySAP Business Suite Using the mySAP Business Suite™ Zebra Device Types with Output devices / Print Queues A dialog box similar to this opens: © SAP AG 2006. All rights reserved. The Spool Administration: List of Output Devices . . . dialog box (below) should appear with a new row of icons. 5. Click or press F8. A dialog box similar to this opens: © SAP AG 2006. All rights reserved.
mySAP Business Suite Using the mySAP Business Suite™ Zebra Device Types with Output devices / Print Queues In the Spool Administration: Create Output Device dialog box (below), do the following: 1. Create a new device, click or press Shift + F1. A dialog box similar to this opens: © SAP AG 2006. All rights reserved. 2. Allocate the Output Device name. You can also allocate a short name. 3. In the Device Type field, type a name. For example, ZLB_ZEB. 4. If required, type Location and Message.
mySAP Business Suite Using the mySAP Business Suite™ Zebra Device Types with Output devices / Print Queues 5. Select the HostSpoolAccMethod tab. A dialog box similar to this opens: © SAP AG 2006. All rights reserved. For testing and demonstration purposes it is recommended that you use Front End printing. This means that you should complete the configuration of the output device. To complete the output device configuration, do the following: 1. Ensure Host spool access method is set as option F. 2.
mySAP Business Suite Printing Terminology Printing Terminology Below is a detailed explanation of mySAP Business Suite™ printing terminology: Output Device This is the name of the print queue. On older versions of mySAP Business Suite™, it must be four alphanumeric characters such as ZKM1. In mySAP Business Suite™ server versions 4.0 or higher, this can be up to 40 characters. Device Type This is the name of the printer (device type) and would normally be ZLB_ZEB or ZLB_ZEBU.
mySAP Business Suite Printing Terminology Access Method Description U = Printing with the Berkley protocol This access method serves as the protocol for the spool systems on UNIX systems. You can use this access method together with the delivery program SAPlpd on Windows systems; however, in this case, access method S is more appropriate. S = Printing with SAP protocol This access method is used for printers that function as workplace printers on a Windows System.
mySAP Business Suite Printing Terminology To setup SAP to communicate directly with the printer, do the following: 1. Access method U. 2. Host Printer PORTLF1. 3. Destination Host Your Printers IP Address. Host Printer (such as the name of the target print queue on a PC or print server) When using F, U, or S with SAPlpd, this could be “__DEFAULT” (underscore underscore DEFAULT) for the Default Windows printer or it could be the exact name of the printer (not the share name), such as “Generic / Text Only”.
mySAP Business Suite Printing Terminology To start SAPlpd, complete this step: 1. Select Start > Programs > SAP Frontend > SAP Printer Daemon. A dialog box similar to this opens: © SAP AG 2006. All rights reserved. SAPlpd must be run on any PC that requires a Windows printer driver to be used with mySAP Business Suite™. This is the case if you are using generic text drivers or full-blown Windows drivers.
mySAP Business Suite Uploading a Sample Form for Zebra Printers Uploading a Sample Form for Zebra Printers It is recommended to use the sample form as a template for creating new forms or that you review the settings of the sample form and use those settings in creating new forms. Use SA38 Transaction to upload a sample form for Zebra printers Modifying the existing forms rather than creating new forms is what is most commonly done.
mySAP Business Suite Uploading a Sample Form for Zebra Printers 2. Click or press F8. A dialog box similar to this opens: © SAP AG 2006. All rights reserved. 3. Select Form. 4. In the Object name field, type the form name. For example, ZEBRA_DEMO. 5. In the Mode (EXPORT/IMPORT) field, type IMPORT. 6. Select From/on frontend (or File system: GUI on older releases). 7. When the entries for all of the requirement fields above are entered correctly, click press F8 to start the import process.
mySAP Business Suite Uploading a Sample Form for Zebra Printers Allocate a Development Class You must either allocate a development class to this or make it a local object. The development class is only required if you want to transport this object to other R/3 systems (local objects can’t be transported to other R/3 systems). To complete the development class, do the following: © SAP AG 2006. All rights reserved. You can enter a Development class and click , or press Enter.
mySAP Business Suite Uploading a Sample Form for Zebra Printers 2. To start the upload process, click or press Enter. When the import process is finished, update messages appear in a dialog box similar this: © SAP AG 2006. All rights reserved.
mySAP Business Suite Uploading a Sample Form for Zebra Printers Test Printing from mySAP Business Suite™ to an Output Device / Print Queue It is a good idea to check that you have setup the output device correctly. To check that the output device is step correctly, do the following: 1. To start the Standard Text: Request dialog box transaction, in the command line text box by type /nSO10. 2. Click or press Enter. 3.
mySAP Business Suite Uploading a Sample Form for Zebra Printers 4. Click or press F5. If the text editor looks like the screen below, you will need to change the Editor type. For details, see User Specific Settings on page 7. © SAP AG 2006. All rights reserved. 5. Select the character at the beginning of the first line. 6. Select the start character . A dialog box similar to this opens: © SAP AG 2006. All rights reserved.
mySAP Business Suite Uploading a Sample Form for Zebra Printers 7. Double-click on the / (Line feed). A dialog box similar to this opens: © SAP AG 2006. All rights reserved. 8. Click in the first column of the first line. A dialog box similar to this opens: © SAP AG 2006. All rights reserved.
mySAP Business Suite Uploading a Sample Form for Zebra Printers 9. At the cursor type ~WC. Important • It is recommended that you change the default form that is associated with this standard text file, otherwise when you print the “SYSTEM” form will be used. The system form contains margins that can cause problems with ZPL printers under certain conditions. To change the form, do the following: 1.
mySAP Business Suite Uploading a Sample Form for Zebra Printers A dialog box similar to this opens: © SAP AG 2006. All rights reserved. Note • The form used is identified in the above dialog box. It changed from SYSTEM to ZEBRA_DEMO.
mySAP Business Suite Uploading a Sample Form for Zebra Printers 4. Click or press Ctrl + P. A dialog box similar to this opens: © SAP AG 2006. All rights reserved. You must populate or edit the following fields: 5. In the Output device field, type the print queue name. 6. Make sure that Print immediately is selected. 7. Click or press Ctrl + P. If the print was successful then the Zebra printer should print out a configuration label.
mySAP Business Suite Designing a Label with ZebraDesigner™ Designing a Label with ZebraDesigner™ This documentation contains the information that is specific to ZebraDesigner™. Please ignore all references to variable data “data types” in the ZebraDesigner™ help system. Further advanced information regarding SAPscript can be obtained via SAP documentation or 3rd party publications. Zebra recommends SAPscript by Michaelson Buchanan published by McGraw Hill ISBN 0-07-134618-X.
mySAP Business Suite Designing a Label with ZebraDesigner™ If you want to change the font, do the following: 4. Click Select. 5. Make any changes to the font, font style, or font size. 6. Click OK. Important • If you make font changes, when you accept the changes you return to the above dialog box. It defaults back to having Fix text selected. Be sure to select Variable text. 7. Click Next. The Variable Field dialog box opens. 8. See Variable Field on page 38.
mySAP Business Suite Designing a Label with ZebraDesigner™ If you want to change the bar code type, do the following: 4. Click Define. A dialog box similar to this opens: 5. Make any changes accordingly. See the ZebraDesigner ™ for ZebraDesigner™ User Guide and help system for more details on the Edit Bar Code dialog box. 6. Click OK. 7. Click Next. The Variable Field dialog box opens. 8. See Variable Field on page 38.
mySAP Business Suite Designing a Label with ZebraDesigner™ Variable Field The Variable Field dialog box opens when you click Next from the Text Object dialog box or Bar Code Object dialog box. This is the data type / dialog box that is used to place mySAP Business Suite™ database and system fields on the label. This can be a simple mySAP Business Suite™ field such as &tablename-fieldname& or an advanced field with multiple fields linked together or fields embedded within SAPscript commands.
mySAP Business Suite Designing a Label with ZebraDesigner™ These are the options in the Variable name dialog box: • Variable Name — This is where you enter the name of the mySAP Business Suite™ database or system field. This should only be used for simple fields that do not require concatenation, linking or embedded SAPscript (refer to “Use Script” for advanced fields). The software always generates a default value of ID_00, 01 etc.
mySAP Business Suite Designing a Label with ZebraDesigner™ • Sample Data — This is simply a representative sample of the data that will be printed. Sample data is used for display purposes on the design screen, and in order to calculate the width of the field. The width of the field can also be calculated by using the Maximum number of characters (see maximum number of characters below).
mySAP Business Suite Designing a Label with ZebraDesigner™ To complete the Variables Property dialog box, do the following: 1. When you finish populating the Variables Property dialog box, click Next. A dialog box similar to this opens: 2. Continue to Automatic Incrementing. Automatic Incrementing Creating incrementing variable fields means that the Zebra printer will increment a mySAP Business Suite™ variable field This field will increment if the print quantity is greater than 1.
mySAP Business Suite Designing a Label with ZebraDesigner™ To complete the Automatic Incrementing dialog box, do the following: 1. When you finish populating the Automatic Incrementing dialog box, click Next. A dialog box similar to this opens: 2. Continue to Script Definition.
mySAP Business Suite Designing a Label with ZebraDesigner™ Please ensure that you enter SAP ITF tags at the beginning of each line (except for bar codes, see below). The common SAP ITF tags you will use are: “/ “ Line Feed (used for fixed text and variables) “/:” Command (used for IF / ENDIF / INCLUDE etc) “/*” Comments “= “ Extended Line ZebraDesigner™ will automatically split SAPscript lines, using “= “, that are greater than 132 characters. This is done when generating the ITF file.
mySAP Business Suite Designing a Label with ZebraDesigner™ 3. Click Next. A dialog box similar to this opens: 4. In the Sample Data text box, type First. 5. Using the space bar change the maximum number of characters to 10. 6. Click Finish. 7. Create another variable. 8. Click Next. 9. In the Sample Data text box, type Last. 10. Using the space bar change the maximum number of characters to 10. 11. Click Finish. 12. From the Toolbox, click Linear. 13. Select Code 128.
mySAP Business Suite Designing a Label with ZebraDesigner™ To create a one to many linked variable, complete these steps: 1. In ZebraDesigner™ create a label. 2. Create a variable. 3. Click Next. 4. In the Sample Data text box, type First Last. 5. Click Next. 6. Click Next. 7. Select Use Script. 8. In the text box type: &ID_01&&ID_02& The Script Definition dialog box looks like this: 1 1 Contains two variables. The ampersand begins and ends each variable.
mySAP Business Suite Designing a Label with ZebraDesigner™ To put the one to many linked bar code on the label, complete these steps: 12. Move the cursor on the label and click. The Bar Code Object dialog box opens. 13. Select Variable bar code data and click Finish. The label looks something like this: 14. Right-click on the bar code and select Bar code Properties. 15. In the Human Readable tab, select Below bar code. 16. Click OK.
mySAP Business Suite Designing a Label with ZebraDesigner™ Paragraph Text, Hard Carriage Returns and the Script Definition dialog box Zebra ZPL printers support multi-line paragraph fields with dynamic word wrapping and/or justification for variable length text fields. The frame of the text field must be dragged, with the shift key held down, to define the width and number of lines. The printer will ignore any hard carriage returns within the data stream.
mySAP Business Suite Designing a Label with ZebraDesigner™ Non-printable characters in a bar code (Used for a General Motors compliance label containing a specially formatted PDF417 Bar code) The above field is supplied as an example label “GMPDF417 example for mySAP™ Business Suite.lbl” Bar codes and the Script Definition dialog box Please note that when using this dialog with a bar code you must not put any SAP ITF tags at the beginning of the first line.
mySAP Business Suite Designing a Label with ZebraDesigner™ Date Field This is a definable date calculated by the Real Time Clock (RTC) option, only. Alternatively, mySAP Business Suite™ can supply the date by using the “mySAP Business Suite™ Variable Field” data type and using a system variable such as &SYST-DATUM&. Refer to the help system for more information on the operation of this dialog box.
mySAP Business Suite Designing a Label with ZebraDesigner™ Time Field This is a definable time calculated by the Real Time Clock (RTC) option, only. Alternatively, mySAP Business Suite™ can supply the time by using the “mySAP Business Suite™ Variable Field” data type and using a system variable such as &SYST-TIMLO&.
mySAP Business Suite Designing a Label with ZebraDesigner™ • Read Source — This is unavailable. • Data Format — This is unavailable. • Preview (WYSIWYG only) — This is a WYSIWYG preview of the choice made in Selected RFID tag field. Creating and Using Variable Graphics ZebraDesigner™ supports using variable graphics, with the graphic fields on the label tied to variable names. At print time, the graphic to be printed is determined by the content of the mySAP variable used.
mySAP Business Suite Designing a Label with ZebraDesigner™ Scenario One - Storing all of the Variable Graphics in the printers memory. When you design a label with variable graphics, using Font and Graphics Downloader, and at export you select Create SAPscript file on disk and download objects to printer, ZebraDesigner™ will automatically download the graphics to the printers you select. To upload graphic files into mySAP™ Business Suite, do the following: 1. In ZebraDesigner™, create a new label. 2.
mySAP Business Suite Designing a Label with ZebraDesigner™ The Card Setup dialog box opens: 8. Enter a description. 9. In the Card size drop down, select the largest card size. 10. Click OK. 11. From the menu bar, select Pictures > Add. 12. Select a graphic. 13. Click Open. The Confirm dialog box opens. 14. Click Yes. 15. To add additional graphics repeat step 11 through step 14. 16. From the menu bar, select Card > Update printer settings and return to server application.
mySAP Business Suite Designing a Label with ZebraDesigner™ 18. Move the cursor on the label and click. The Graphics kind dialog box opens. 19. Select Variable. 20. Click Next. 21. Click New. 22. Click Next. 23. Click Finish. When you are done creating the label, you will need to export it. To export, do the following: 24. Click 14103L-003 .
mySAP Business Suite Designing a Label with ZebraDesigner™ The Format Generation Wizard dialog box opens. Create SAPscript file on disk and download objects to printer: 25. Follow the rest of the prompts to complete the Export process.
mySAP Business Suite Designing a Label with ZebraDesigner™ A dialog box similar to this opens. 5. From the menu bar select Card > New. 6. Create a file name. 7. Click Save. The Card Setup dialog box opens: 8. Enter a description. 9. In the Card size drop down, select the largest card size. 10. Click OK. 11. From the menu bar, select Pictures > Add. 12. Select a graphic.
mySAP Business Suite Designing a Label with ZebraDesigner™ 13. Click Open. The Confirm dialog box opens. 14. Click Yes. 15. To add additional graphics repeat step 11 through step 14. 16. From the menu bar, select Card > Update printer settings and return to server application. You return to the application. 17. In the Toolbox, click Picture. 18. Move the cursor on the label and click. The Graphics kind dialog box opens. 19. Select Variable. 20. Click Next. 21. Click New. 22. Click Next. 23.
mySAP Business Suite Designing a Label with ZebraDesigner™ To define the header and footer scripts, do the following: 1. Right-click on the label. 2. Select Label Setup... 3. Click Next five times. The Custom scripts dialog box opens. 4. Select Use Header Script. This dialog allows you to add commands that will be placed before ITF SAPscript that ZPL ZebraDesigner™ creates. 5. Add a /E element with the name of the form you are going to upload the files to. Note • Step 5 is a required step.
mySAP Business Suite Designing a Label with ZebraDesigner™ To export, do the following: 10. Click . The Format Generation Wizard dialog box opens: 11. Select Create SAPscript files on disk. 12. Follow the rest of the prompts to complete the Export process. When the export is finished you can confirm its success. To confirm the success of the export, do the following: 1. Open Explorer. 2.
mySAP Business Suite Designing a Label with ZebraDesigner™ Creating EAN/UCC 128 Bar Codes ZebraDesigner™ allows you to take advantage of native features in Zebra printers that support UCC/EAN bar codes. These are the native features in the printers: • Automatically starting in EAN/UCC 128 mode (using Subset C followed by FNC1) • Parenthesis “()” and Spaces “ ” can be included within the data, for human readable formatting, but will be automatically stripped out from the bar code.
mySAP Business Suite Designing a Label with ZebraDesigner™ 8. In the text box type (00)&tablename-fieldname& The Variable properties dialog box looks like this: 1 1 The first two digits (00) are the application identifier. The remaining digits &tablename-fieldname& are the SAP set variable. For mySAP to send correct data it must use the script definition function. At print time, my SAP combines these two elements together in the bar code. 9. Click Finish. 10. From the Toolbox, click GS1 (EAN.UCC). 11.
mySAP Business Suite Designing a Label with ZebraDesigner™ To create the second sample EAN/UCC 128 bar code, complete these steps: 1. In ZebraDesigner™ create a label. 2. Create a variable. 3. Click Next. 4. In the Sample Data text box, type: 0212345678901234371011123456. 5. Click Next. 6. Click Next. 7. Select Use Script. 8. In the text box type: (02)&tablename-fieldname&(37)&tablename-fieldname&>8(11)&tablenamefieldname&.
mySAP Business Suite Designing a Label with ZebraDesigner™ To put the EAN/UCC bar code on the label, complete these steps: 12. Move the cursor on the label and click. The Bar Code Object dialog box opens. 13. Select the variable to use and click Finish. 14. Right-click on the bar code and select Bar code Properties. 15. In the Human Readable tab, select Below bar code. 16. Click OK. For more details on the specification s for the application identifiers, see the ZPL Programming guide on Code 128 subsets.
mySAP Business Suite Uploading Logos from ZebraDesigner™ Standard Text Files Uploading Logos from ZebraDesigner™ Standard Text Files To upload logos, do the following: 1. To the Standard Text: Request dialog box (below) transaction, in the command line text box by type /nSO10. 2. Click or press Enter. A dialog box similar to this opens: © SAP AG 2006. All rights reserved. 3. From the Standard Text: Request dialog box (below), in the Text Name field type a name, such as UL.
mySAP Business Suite Uploading Logos from ZebraDesigner™ Standard Text Files 4. Click or press F5. A dialog box similar to this opens: © SAP AG 2006. All rights reserved. 5. From the main menu of the Change Standard Text: Request dialog box (below), select Text > Upload. A dialog box similar to this opens: © SAP AG 2006. All rights reserved. 6. Select ASCII. 7. Click 01/19/2010 or press Enter.
mySAP Business Suite Uploading Logos from ZebraDesigner™ Standard Text Files A dialog box similar to this opens: © SAP AG 2006. All rights reserved. 8. The Import ASCII file dialog box prompts for File and its location. Use the browse button to navigate to the file. The graphic files will be stored in the C:\Program Files\ZebraDesigner for mySAP Business Suite 2\Templates directory. The files will be named using the name of the graphic and an .zpl extension.
mySAP Business Suite Uploading Labels from ZebraDesigner™ into mySAP Business Suite™ Layout Sets / Forms Uploading Labels from ZebraDesigner™ into mySAP Business Suite™ Layout Sets / Forms To upload labels, do the following: 1. Open the Standard Text: Request transaction dialog box.In the command line, type /nSO10. A dialog box similar to this opens: 2. Click or press Enter. 3. In the Standard Text: Request dialog box (below), enter a name for the Text Name, such as ZEBRATEMP.
mySAP Business Suite Uploading Labels from ZebraDesigner™ into mySAP Business Suite™ Layout Sets / Forms A dialog box similar to this opens: © SAP AG 2006. All rights reserved. 5. From the main menu in the Change Standard Text: Request dialog box (below), select Text > Upload. A dialog box similar to this opens: © SAP AG 2006. All rights reserved. 6. Select ITF. 7. Click or press Enter. A dialog box similar to this opens: © SAP AG 2006. All rights reserved.
mySAP Business Suite Uploading Labels from ZebraDesigner™ into mySAP Business Suite™ Layout Sets / Forms 8. The Import ITF file dialog box prompts you for the ITF file and location. Use the browse button to locate the file ZebraDesigner™ normally stores .itf files in the \ZebraDesigner For mySAP Business Suite 2\Templates directory. 9. When you have selected the file, click or press Enter. A dialog box similar to this opens: © SAP AG 2006. All rights reserved. 10.
mySAP Business Suite Uploading Labels from ZebraDesigner™ into mySAP Business Suite™ Layout Sets / Forms A dialog box similar to this opens: © SAP AG 2006. All rights reserved. 11. To copy your label into the internal SAP clipboard, click or press F6. 12. From the main menu, select Text > Exit. 13. To start the From Painter: Request transaction dialog box, in the command line type /nSE71. 14. Press Enter. In older versions of mySAP Business Suite™ this was known as the Layout Set: Request: 15.
mySAP Business Suite Uploading Labels from ZebraDesigner™ into mySAP Business Suite™ Layout Sets / Forms A dialog box similar to this opens: © SAP AG 2006. All rights reserved. 16. Fill in the fields as shown above. The Target form name will be the name by which the label will be accessed in the SAP system. 17. To execute, click or press F8. A dialog box similar to this opens: © SAP AG 2006. All rights reserved. 18.
mySAP Business Suite Uploading Labels from ZebraDesigner™ into mySAP Business Suite™ Layout Sets / Forms A dialog box similar to this opens: © SAP AG 2006. All rights reserved. 19. To start the From Painter: Request transaction dialog box. in the command line type /nSE71. 20. Press Enter. In older versions of mySAP Business Suite™ this was known as the Layout Set: Request. 21. In the Form Painter: Request dialog box, type the name for the Form name that was just created.
mySAP Business Suite Uploading Labels from ZebraDesigner™ into mySAP Business Suite™ Layout Sets / Forms A dialog box similar to this opens: © SAP AG 2006. All rights reserved. 22. Click 01/19/2010 .
mySAP Business Suite Uploading Labels from ZebraDesigner™ into mySAP Business Suite™ Layout Sets / Forms A dialog box similar to this opens: © SAP AG 2006. All rights reserved. This is a copy of the ZEBRA_DEMO sample form that you uploaded earlier. Copying the sample form ensures that the new form utilizes the exact same Basic settings and Page Windows. This ensures that your margins are 0, Paper is DINA3 and your font settings are correct.
mySAP Business Suite Uploading Labels from ZebraDesigner™ into mySAP Business Suite™ Layout Sets / Forms A dialog box similar to this opens: © SAP AG 2006. All rights reserved. Note • Zebra printers do not need multiple windows. They only need a one Main Window dialog box. 25. Click 01/19/2010 or press F9.
mySAP Business Suite Uploading Labels from ZebraDesigner™ into mySAP Business Suite™ Layout Sets / Forms A dialog box similar to this opens: © SAP AG 2006. All rights reserved.
mySAP Business Suite Uploading Labels from ZebraDesigner™ into mySAP Business Suite™ Layout Sets / Forms To paste the contents of the SAP clipboard into this Main Window, do the following: You are actually pasting Zebra ZPL SAPscript commands that are specific to Zebra printers. These commands are also dependent on the resolution of the printer that you are using. This means that if you require support for 200 and 300 dpi, then you will have to design a form for each resolution. 1. Click or press F9.
mySAP Business Suite Uploading Labels from ZebraDesigner™ into mySAP Business Suite™ Layout Sets / Forms Notes • ___________________________________________________________________ __________________________________________________________________________ __________________________________________________________________________ __________________________________________________________________________ __________________________________________________________________________ _________________________
Zebra Technologies Corporation Zebra Technologies Corporation 475 Half Day Road, Suite 500 Lincolnshire, IL 60069 USA T: +1 847 634 6700 Toll-free +1 866 230 9494 F: +1 847 913 8766 Zebra Technologies Europe Limited Dukes Meadow Millboard Road Bourne End Buckinghamshire, SL8 5XF, UK T: +44 (0)1628 556000 F: +44 (0)1628 556001 Zebra Technologies Asia Pacific, LLC 120 Robinson Road #06-01 Parakou Building Singapore 068913 T: +65 6858 0722 F: +65 6885 0838 http://www.zebra.com © 2009 ZIH Corp.