ZEBRA ZXP Series 1™ User’s Manual P1060728-002
Copyright Notice © 2013 ZIH Corp. This document contains information proprietary to Zebra Technologies Corporation. This document and the information contained within is Copyrighted by Zebra Technologies Corporation and may not be duplicated in full or in part by any person without written approval from Zebra.
Contents 1 • Getting Started . . . . . . . . . . . . . . . . . . . . . . . . . . . . . . . . . . . . . . . 1 ZXP Series 1 Part Numbers . . . . . . . . . . . . . . . . . . . . . . . . . . . . . . . . . . . . Features, Controls, and Indicators . . . . . . . . . . . . . . . . . . . . . . . . . . . . . . . Rear Panel Connectors . . . . . . . . . . . . . . . . . . . . . . . . . . . . . . . . . . . . . . . Multi-Function LCD Panel . . . . . . . . . . . . . . . . . . . . . . . . . . . . . . . . . . . . .
: Contents 4 • Printer Settings and Adjustments . . . . . . . . . . . . . . . . . . . . . . . 39 Introduction . . . . . . . . . . . . . . . . . . . . . . . . . . . . . . . . . . . . . . . . . . . . . . . . Printer Properties . . . . . . . . . . . . . . . . . . . . . . . . . . . . . . . . . . . . . . . . . . . General Tab . . . . . . . . . . . . . . . . . . . . . . . . . . . . . . . . . . . . . . . . . . . . Sharing Tab . . . . . . . . . . . . . . . . . . . . . . . . . . . . . . . . . . . . . . . . . . . .
1 Getting Started This manual contains installation and operation information for the Zebra ZXP Series 1 Card Printer, manufactured by Zebra Technologies Corporation. The printer provides full color dye sublimation or monochrome thermal transfer printing on standard CR-80, ISO 7810 format, 2.12 inch by 3.38 inch (54 mm by 86 mm) PVC or PVC Composite plastic 10-mil to 40-mil cards.
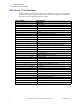
1: Getting Started ZXP Series 1 Part Numbers ZXP Series 1 Part Numbers The Part Number of a particular Zebra ZXP Series 1 Card Printer is shown on a label affixed to the bottom of the printer; that Part Number identifies the specific configuration for that printer.
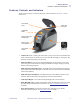
1: Getting Started Features, Controls, and Indicators Features, Controls, and Indicators The picture below points out some of the printer’s external features; see Section 3 for an interior view. Card Feeder Cover Quick Help QR Code Lid Release Button Multi-Function LCD Display Panel Multi-Function Control Button Card Output Hopper Zebra Print Touch Tag • Card Feeder Cover - Opening the Card Feeder Cover gives access to the automatic card feeder.
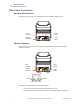
1: Getting Started Rear Panel Connectors Rear Panel Connectors Standard USB Connection The figure below shows the rear of the Printer with the standard USB connection. USB Connector Power Socket Security Cable Slot Power Switch Ethernet Connection The figure below shows the rear of the printer with the standard USB interface with the Ethernet connection.
1: Getting Started Multi-Function LCD Panel Multi-Function LCD Panel Your printer is equipped with a Multi-Function LCD Panel to provide printer status information. The readout is controlled by the Multi-Function Control Button directly below the viewing window. Multi-Function LCD Panel messages fall into three categories: Operational, Warning, and Error. Operational Messages Operational Messages are displayed during the Printer’s normal operation.
1: Getting Started Multi-Function LCD Panel Warning Messages Warning messages alert the operator to action that should be taken; the printer will generally continue operation. WARNINGS (Printer will still operate) CHECKING RIBBON CLEAN PRINTER CLOSE LID ENCODING ERROR INVALID MAGNETIC DATA Error Messages Error messages are displayed when a situation causes the printer to stop operating.
1: Getting Started Zebra Supplies Icons Throughout this manual, different icons highlight important information, as follows: Note • Indicates information that emphasizes or supplements important points of the main text. Important • Advises you of information that is essential to complete a task, or points out the importance of specific information in the text. Provides an example or scenario to demonstrate or clarify a section of text.
8 Zebra ZXP Series 1 Card Printer User’s Manual P1060728-002
2 Printer Installation Unpacking Your Card Printer Your ZXP Series 1 Card Printer ships in a cardboard carton, protected by foam inserts and a protective anti-static bag. Keep all packaging material in case you need to move or re-ship the printer. Step 1. Before opening and unpacking the printer, inspect the carton to ensure that no damage occurred during shipment. Step 2. Ensure that you have a clean and nearly dust free environment for proper operation and storage of the printer. Step 3.
2: Printer Installation Installing the Printer Installing the Printer Setting up the Printer Step 1. Place the printer in a location that allows easy access to all sides. The printer should never be operated while resting on its side or upside down. Step 2. Remove the yellow CAUTION label from the back of the printer. Step 3. Ensure that the printer’s power switch is in the OFF (O) position.
2: Printer Installation Installing the Printer Connecting Power Caution • Limit electrical power supplied to the printer to 24 VDC. Limit excess current draw to 16 amps or less, using an associated circuit breaker or other such device. Never operate the printer in a location where operator, computer, or printer can get wet. Personal injury could result. The printer must be connected to an earthed electrical power supply and properly protected against electrical surges and grounding faults.
2: Printer Installation Installing the Printer Connecting the Printer to your Computer Step 1. If your printer has only the USB interface, attach the included USB cable to your computer and the printer. Step 2. If your printer has the optional Ethernet interface (as well as the USB interface), connect either the USB cable to printer and computer or the Ethernet cable to the printer and the Ethernet network.
2: Printer Installation Viewing Printer Information Viewing Printer Information Step 1. Turn printer power ON, wait until the LCD Display Panel shows READY, turn printer power OFF, and then wait a minimum of 20 seconds. Step 2. While holding down the Control Button, turn printer power ON. The LCD Display Panel will glow blue. LCD Display Panel Control Button Step 3. Keep pressing the Control Button, and observe the LCD Display Panel show Initializing and CHECKING RIBBON. Step 4.
2: Printer Installation Installing the Windows Printer Driver Installing the Windows Printer Driver Installing the USB Printer Driver Note • To install the Ethernet driver, see page 19. Step 1. If not already done, connect power to the printer. Turn power OFF. Step 2. Connect the USB port on the rear of the printer to the computer’s USB port. Step 3. Ensure that the Printer’s power switch is in the OFF (O) position. Step 4.
2: Printer Installation Installing the Windows Printer Driver Step 7. Select Install USB printer drivers, and click the Next button. Step 8. Ensure that the Printer’s power switch in the OFF (O) position; and then click the OK button. Step 9. This will bring up the License Agreement window. To proceed with the installation, click the Yes button.
2: Printer Installation Installing the Windows Printer Driver Step 10. This will bring up the Setup Type window. Select Complete to install all program features, and click the Next button. Step 11. This will bring up the Select Program Folder window. Type in a new folder name or select one from the existing folders list, and click the Next button.
2: Printer Installation Installing the Windows Printer Driver Step 12. Observe the Setup Status window. Step 13. The Congratulations window will appear. Step 14. At this point, turn on your printer; and then click the Next button. The Windows New Hardware Found wizard will find the printer.
2: Printer Installation Installing the Windows Printer Driver Step 15. When the InstallShield Wizard Complete window appears, click the Finish button. Step 16. This completes USB driver installation. Note • You may need to change the card setup (card orientation, ribbon type, etc.), encoding, overlay, and/or black panel settings via the Printer Driver; see Printing Preferences on page 51.
2: Printer Installation Installing the Windows Printer Driver Installing the Ethernet Printer Driver Note • To install the USB driver, see page 14. Important • The Ethernet Network must be configured correctly, with the Printer and the host computer on the same subnet mask. If you are not sure how to verify this or change the configuration, consult someone knowledgeable on Ethernet Networks. Step 1. If not already done, connect power to the printer. Turn power ON. Step 2.
2: Printer Installation Installing the Windows Printer Driver Step 7. Select Install Ethernet printer drivers, and click the Next button. Step 8. This will bring up the License Agreement window. To proceed with the installation, select the I accept the terms of the license agreement option, and then click the Next button.
2: Printer Installation Installing the Windows Printer Driver Step 9. This will bring up the Setup Type window. Select Complete to install all program features, and click the Next button. Important • To get the printer’s IP Address, see Viewing Printer Information on page 13. Step 10. Select the Zebra ZXP Series 1 Printer radio button (circled below), and click the Refresh button. Step 11. Setup will find and list all Zebra ZXP Series 1 Printers on the network.
2: Printer Installation Installing the Windows Printer Driver Step 12. This will bring up the Select Program Folder window. Type in a new folder name, or select one from the existing folders list; and click the Next button. Step 13. Observe the Setup Status window. Step 14. When the Congratulations window will appears, click the Next button.
2: Printer Installation Installing the Windows Printer Driver Step 15. When the InstallShield Wizard Complete window appears, click the Finish button. Step 16. This completes Ethernet driver installation. Note • You may need to change the card setup (card orientation, ribbon type, etc.), encoding, overlay, and/or black panel settings via the Printer Driver; see Printing Preferences on page 51.
2: Printer Installation Setting Up a Network Printer Setting Up a Network Printer Use this procedure if you have already installed an Ethernet printer on your system (refer to Section 2), and you want to install a second Ethernet printer on the network via the Microsoft Add Printer Wizard. Step 1. Click on the Start button, then select Devices and Printers. Step 2. Observe the Devices and Printers window. Step 3. Click on the Add a printer option in the Taskbar (arrow above). Step 4.
2: Printer Installation Setting Up a Network Printer Step 6. Observe the Choose a printer port window. Step 7. Select the Create a new port radio button (1st arrow above). Step 8. From the dropdown menu, select Standard TCP/IP Port (2nd arrow above). Step 9. Click on the Next button. Step 10. Observe the Type a printer hostname or IP address window. Step 11. Enter the IP address of your printer in the Hostname or IP address text box (circled above).
2: Printer Installation Setting Up a Network Printer Step 14. Observe the Install the printer driver window. Step 15. Select the Manufacturer and the Printer (arrows above). Step 16. Click on the Next button. Step 17. Observe the Which version of the driver do you want to use window. Step 18. Select the Use the driver that is currently installed radio button (arrow above). Step 19. Click the Next button.
2: Printer Installation Setting Up a Network Printer Step 20. Observe the Type a printer name window. Step 21. Enter the printer name: use the default name, or add more information to indicate the printer location; e.g., Ed’s Printer, Mike’s Office, Room 33, etc. Step 22. Click the Next button. Step 23. Observe the You’ve successfully added ... window. Step 24. If appropriate, select the Set as the default printer checkbox (arrow above). Step 25.
2: Printer Installation Printer Pooling Printer Pooling Setting Up Printer Pooling Printer Pooling is a standard feature of Windows, which lets you spread the printed output across a pool of several printers. In this example, we will install and setup the three network printers to be used for pooling. Step 1. Before proceeding to pool the printers, test them individually, and be sure they are configured similarly.
2: Printer Installation Printer Pooling Using Printer Pooling Important • Send print jobs to the printer pool, not to an individual printer. When the first printer has taken as many jobs as it can handle (that being two jobs - one to be printed immediately, the other waiting), the following jobs “spill over” to the second printer, and then to the third printer. Note that if you are only printing two jobs, they would both go to the first printer. Pooling is a spill-over methodology.
30 Zebra ZXP Series 1 Card Printer User’s Manual P1060728-002
3 Printer Setup Printer Features The following shows an interior view of the ZXP Series 1 Card Printer.
3: Printer Setup Loading Ribbon Cartridge Loading Ribbon Cartridge The ZXP Series 1 Printer requires genuine Zebra ZXP Series 1 True Colours® ix Series Ribbons. These high-performance Resin Thermal Transfer and Dye Sublimation ribbons are specifically designed for the ZXP Series 1 Printer. • Each ribbon cartridge includes an integrated adhesive cleaning roller assembly that is used to clean the cards entering the printer.
3: Printer Setup Loading Ribbon Cartridge 3. Insert the ribbon cartridge with the cleaning roller facing down, so the gears on the ends of the rollers fit into the appropriate slots. 4. Close the printer lid and push down until you hear an audible click. Note • After the lid is closed, the ribbon automatically synchronizes when the printer power is on.
3: Printer Setup Loading Cards Loading Cards Card Feeder The card feeder is used for loading cards, it can hold up to 100 cards of 30-mil thickness. The card feeder is located under the card feeder cover of the printer.Check with your card vendor or packaging label to identify the thickness of your cards. A typical card thickness is 30 mil. 1. Set the card thickness adjustment (circled below) to the number corresponding to the thickness of the cards being loaded.
3: Printer Setup Loading Cards 3. Slide the card guide all the way to the right until it locks in place with an audible click. Caution • Hold the cards by the edges only. DO NOT touch print surfaces as this can reduce print quality. 4. Remove the wrapper from the card stack. 5. Examine the cards, and discard any cards with damaged edges. 6. Holding the card stack by its sides, fan the cards (like flexing a deck of playing cards) at least once from each end, so as to separate all the cards. 7.
3: Printer Setup Loading Cards Card Output Hopper 1. Raise the printer lid. 2. Pull the card output hopper down to place it in its functional position. 3. When not using the printer, place the card output hopper back in its closed position to protect the printer from dust.
3: Printer Setup Printing a Test Card Printing a Test Card With ribbon cartridge and cards loaded, your printer is ready to print. To check the operation of the printer, you should print a test card. 1. Select Start > Devices and Printers. Right click on the Zebra ZXP Series 1 Card Printer listing. Select Printer properties > Device Settings; and click on the Tools button. 2. Observe the Tools window. 3. From the Print Test Card dropdown menu, select the desired test card (circled above). 4.
3: Printer Setup Typical Printer Operation Typical Printer Operation The ZXP Series 1 Card Printer can be used with your software application program, using the Drivers on the CD provided with your Printer; refer to Installing the Windows Printer Driver on page 14. Creating a Sample Card Before you begin a new printing session, print a sample card to ensure that the cards will be printed correctly. Follow the steps below to print your first card. 1. Open a new Microsoft Word document. 2.
4 Printer Settings and Adjustments Introduction This section describes the settings and adjustments that can be made to your ZXP Series 1 Printer Driver: Printer Properties. . . . . . . . . . . . . . . . . . . . . . . . . . . . . . . . . . . . . . . . . . . . . . . . . 40 Printing Preferences . . . . . . . . . . . . . . . . . . . . . . . . . . . . . . . . . . . . . . . . . . . . . .
4: Printer Settings and Adjustments Printer Properties Printer Properties Note • The screen shots shown in this section are for a printer using the USB interface. If you are using the Ethernet interface, the screens will refer to the “Network Printer.” Screen shots may also look different depending on your Operating System. Access to Card Printer Properties varies depending on your Operating System (OS); e.g., for Windows 7, select Start > Devices and Printers.
4: Printer Settings and Adjustments Printer Properties General Tab The General tab shows the selected printer and lists the features of the printer. • Location - Lets you specify where the printer is located. • Comment - Lets you specify general information about the printer, such as the type of print device and who is responsible for it. Once set, these fields can be displayed by applications. • Model - Specifies the name of the printer driver installed.
4: Printer Settings and Adjustments Printer Properties Sharing Tab On the Sharing tab, you can choose to share the printer over the network and install additional drivers to accommodate different operating systems. See Appendix A for the various printer sharing options allowed and the configurations required. Printer sharing tasks that you can perform include: • To share a printer, select the Share this printer checkbox; and specify a name for the shared resource.
4: Printer Settings and Adjustments Printer Properties Ports Tab Use the Ports tab to specify the computer port to which the printer is connected. This will have been established at the initial installation of the printer. An exception to this is if you wish to use printer pooling, the ability to distribute print jobs to multiple printers; see Printer Pooling on page 28 for details. To enable printer pooling, select the Enable printer pooling checkbox, then check the additional ports boxes.
4: Printer Settings and Adjustments Printer Properties Advanced Tab The Advanced tab determines the spooling (queuing) of print jobs and determines how spooled jobs are handled relative to the most recent job. You can make the printer always available by selecting the Always available radio button, or you can limit availability by selecting the Available from radio button and specifying the “Available from” and “To” times. Click the Apply button, and then the OK button.
4: Printer Settings and Adjustments Printer Properties Color Management Tab This is the standard Windows color management screen, showing user access to various printer control options.
4: Printer Settings and Adjustments Printer Properties Security Tab This is the standard Windows security screen, showing user access to various printer control options.
4: Printer Settings and Adjustments Printer Properties Device Settings Tab The Device Settings tab provides device information, security status, and printer usage. Device Information • Model: Specifies the printer model number. • Fw version: Specifies the printer model and the installed firmware version. • Serial number: Specifies the printer serial number. • Ribbon type: Specifies the ribbon installed in the printer. • Head resistance: Specifies the printhead resistance value.
4: Printer Settings and Adjustments Printer Properties Save/Restore Dialog box for saving printer and driver settings or restoring previously saved settings. To save settings: Step 1. Click on the appropriate Save button (Printer Settings or Driver Settings). Step 2. Observe a browse window showing the default location where the configuration files are saved. The location depends on the Operating System; e.g., for Windows 7, C:\Program Data\ZXPS1\config. Step 3.
4: Printer Settings and Adjustments Printer Properties Tools Dialog box for testing and communicating with the printer. P1060728-002 • Command to send to printer - Enter a printer command (all capitals without the leading escape character) in the top edit box; e.g., MI MO, which will pick and eject one card. Then click on the Execute button. Printer Status will show the status of the command. Contact Zebra Technical Support for a complete list of the printer commands.
4: Printer Settings and Adjustments Printer Properties Firmware Download This option is used to install the ZXP Series 1 firmware, downloaded from the Zebra web site at http://www.zebra.com under Drivers & Downloads. Important • Do not turn off the power to the printer until the process is done and the LCD Display shows READY. If the download process is interrupted, the printer will not operate. Step 1. Download the firmware from Zebra web site ( http://www.zebra.
4: Printer Settings and Adjustments Printing Preferences Printing Preferences Note • The screen shots shown in this section are for a printer using the Ethernet interface. The screens refer to the “Network Card Printer.” If you are using the USB interface, the screens will refer to the “USB Card Printer.” If you are using a network driver on a server, set the parameters from the Advanced Tab, Printing Defaults. Access to Card Printing Preferences varies depending on your Operating System (OS); e.g.
4: Printer Settings and Adjustments Printing Preferences Card Setup Tab Card Setup tab allows the user to adjust selected card and print job parameters. • Printing options - Orientation: Selection for portrait or landscape printing. Portrait - 52 Landscape Rotate 180o: Selection for rotating the image 180o. The options are No and Yes.
4: Printer Settings and Adjustments Printing Preferences - Monochrome Conversion: Specifies the method of monochrome conversion used in printing. Different selections have different effects on the way the image is printed. The options are Diffusion, Halftone, Barcode, Text Mode, and Auto.
4: Printer Settings and Adjustments Printing Preferences - - - Monochrome Conversion SUMMARY • Diffusion/Halftoning: Use on pictures. Image content dictates if error diffusion or halftoning would look best. For the majority of time, diffusion is better. • Barcode: Use on text, barcodes, line art, and simple graphics. • Text Mode: Use with black anti-alised text. Printing Mode - Sets the type of printing required: • Print.
4: Printer Settings and Adjustments Printing Preferences Black (K) Panel Options The Black Panel Options window is available when using K panel ribbons; e.g., YMCKO. The figure below shows settings for the front side of the card. To set how the printer prints the black areas of color images, several selections must be made: • P1060728-002 Select black panel extraction type: - Disable black extraction does not use the K panel for any part of the image.
4: Printer Settings and Adjustments Printing Preferences • Apply black extraction on: Option 1. Black text applies black extraction to areas of the image identified as text; e.g., company name, address. Zebra Technologies Option 2. Black graphics applies black extraction to areas of the image identified as graphics primitives; e.g., lines, circles, rectangles, area fills, etc. Option 3.
4: Printer Settings and Adjustments Printing Preferences • Black extraction from color images: - - P1060728-002 Print black with K panel: • Defined areas applies black extraction to areas of the image inside of the zones specified in the Area manager. • Undefined areas applies black extraction to areas of the image outside of the zones specified in the Area manager. • Full card applies black extraction to the entire image.
4: Printer Settings and Adjustments Printing Preferences • Area manager: This option is enabled when either the Defined areas (extract inside the zone) or the Undefined areas (extract outside the zone) radio button is selected. • Orientation: The Orientation selection sets the image orientation to either Portrait or Landscape. • Units: The Units selection sets the units to either inches or mm (millimeters). The X-dimension, X-offset, Y-dimension, and Y-offset reflect these units.
4: Printer Settings and Adjustments Printing Preferences Black Panel Print Overview This section covers special handling of black data specified on the “Black Panel (K)” tab and applies only to surfaces of the card on which both YMC (color) and K (black) are to be printed. Reasons and Behavior for Black Panel Extraction To print black during the print process, equal amounts of process colors Y, M, and C (printer ribbon panels) are delivered, with maximum intensity, to create a near-black image.
4: Printer Settings and Adjustments Printing Preferences If the printer is set up to print both YMC and K on the same side, text, lines and pixels, area fills and monochrome bitmaps, if (and only if) designated black by the application, can be directed to the K panel. For this to happen, the graphic type in question has to be selected on the “Black Panel (K)” tab. For text, lines and pixels, area fills and monochrome bitmaps the designation “black” is set at RGB values of 0,0,0.
4: Printer Settings and Adjustments Printing Preferences Overlay Varnish Options The Overlay Varnish Options window allows you to manage and configure the use of the Overlay when the selected ribbon shows the O panel (e.g. YMCKO). Select the overlay varnish type - Option selection for applying overlay varnish ribbon to a card. Default setting is full edge-to-edge varnish. There are various varnish options. A preview pane is shown for each selection.
4: Printer Settings and Adjustments Printing Preferences Job Log The Job Log is a utility that builds a database of card transactions in the printer’s host computer. The Job Log records the data encoded on the card’s magnetic stripe, together with date, time, and the printer’s serial number. The data set can be uploaded at any time to a central archive, thus providing a means for security officers to validate a card by comparing it with tamper-proof real data.
4: Printer Settings and Adjustments Printing Preferences • Log File Contents - The Log File Contents group selects the data to be logged in the file you specified above. The data will be logged in the order displayed on the screen, each field being separated by the character specified in the Logfile Definition, Separator. Log File Contents selections include: - Time: Logs the time a which the card was sent to the printer in the HH:MM:SS format.
4: Printer Settings and Adjustments Printing Preferences Image Control Note • Printed colors can appear different than displayed colors; the following controls allow you to optimize the printed results. Allows you to adjust the image colors; these adjustments apply to the entire card, not just photographic image. - Intensity - increase or decrease the image intensity by moving the Black, Yellow, Magenta, and Cyan slider bars left or right. This will change the overall lightness or darkness of the image.
4: Printer Settings and Adjustments Printing Preferences Encoding Tab The Encoding tab dialog box is for setting Magnetic Encoder parameters. This feature is not enabled if the printer does not have the magnetic encoder option. To access the Encoding tab, select Start > Devices and Printers. Right click on the Zebra ZXP Card Printer listing, then select Printing preferences > Encoding. • Enable macro processing - This option is used to set the encoding preamble and other magnetic encoder parameters.
4: Printer Settings and Adjustments Printing Preferences • Direct Encoding - For writing data and reading encoded data. Track selection: - To read encoded data: Click on the checkboxes to select the desired track(s), click on the Read button, and validate the data read. - To write data: Click on the checkboxes to select the desired track(s), enter the data to be written, and click on the Encode button. - To eject the card: Click on the Eject Card button to eject the card.
4: Printer Settings and Adjustments Printing Preferences Advanced Settings Advanced Settings provides advanced configuration capabilities and tools to manage magnetic encoder operation. This option is primarily used for Non-ISO encoding. • Track: Select the track you want to configure. • Track Settings: - Mode: Select ISO1, ISO2, ISO3, 3 bit, 4 bit, 5 bit, 6 bit, or 7 bit. - Density: Select 75 bpi or 210 bpi for the tracks.
4: Printer Settings and Adjustments Printing Preferences About Tab This tab specifies the Printer Model, the Driver Version, and the Zebra Technologies Corporation Copyright. To access the About tab, select Start > Devices and Printers. Right click on the Zebra ZXP Card Printer listing, then select Printing preferences > About.
5 Cleaning Cleaning the System Caution • PROTECT YOUR FACTORY WARRANTY! The recommended maintenance procedures must be performed to maintain your factory warranty. Other than the recommended cleaning procedures described in this manual, allow only Zebra authorized technicians to service the ZXP Series 1 Card Printer. NEVER loosen, tighten, adjust, or bend, etc., a part or cable inside the printer. NEVER use a high-pressure air compressor to remove particles in the printer.
5: Cleaning Cleaning the System How to Clean Note • Cleaning can also be performed via the Tools dialog box; see Tools on page 49. Step 1. Place the printer power switch in the ON ( | ) position. Step 2. When the printer LCD shows READY, hold down the Multi-Function Control Button for five seconds. Step 3. When the cleaning cycle is initiated, the LCD message REMOVE RIBBON THEN CLOSE LID will display. Open the lid, remove the ribbon, and close the lid.
5: Cleaning Cleaning the System Step 6. When the presence of the cleaning card is sensed, the rollers will take the card into the printer; and the cleaning process will begin. Step 7. When the cleaning process is completed, the printer will eject the cleaning card. Step 8. The message INSERT FEEDER CLEANING CARD will display. Open the feeder cover, and insert the feeder cleaning card. Step 9. When the feeder cleaning card has been sensed by the feeder card sensor, the message CLOSE COVER will display.
5: Cleaning Cleaning the Printhead Cleaning the Printhead Use of the cleaning cards will normally do an adequate job of cleaning the printer. However, a separate Printhead cleaning, using swabs, can remove more stubborn deposits when print anomalies persist. To avoid deposits, only use foam-tipped swabs. Caution • Never use a sharp object to scrape deposits from the printhead. Permanent damage to the printhead will result Step 1. Place the printer power switch in the OFF (O) position. Step 2.
6 Troubleshooting Introduction The objective of troubleshooting is to relate a problem to an associated assembly or system function, in order to most efficiently isolate and repair the problem. Typically, this involves determining the failure symptom and then checking one or more possible causes of the failure. In general, for a given failure symptom one or more possible causes are listed, with suggested corrective action to take.
6: Troubleshooting Troubleshooting Procedures Troubleshooting Procedures LCD Panel Warnings and Error Messages The following tables show causes and solutions to symptoms related to improper operation. Check the table when experiencing any loss of operation or print quality. PANEL WARNINGS (printer will still operate) Problem / Symptom Description or Cause Possible SolutionNote CHECKING RIBBON Printer is determining type of ribbon installed. No action required -- status message only.
6: Troubleshooting Troubleshooting Procedures ERROR MESSAGES (printer will not operate) Problem / Symptom Description or Cause Possible SolutionNote CHECK RIBBON Wrong type of ribbon may be installed. Ribbon for P1XX or ZXP3 will not work. Install proper ribbon. Ribbon may be improperly installed. Reload ribbon cartridge. Refer to Loading Ribbon Cartridge on page 32. COMMAND ERROR A command error occurred. Reset the Printer, and try printing the card again. COVER OPEN The cover is open.
6: Troubleshooting Troubleshooting Procedures ERROR MESSAGES (printer will not operate) Problem / Symptom Description or Cause Possible SolutionNote MECHANICAL ERROR (continued) The card feeder feeds two cards completely onto the card feed module. Calibrate the Card Load Sensor via the !SAP 1 command. For command implementation, refer to Tools on page 49. The card feeder partially feeds the second card, thereby blocking card feed module operation.
6: Troubleshooting Troubleshooting Procedures Print Quality Issues This section will help you resolve print quality problems. The print quality is dependent on several factors. The two most important factors that will increase your print quality are cleanliness and card stock.
6: Troubleshooting Troubleshooting Procedures Example • Small spots Small spots appear on the printed card with a non-printed area or a different color. Possible Cause: • Contamination on the card surface. Solutions: • Check that cards are stored in a dust free environment. • Use a different supply of cards. Possible Cause: • Dust inside the printer and/or dirty Cleaning Roller. Solutions: 78 • Clean the printer. Refer to Cleaning the System on page 69.
6: Troubleshooting Troubleshooting Procedures Example • Non-printing horizontal lines (white) There are non-printing horizontal lines (white) on the card surfaces. Possible Cause: • Ribbon cartridge is not correctly positioned. Solutions: • Ensure that the ribbon is properly rolled onto the ribbon cores of the cartridge and that there are no wrinkles in the ribbon. • Replace ribbon cartridge. Refer to Loading Ribbon Cartridge on page 32. Possible Cause: • Printhead is dirty.
6: Troubleshooting Troubleshooting Procedures Example • Pale or inconsistent results Printing shows very pale or inconsistent results. Possible Cause: • Ribbon cartridge have been stored improperly or is damaged. Solution: • Change ribbon cartridge, and print again. Refer to Loading Ribbon Cartridge on page 32. Possible Cause: • Cards may not meet specifications. Refer to Technical Specifications on page 83. Solution: • Use a different supply of cards.
6: Troubleshooting Troubleshooting Procedures Example • Blurry printed image Printing shows blurry printed image. Possible Cause: • Ribbon cartridge may not be correctly positioned. Solution: • Check that the ribbon is properly rolled onto the ribbon cores of the cartridge, with no wrinkles. • Replace ribbon cartridge, making sure it locks in place, and print again. Refer to Loading Ribbon Cartridge on page 32. Possible Cause: • Ribbon may not be synchronized on the correct color panel position.
6: Troubleshooting Troubleshooting Procedures Example • No printing No printing on the card. Possible Cause: • Ribbon cartridge may not be installed in the printer. Solution: • Check for ribbon cartridge in the printer. Refer to Loading Ribbon Cartridge on page 32. Possible Cause: • Cards may not meet specifications. Refer to Technical Specifications on page 83. Solution: • Use a different supply of cards. Possible Cause: • Cable on Printhead may be disconnected.
7 Technical Specifications Specifications Specifications are provided for reference and are based on printer tests using Zebra brand consumables. Results may vary in actual application settings or when using other than recommended Zebra supplies. Zebra recommends always qualifying any application with thorough testing.
7: Technical Specifications Specifications Printing Specifications • Dye-sublimation thermal transfer direct to card • Full color or monochrome printing • Single-sided printing • 500 cph monochrome single-sided • 120 cph single-sided YMCKO • Edge-to-edge printing on standard CR-80 media Printing Throughput Printing throughput (cards per hour) based on click to drop printing, average print coverage, with USB connectivity. Times may vary depending on the computer and other configurations.
7: Technical Specifications Specifications Physical Specifications (standard model) Printer Height Width Depth Weight 9.3" 7.9" 13.0” 11.6 lbs (236 mm) (200 mm) (330 mm) (5.3 kg) Electrical Specifications • Auto-switching single-phase AC power • Operating range: 90-132VAC and 190-264VAC RMS. • Frequency range : 47-63 Hz.
7: Technical Specifications Specifications Environmental Specifications • Operating Temperature: 60º F to 86º F (15º C to/30º C) • Storage Temperature: 23º F to 131º F (-5º C to 55º C) • Operating Humidity: 20% to 65% non-condensing • Storage Humidity: 20% to 70% non-condensing • Media Storage: - Temperature: 41º F to 77º F (5º C to 30º C) - Humidity: 35% to 65% non-condensing - Store in dark location Agency Approvals Zebra ZXP Series 1 Card Printer complies with following applicable directives
7: Technical Specifications ISO Standard Card Dimensions ISO Standard Card Dimensions Dimensions for Plain Card ISO Standard 7810 2.125 ± 0.002 in (53.98 ± 0.050 mm) Radius 0.125 in (3.18 mm) 3.375 ± 0.010 in (85.72 ± 0.25 mm) 0.009 ~ 0.034 in (0.23 ~ 0.84 mm) Dimensions for Magnetic Stripe Card ISO Standard 7811 0.623 in (15.82 mm) min 0.218 in (5.54 mm) max MAGNETIC STRIPE 0~0.115 in (2.92 mm) 0~0.115 in (2.92 mm) Contact Location for Smart Card ISO Standard 7816 0.757 in (19.23 mm) 1.
7: Technical Specifications Compliance Information Compliance Information FCC Compliance Statement This device complies with Part 15 rules. Operation is subject to the following two conditions: 1. This device may not cause harmful interference, and 2. This device must accept any interference received, including interference that may cause undesired operation. This equipment has been tested and found to comply with the limits for Class A Digital Devices, pursuant to Part 15 of the FCC Rules.
7: Technical Specifications Compliance Information European Union and EFTA The Class 2 RLAN may be operated in the following countries with the restrictions and limitations indicated below. AT FI LV RO IS BE FR LT SK LI BG DE LU SI NO CY GR MT ES CH CZ HU NL SE DK IE PL GB EE IT PT Important Notice: Operation in band 5150 – 5350 MHz shall be restricted to indoor use.
90 Zebra ZXP Series 1 Card Printer User’s Manual P1060728-002
APPENDIX A Advanced Sharing Printer Sharing Configurations This section covers: Microsoft Driver Support Matrix . . . . . . . . . . . . . . . . . . . . . . . . . . . . . . . . . . . . . 92 Client / Server Printer sharing support Matrix . . . . . . . . . . . . . . . . . . . . . . . . . . .
A: Advanced Sharing Microsoft Driver Support Matrix Supported Windows 1 Drivers Microsoft OS One-to-One One-to-Many Many-to-One Many-to-Many 1 Printer 1 Host 1 Host - Many Printers Multiple Hosts (Drivers) One Printer Multiple Hosts (Drivers) Many Printers Windows 8 (32-bit) Yes Yes Yes Yes Yes Windows 8 (64-bit) Yes Yes Yes Yes Yes Server 2008 (64-bit) Yes Yes Yes Yes Yes Server 2008 (32-bit) Yes Yes Yes Yes Yes Server 2003 Yes Yes Yes Yes Yes Windows 7 (64-bit) Yes
A: Advanced Sharing Client / Server Printer sharing support Matrix The following Matrix shows the tested configurations between various Microsoft OS in a shared Client / Server print environment.
A: Advanced Sharing Advanced Sharing Settings This section covers the following Advanced Sharing Settings: Installing and setting up a Windows 2008 Server- - - - - - - - - - - - - - - - - - - - -94 Advanced Sharing Settings for Server R2 2008 - - - - - - - - - - - - - - - - - - - - - -95 Home or Work Network Settings: - - - - - - - - - - - - - - - - - - - - - - - - - - - -95 Public Network Settings: - - - - - - - - - - - - - - - - - - - - - - - - - - - - - - - - - -96 Advanced Sharing Settings for Server 2
A: Advanced Sharing Advanced Sharing Settings for Server R2 2008 Home or Work Network Settings: P1060728-002 Zebra ZXP Series 1 Card Printer User’s Manual 95
A: Advanced Sharing Public Network Settings: 96 Zebra ZXP Series 1 Card Printer User’s Manual P1060728-002
A: Advanced Sharing Advanced Sharing Settings for Server 2008 P1060728-002 Zebra ZXP Series 1 Card Printer User’s Manual 97
A: Advanced Sharing Advanced Sharing Settings for Windows 7 Home or Work Network settings: 98 Zebra ZXP Series 1 Card Printer User’s Manual P1060728-002
A: Advanced Sharing Public Network Settings: P1060728-002 Zebra ZXP Series 1 Card Printer User’s Manual 99
A: Advanced Sharing 100 Zebra ZXP Series 1 Card Printer User’s Manual P1060728-002
Appendix B Magnetic Encoder Option Introduction This section contains information on the additional operations of the ZXP Series 1 Card Printer with an optional Magnetic Encoder. This section covers: Encoder Settings (Driver) . . . . . . . . . . . . . . . . . . . . . . . . . . . . . . . . . . . . . . . . . . Media Loading Orientation. . . . . . . . . . . . . . . . . . . . . . . . . . . . . . . . . . . . . . . . . Magnetic Encoder Cleaning . . . . . . . . . . . . . . . . . . . . . . . . . . . . . . . . . .
B: Magnetic Encoder Option Encoder Settings (Driver) The Encoder Settings dialog box is used for setting various Magnetic Encoder parameters. This feature is not enabled if the printer does not have the magnetic encoder option.; see Encoding Tab on page 65 for details. Media Loading Orientation Caution • ONLY USE cards that comply with ISO 7810 & 7811 standards for magnetic stripe cards. The magnetic stripe must be flush to the surface of the card to work properly.
B: Magnetic Encoder Option Magnetic Encoding Type ISO (Default) The encoder reads and writes standard ISO track data formats in standard ISO track locations. The following shows the three standard ISO tracks.
104 Zebra ZXP Series 1 Card Printer User’s Manual P1060728-002
Appendix C CardSense Single-Card Feed Mode Introduction For operating the ZXP Series 1 Card Printer in single-card feed mode, the printer requires that the operator install an optional CardSense Single-Card Feed Kit. In the single-card feed mode, the printer will accept cards through the front slot.
C: CardSense Single-Card Feed Mode Installing the CardSense Single-Card Feed Kit Step 1. Turn printer power OFF. Step 2. Open the lid, and remove the ribbon cartridge. Important • Make sure the Card Output Hopper remains closed. Step 3. Install the black roller. Place it between the blue clips just behind the card entry slot, and press the roller straight down so it is fully seated. Step 4. While holding the roller down, turn power ON. You will hear a loud click as the clips secure the roller.
C: CardSense Single-Card Feed Mode Step 7. Remove the Cleaning Roller from the Cleaning Cartridge, and then remove the protective wrapper from the Cleaning Roller, Step 8. Place the Cleaning Roller in the Cartridge, and close the lid. Step 9. The Cleaning Cartridge is held in place by two clips. While gently squeezing the clips inward, press the cartridge into place. It will seat with a click. Step 10.
C: CardSense Single-Card Feed Mode Setting Up the Printer Driver Card Setup tab allows the user to set the single-card feed mode. To access the Card Setup tab, select Start > Devices and Printers. Right click on the Zebra ZXP Card Printer listing, then select Printing preferences > Card Setup. Step 1. Make the appropriate Single Feed option selection from the Current Status dropdown menu: • Card feeder: The printer will attempt to a pull a card from the Card Feeder.
C: CardSense Single-Card Feed Mode Printing a Single Card Step 1. Cards are inserted one at a time into the slot on the front of the printer. Do not feed more than one card at a time. Note that the card must be fully inserted before printer turns on and accepts the card. INSERT CARD ZEBRA ZXP Series 1 Step 2. The card is printed. Step 3. The printed card is ejected out through the same (input) slot.
110 Zebra ZXP Series 1 Card Printer User’s Manual P1060728-002
Appendix D Half-Panel Ribbon Operation Introduction Half-Panel YMCKO Color Ribbons are used if you do not need full color printing over the entire surface of a card. These ribbons have half panels of YMC for ID pictures, logos, etc., for printing a 38mm wide window on the front of the card. The remaining panels are full-size black resin and clear overlay so black text and protection can be applied over the entire surface of the card. The position of the half panel is adjustable.
D: Half-Panel Ribbon Operation Setup and Operation Step 1. Install a Half-Panel YMCKO Ribbon Cartridge; see Loading Ribbon Cartridge on page 32. Step 2. Configure Driver Printing Preferences: 112 a. Select Start > Devices and Printers. Right click on the Zebra ZXP Card Printer listing. Select Printing preferences > Card Setup. b. Click on the K Panel Options button (arrow above).
D: Half-Panel Ribbon Operation P1060728-002 c. From the Black Panel Options dialog box, make the following selections (arrows below). d. Click the OK button to close the Black Panel Options dialog box. e. Click the OK button to exit Printing Preferences.
D: Half-Panel Ribbon Operation Step 3. Set Driver Printer Properties: 114 a. Select Start > Devices and Printers. Right click on the Zebra ZXP Card Printer listing. Select Printer properties > Device Settings. b. Click the Tools button (arrow above). This will bring up the Tools dialog box.
D: Half-Panel Ribbon Operation Step 4. Enter the half-panel command. a. From the Tools dialog box, type the command in the “Command to send to printer” field to position the print window on the card; e.g., HALF 0. Type the command here ... HALF 0 ... then click the Execute button. b. Click the Execute button. If successful the printer will respond with in the Printer Status field directly under the “Command to send to printer” field. c. Click the Close button to close the Tools dialog box.
116 Zebra ZXP Series 1 Card Printer User’s Manual P1060728-002
Appendix E Worldwide Support For Technical Support or Repair Services, contact the appropriate facility listed below. North America and Latin America - Technical Support T: E: +1 877 ASK ZEBRA (877 275 9327) +1 847 913 2259 ts1@zebra.com North America and Latin America - Repair Services Before returning any equipment to Zebra Technologies Corporation for in-warranty or out-ofwarranty repair, contact Repair Services for a Repair Order (RO) number. Mark the RO number clearly on the outside of the box.
E: Worldwide Support Europe, Middle East, and Africa - Technical Support Language Phone Email Arabic +971 (0)46058220 zebraCareUAE@zebra.com Dutch +31 (0)33 450 50 48 ZebraCareBNL@zebra.com (UK) +44 (0)1628 556 225 zebraCareUK@zebra.com (Sweden) +46 (0)8 594 709 88 zebraCareUK@zebra.com (South Africa) +27 (0)11 201 7712 / 0860 393272 zebracareSA@zebra.com French +33 (0) 1 53 48 12 74 zebraCareFR@zebra.com German +49 (0) 2159 676 870 zebraCareDE@zebra.
E: Worldwide Support Europe, Middle East, and Africa - Repair Services Before returning any equipment to Zebra Technologies Corporation for in-warranty or out-ofwarranty repair, contact your supplier for a Return Materials Authorization (RMA) number, or contact one ot the following repair centers for support and instructions: Type of repair and location Phone Email Depot Repair in Germany, Austria, Switzerland +49 (0) 2159 676 870 zebracareDE@zebra.
E: Worldwide Support Asia Pacific - Technical Support Zebra Technologies Asia Pacific Pte. Ltd. 120 Robinson Road #06-01 Parakou Building Singapore 068913 T: F: E: +65 6858 0722 +65 6885 0838 tsasiapacific@zebra.com Asia Pacific - Repair Services Before returning any equipment to Zebra Technologies Corporation for in-warranty or out-of warranty repair, contact Repair Services for a Return Materials Authorization (RMA) number.