
Installation Guide
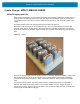

Table Of Contents
- Terms of Use
- Contents
- About This Document
- Hardware Specifications and Installation
- Lozier® Shelves
- MB1000 Beacon: MPACT-T1B20-000-WR
- MB1000 Beacon: MPACT-T1B10-000-WR
- MPACT-MB2000-01-WR, MPACT-MB1000-01-WR, MPACT-MB2001-01-WR, MPACT-SB2000-01-WR
- USB Beacon: MPACT-MB3000-01-WR
- Beacon Part Numbers: MPACT-MB4000-01-WR and MPACT-MB4001-01-WR
- Beacon: MPACT-MB1000-01-WR and MPACT-SB1100-01-WR
- Fixed IoT Bridge (hub): MB5000-01-WR
- Mobile IoT Bridge (badge): MB6000-01-WR
- Cradle Charger: MPACT-MB6000-CHRGR
- Troubleshooting

Hardware Specifications and Installation
34
Cleaning the Charging Cradle
The following materials are required to clean the charging cradle:
• Alcohol wipes
• Cotton tipped applicators
• Can of compressed air
Cleaning frequency is discretionary in respect to the environments the charger and the badges are
deployed. They may be cleaned as frequently as required.
When using sodium hypochlorite (bleach) based disinfectants to clean the product, always follow the
manufacturers recommended instructions regarding the use of gloves during application and to remove
the residue afterwards with a damp cloth to avoid prolonged skin contact while handling the scanner.
Please note that due to the powerful oxidizing nature of sodium hypochlorite the metal surfaces on the
product are prone to oxidation (corrosion) when exposed to this disinfectant in the liquid form and should
be removed promptly after cleaning with a damp cloth.
Cleaning frequency is discretionary in respect to the environments the MB6000-01-WR and the
MB6000-CHRGR are deployed. They may be cleaned as frequently as required.
Use pre-moistened wipes to clean the unit. Do not allow liquid cleaners to pool or remain on the unit.
Cleaning the Badge Contacts
To clean the contacts on a badge before inserting into the charging cradle:
1. Dip the cotton portion of the cotton tipped applicator in isopropyl alcohol.
2. Rub the cotton portion of the cotton tipped applicator back-and-forth across the contacts. Do not leave
any cotton residue on the contacts (repeat at least three times).
3. Use a dry cotton tipped applicator to clean any moisture or residue remaining on the contacts.
4. Spray compressed air on the contact area by pointing the nozzle about ½ inch away from the surface.
5. Inspect the area for any grease or dirt, repeat this process if required.
Cleaning the Cradle Connectors
To clean the connectors within the cradle:
1. Unplug the unit from the AC wall outlet and remove the DC power cable from the cradle.
2. Dip the cotton portion of the cotton tipped applicator in isopropyl alcohol.
3. Rub the cotton portion of the applicator along the connector pins. Slowly move the applicator
back-and-forth on the connector to the other. Do not leave any cotton residue on the connector. All
sides of the connector should also be rubbed with the cotton tipped applicator.
4. Spray compressed air in the connector area by pointing the tube/nozzle about ½ inch away from the
surface.
5. Ensure there is no lint left by the cotton tipped applicator, remove any lint if found.
6. If grease or other dirt can be found on other areas of the cradle, use a lint free cloth and alcohol to
remove.
7. Allow at least 10–30 minutes (depending on ambient temperature and humidity) for the alcohol to air
dry before applying power to cradle. If the temperature is low and the humidity is high, a longer drying
time is required. Warm temperatures and dry humidity require less drying time.