
Installation Guide
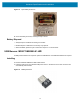
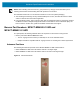
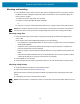
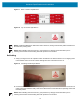
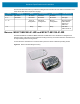
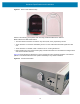
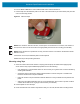
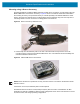
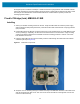
Table Of Contents
- Terms of Use
- Contents
- About This Document
- Hardware Specifications and Installation
- Lozier® Shelves
- MB1000 Beacon: MPACT-T1B20-000-WR
- MB1000 Beacon: MPACT-T1B10-000-WR
- MPACT-MB2000-01-WR, MPACT-MB1000-01-WR, MPACT-MB2001-01-WR, MPACT-SB2000-01-WR
- USB Beacon: MPACT-MB3000-01-WR
- Beacon Part Numbers: MPACT-MB4000-01-WR and MPACT-MB4001-01-WR
- Beacon: MPACT-MB1000-01-WR and MPACT-SB1100-01-WR
- Fixed IoT Bridge (hub): MB5000-01-WR
- Mobile IoT Bridge (badge): MB6000-01-WR
- Cradle Charger: MPACT-MB6000-CHRGR
- Troubleshooting

Hardware Specifications and Installation
22
Prolonged exposure to Metrex CaviWipes or similar chemicals may degrade the clear PC9925A material
used in the asset beacon (and associated mounting accessory) and should be used with care and in small
amounts per the manufacturers recommended instructions. Contact Zebra for specific product and
cleaning agent information.
Fixed IoT Bridge (hub): MB5000-01-WR
Installing
1. Select your desired mounting location for the unit. Verify the USB cable can reach the power supply
and it’s electrical outlet (nearby the device). Clean the surface with a 50:50 mixture of isopropyl alcohol
(IPA) and water.
2. Peel backing tape from adhesive on the back of the rear cover and place firmly on a wall. Make sure the
arrow is pointing up. Optionally, use #8 or #10 Pan Head screws to mount the unit to rough mounting
surfaces The distance between the horizontal screw hole mounting positions is 109 mm. The screw
hole diameters are 5.2 mm.
3. Insert the USB cable into the unit and carefully route the cable through the cable strain lock features
outlined in yellow (see Figure 27).
Figure 27 Install Hub Components
4. Snap the cover on. Ensuring the logo is oriented correctly. The USB cable should be in the cable notch
and not pinched by the cable cover. The unit’s cover access slot will be on the right side if cover and
unit are mounted correctly.