
Installation Guide
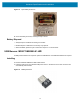
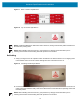
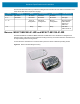
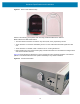
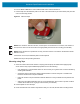
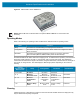
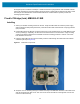
Table Of Contents
- Terms of Use
- Contents
- About This Document
- Hardware Specifications and Installation
- Lozier® Shelves
- MB1000 Beacon: MPACT-T1B20-000-WR
- MB1000 Beacon: MPACT-T1B10-000-WR
- MPACT-MB2000-01-WR, MPACT-MB1000-01-WR, MPACT-MB2001-01-WR, MPACT-SB2000-01-WR
- USB Beacon: MPACT-MB3000-01-WR
- Beacon Part Numbers: MPACT-MB4000-01-WR and MPACT-MB4001-01-WR
- Beacon: MPACT-MB1000-01-WR and MPACT-SB1100-01-WR
- Fixed IoT Bridge (hub): MB5000-01-WR
- Mobile IoT Bridge (badge): MB6000-01-WR
- Cradle Charger: MPACT-MB6000-CHRGR
- Troubleshooting

Hardware Specifications and Installation
20
Mounting using a Beacon Accessory
The MPACT-MB1000-01-WR and MPACT-SB1100-01-WR can be mounted on non-flat objects using the
MPACT-MB1000-01-ACC beacon accessory. Figure 24 shows a tool with the asset beacon attached to
the mounting accessory. The optional accessory is ordered separately from MPACT-MB1000-01 asset
beacon. The beacon is attached to the mounting plastic using the adhesive strip, then a tie wrap wire or
something similar is used to connect the mounting plastic to the hand tool.
Figure 24 Beacon Accessory attached to Tool
1. Peel the tape from the adhesive pads on the rear of the asset beacon and press the unit to the
mounting surface on the accessory MPACT-MB1000-01-ACC. The adhesive bonds immediately and
reaches full adhesion within an hour.
Figure 25 MPACT-MB1000-01-ACC Beacon
NOTE: Ensure the beacon is positioned correctly, Once the beacon is mounted on the bracket it will be
difficult to remove.
If the beacon is moved, the adhesive pads must be replaced.
The MPACT-SB1100-01-WR is a small, waterproof (IP67), BLE 5.0 version of the MB1000. An NFC
application for Android is available for Zebra product management and is used to turn the beacon on and
off, switch modes, and change operating configurations.