
Installation Guide
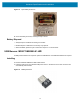
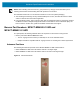
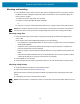
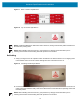
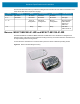
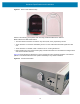
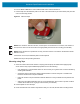
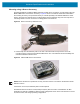
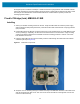
Table Of Contents
- Terms of Use
- Contents
- About This Document
- Hardware Specifications and Installation
- Lozier® Shelves
- MB1000 Beacon: MPACT-T1B20-000-WR
- MB1000 Beacon: MPACT-T1B10-000-WR
- MPACT-MB2000-01-WR, MPACT-MB1000-01-WR, MPACT-MB2001-01-WR, MPACT-SB2000-01-WR
- USB Beacon: MPACT-MB3000-01-WR
- Beacon Part Numbers: MPACT-MB4000-01-WR and MPACT-MB4001-01-WR
- Beacon: MPACT-MB1000-01-WR and MPACT-SB1100-01-WR
- Fixed IoT Bridge (hub): MB5000-01-WR
- Mobile IoT Bridge (badge): MB6000-01-WR
- Cradle Charger: MPACT-MB6000-CHRGR
- Troubleshooting

Hardware Specifications and Installation
14
NOTE: When installing numerous beacons, group beacons by category and activate them prior to
scanning the barcodes and associating them with positions in the Toolbox.
The USB beacon barcode is not on the beacon itself but on the on its plastic packaging.
1. After inserting the beacon(s) into any standard USB power source, associate the beacon in either
offline or online mode in the Toolbox application.
2. From the MPact Toolbox, select a site floor plan and an unassigned position for the beacon. Refer to
the MPact Location & Analytics Deployment Guide for information on how to install and deploy the
beacon from the Toolbox. The guides are available at www.zebra.com/support.
Beacon Part Numbers: MPACT-MB4000-01-WR and
MPACT-MB4001-01-WR
As a prerequisite, the following hardware items are required to mount a beacon using screws:
• Beacon part number MPACT-MB4000-01-WR
• Two No. 6 gauge or M3.5 screws (not included) for use on the intended surface
• Phillips screwdriver compatible with No. 6 gauge screws for mounting the Outdoor Style beacon
Antennae Positions
The following are antennae positions for the MPACT-MB4000-01-WR Outdoor Beacon:
• MPACT-MB4000-01-WR orients its antenna down at a 20 degree angle.
• MPACT-MB4001-01-WR orients its antenna down to the side at a 20 degree angle.
Figure 16 Antennae Positions