
Installation Guide

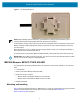
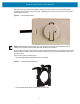

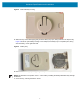
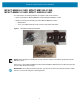
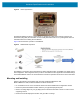
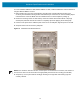
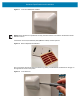
Table Of Contents
- Terms of Use
- Contents
- About This Document
- Hardware Specifications and Installation
- Lozier® Shelves
- MB1000 Beacon: MPACT-T1B20-000-WR
- MB1000 Beacon: MPACT-T1B10-000-WR
- MPACT-MB2000-01-WR, MPACT-MB1000-01-WR, MPACT-MB2001-01-WR, MPACT-SB2000-01-WR
- USB Beacon: MPACT-MB3000-01-WR
- Beacon Part Numbers: MPACT-MB4000-01-WR and MPACT-MB4001-01-WR
- Beacon: MPACT-MB1000-01-WR and MPACT-SB1100-01-WR
- Fixed IoT Bridge (hub): MB5000-01-WR
- Mobile IoT Bridge (badge): MB6000-01-WR
- Cradle Charger: MPACT-MB6000-CHRGR
- Troubleshooting

Hardware Specifications and Installation
10
To mount a MPACT-MB2000-01-WR, MPACT-MB2001-01-WR, or MPACT-SB2000-01-WR model beacon
using the MPACT-MB2001-01-ACC:
1. Before peeling the cover tape off the adhesive mounting pads, hold the wall plate portion of the
accessory in its intended mounting location and mark the spot on the wall. You can use masking tape to
mark the bottom of the unit. Make sure the orientation arrow on the back plate is pointing up.
2. Ensure the mounting surface is clean and dry. Clean the surface with a 50:50 mixture of isopropyl
alcohol (IPA) and water. Ensure the surface is completely dry before applying the mounting tape.
3. Peel the cover tape from the adhesive pads on the rear of the wall plate, align and press to the wall.
4. Snap the beacon into the accessory wall plate.
Figure 10 Wall Mount and attached beacon
NOTE: If the surface is clean and smooth, use the tape to mount the beacon. However, if the surface is
wood, brick or other non-smooth surface use appropriately sized screws for mounting (not included).
5 Snap the top cover in place with the small gap showing on the right side and ensuring logos are
correctly oriented.