
Installation Guide

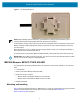
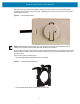

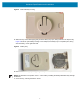
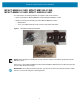
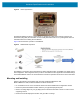
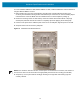
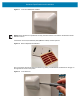
Table Of Contents
- Terms of Use
- Contents
- About This Document
- Hardware Specifications and Installation
- Lozier® Shelves
- MB1000 Beacon: MPACT-T1B20-000-WR
- MB1000 Beacon: MPACT-T1B10-000-WR
- MPACT-MB2000-01-WR, MPACT-MB1000-01-WR, MPACT-MB2001-01-WR, MPACT-SB2000-01-WR
- USB Beacon: MPACT-MB3000-01-WR
- Beacon Part Numbers: MPACT-MB4000-01-WR and MPACT-MB4001-01-WR
- Beacon: MPACT-MB1000-01-WR and MPACT-SB1100-01-WR
- Fixed IoT Bridge (hub): MB5000-01-WR
- Mobile IoT Bridge (badge): MB6000-01-WR
- Cradle Charger: MPACT-MB6000-CHRGR
- Troubleshooting

Hardware Specifications and Installation
8
MPACT-MB2000-01-WR, MPACT-MB1000-01-WR,
MPACT-MB2001-01-WR, MPACT-SB2000-01-WR
As a prerequisite, the following hardware is required to wall mount a beacon:
• Beacon part numbers: MPACT-MB2000-01-WR and MPACT-MB2001-01-WR
• Bracket mount kit (included with part number MPACT-MB2000-01-WR):
• Metal bracket
• Two 1-inch Phillips head tap screws, and two 1inch plastic wall inserts
Figure 7 Metal Beacon Wall Mount Bracket
NOTE: Ensure the beacon is positioned correctly, Once the beacon is mounted on the bracket it will be
difficult to remove.
Activate one or more MPACT-MB2000-01-WR or MPACT-MB2001-WR beacons by pulling the mylar strip
out from inside the beacon housing.
IMPORTANT: After pulling off the last mylar strip, you have 20 seconds to associate the beacon in either
off-line or on-line mode using the Toolbox application.