
Installation Guide

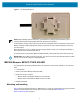
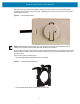

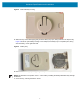
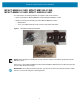
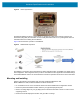
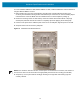
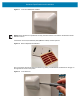
Table Of Contents
- Terms of Use
- Contents
- About This Document
- Hardware Specifications and Installation
- Lozier® Shelves
- MB1000 Beacon: MPACT-T1B20-000-WR
- MB1000 Beacon: MPACT-T1B10-000-WR
- MPACT-MB2000-01-WR, MPACT-MB1000-01-WR, MPACT-MB2001-01-WR, MPACT-SB2000-01-WR
- USB Beacon: MPACT-MB3000-01-WR
- Beacon Part Numbers: MPACT-MB4000-01-WR and MPACT-MB4001-01-WR
- Beacon: MPACT-MB1000-01-WR and MPACT-SB1100-01-WR
- Fixed IoT Bridge (hub): MB5000-01-WR
- Mobile IoT Bridge (badge): MB6000-01-WR
- Cradle Charger: MPACT-MB6000-CHRGR
- Troubleshooting

Hardware Specifications and Installation
6
Figure 4 Universal Style Plastic Bracket
To mount the universal style beacon to Lozier shelves:
1. Place the universal beacon shelf-bracket on the shelf:
• Metal brackets: Fit in place and tighten onto the shelving unit using a Phillips screwdriver.
• Plastic brackets: Fit in place and snap onto the shelving unit.
2. Fit the beacon’s universal style housing into the bracket (mylar strip pointing up) and turn the beacon
housing clockwise 90 degrees.
The barcode label should face up toward the ceiling and the smooth front of the beacon should face out
toward the aisle.
Activate one or MPACT-T1B10-000-WR model beacons by pulling the mylar strip off the beacon housing.
IMPORTANT: After pulling off the last mylar strip, you have 20 seconds to associate the beacon in either
off-line or on-line mode using the Toolbox application.
Battery Replacement
When a the battery life is less than 20%, the beacon should be prioritized for immediate replacement.
This section includes procedures for replacing batteries for the following part numbers:
• MPACT-T1B20-000-WR
• MPACT-T1B10-000-WR
Replacing MB1000 Battery
The battery is located within a tray in the beacon housing.
1. Remove the beacon from the shelving unit.
2. With the bottom of the beacon facing up, gently lift each corner of the beacon’s battery tray.
Figure 5 shows the beacon battery housing for part number MPACT-T1B20-000-WR,
MPACT-T1B10-000-WR, and MPACT-T1B10-000-WR. In this example, the battery tray is on the right
and the corners of the battery tray are marked in red. When gently lifting each tray corner, slightly push
the each corner out to dislodge corners of the tray.