
Installation Guide

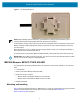
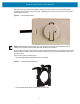

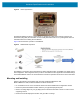
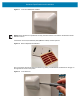
Table Of Contents
- Terms of Use
- Contents
- About This Document
- Hardware Specifications and Installation
- Lozier® Shelves
- MB1000 Beacon: MPACT-T1B20-000-WR
- MB1000 Beacon: MPACT-T1B10-000-WR
- MPACT-MB2000-01-WR, MPACT-MB1000-01-WR, MPACT-MB2001-01-WR, MPACT-SB2000-01-WR
- USB Beacon: MPACT-MB3000-01-WR
- Beacon Part Numbers: MPACT-MB4000-01-WR and MPACT-MB4001-01-WR
- Beacon: MPACT-MB1000-01-WR and MPACT-SB1100-01-WR
- Fixed IoT Bridge (hub): MB5000-01-WR
- Mobile IoT Bridge (badge): MB6000-01-WR
- Cradle Charger: MPACT-MB6000-CHRGR
- Troubleshooting

Hardware Specifications and Installation
5
Notice the up arrow located on the middle of the beacon housing. This arrow indicates the optimal
orientation for the beacon to function properly. Additionally, the smooth front of the beacon should face
outward toward the aisle.
Figure 2 Universal Style Beacon
NOTE: When installing numerous beacons, group beacons by category and activate them prior to
scanning the barcodes and associating them with positions in the Toolbox.
From the MPact Toolbox, select a site floor plan and an unassigned position for the beacon. Refer to the
MPact Location & Analytics Deployment Guide for information on how to install and deploy the beacon
from the Toolbox.
There are two styles of bracket mounts:
• Universal Style Metal Bracket: MPACT-A1O10-004-WR
Figure 3 Universal Style Metal Bracket
• Universal Style Plastic Bracket: MPACT-A1O10-001-WR