
Installation Guide

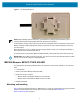
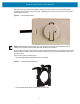

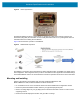
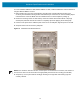
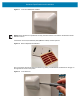
Table Of Contents
- Terms of Use
- Contents
- About This Document
- Hardware Specifications and Installation
- Lozier® Shelves
- MB1000 Beacon: MPACT-T1B20-000-WR
- MB1000 Beacon: MPACT-T1B10-000-WR
- MPACT-MB2000-01-WR, MPACT-MB1000-01-WR, MPACT-MB2001-01-WR, MPACT-SB2000-01-WR
- USB Beacon: MPACT-MB3000-01-WR
- Beacon Part Numbers: MPACT-MB4000-01-WR and MPACT-MB4001-01-WR
- Beacon: MPACT-MB1000-01-WR and MPACT-SB1100-01-WR
- Fixed IoT Bridge (hub): MB5000-01-WR
- Mobile IoT Bridge (badge): MB6000-01-WR
- Cradle Charger: MPACT-MB6000-CHRGR
- Troubleshooting

Hardware Specifications and Installation
4
Figure 1 Tie Wrap Style Beacon
NOTE: When installing numerous beacons, group beacons by category and activate them prior to
scanning the barcodes and associating them with positions in the Toolbox.
From the MPact Toolbox, select a site floor plan and an unassigned position for the beacon. Refer to the
MPact Location & Analytics Deployment Guide for information on how to install and deploy the beacon
from the Toolbox.
Mount the beacon to a pole or similar structure using the plastic tie wrap. Tie can be placed vertically or
horizontally but the arrow should still point up.
To activate a beacon part number MPACT-T1B20-000-WR, pull the mylar strip off the beacon housing.
IMPORTANT: After pulling off the last mylar strip, you have 20 seconds to associate the beacon in either
off-line or on-line mode using the Toolbox application.
MB1000 Beacon: MPACT-T1B10-000-WR
As a prerequisite, the following hardware items are required to mount beacon brackets to a Lozier style
shelf:
• Lozier Shelves
• Beacon part number MPACT-T1B10-000-WR
• Bracket mount (one of either):
• MPACT Metal Lozier Bracket: MPACT-A1O10-004-WR
• MPACT Plastic Lozier Bracket: MPACT-A1O10-001-WR
• Phillips screwdriver
Mounting and Installing
Figure 2 shows a universal style beacon. While there is no up arrow on this beacon’s housing, the beacon
should be oriented similar to the tie wrap style of beacon housing (see MB1000 Beacon:
MPACT-T1B20-000-WR on page 3).