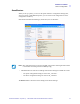
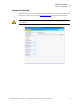
ZXP Series Toolbox Printer Configuration Save/Restore When you set up a printer, you can save the printer and driver configuration settings; then, when you restore or add additional printers, you can use the saved configuration to ensure configuration consistency. Note that the Saved/Restored Settings (circled below) are for the Printer. Note • The configuration files are stored in an XML format in the following default location: C:\Documents and Settings\All Users\ZMotif\Config • The Save button saves
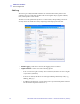
ZXP Series Toolbox Printer Configuration Job Log The Job Log is a utility that builds a database of card transactions in the printer’s host computer. Job Log records data encoded on the card’s magnetic stripe, together with date, time, and the printer’s serial number. The data set can be uploaded at any time to a central archive, thus providing a means for security officers to validate the card by comparing it with tamper-proof real data.
ZXP Series Toolbox Printer Configuration • Log File Contents - The Log File Contents group selects the data to be logged in the file you specified above. The data will be logged in the order displayed on the screen, each field being separated by the character specified in the Logfile Definition, Separator. Log File Contents selections include: - Time: Logs the time a which the card was sent to the printer in the HH:MM:SS format. The 24-hour clock is used, so 13:00:00 = 1:00 pm, and 05:00:00 = 5:00 am.
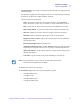
ZXP Series Toolbox Printer Configuration Image Control The Image Control window lets you make color adjustments to compensate for camera or lighting conditions. Keep in mind that these color adjustments modify how the pictures print. The adjustments do not affect the image files. (That type of adjustment would be made in an image processing application program.) • The Monochrome conversions dropdown menu lets you select Dither error diffusion, dither halftoning, or Dither pure black on white.
ZXP Series Toolbox Printer Configuration Firmware Download The Firmware Download screen allows you to download firmware and firmware updates. Note that firmware updates can be found at http://zebracard.com under Drivers & Downloads. Caution • Do not turn power OFF while the printer is downloading and configuring the new firmware. P1013772-001 Rev.
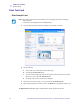
ZXP Series Toolbox Print Test Card Print Test Card Print Sample Card Note • The sample cards in the Test Card Library are .bmp images stored in the following default location: C:\Documents and Settings\All Users\ZMotif\Library 1. View the Test Card Library. Use the scrollbar to view all the selections. 2. Set the front side: a. Select (click on) a card from the Test Card Library. b. Click on the Set As Front button. c. View the selected card in the Preview.
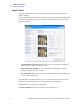
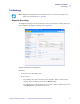
ZXP Series Toolbox Technology Technology Note • Magnetic Encoding and Smart Card default values are set via the Card type in use option in the Card Setup tab, see page 60) Magnetic Encoding The Magnetic Encoding screen allows the user to test various magnetic encoding options. For more information on magnetic encoding, refer to Appendix C. Settings: EIN options not implemented. Read Data: • Coercivity: Select either High or Low.
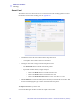
ZXP Series Toolbox Technology Smart Card The Smart Card screen allows the user to test various smart card encoding options. For more information on smart card encoding, refer to Appendix D. • Card Readers: Select the card reader from the drop-down menu. - • • Card Option: Select either Contact or Contactless. Card Types: Select the card type from the drop-down menu. - The Feed Card button feeds the card into the printer. - Input Data includes address, length, and input.
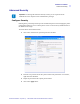
ZXP Series Toolbox Advanced Security Advanced Security Important • To manage this Advanced Security section, you are required to be the administrator of the computer or have administrative privileges. Configure Security Enabling driver password protection prevents unauthorized persons from changing the printer configuration settings. Access to various printer screens can be selectively disabled based on the Windows User Login. To activate Driver Password Protection: 1.
ZXP Series Toolbox Advanced Security To deactivate Driver Password Protection: 1. Click on the Activate driver password protection checkbox to remove the checkmark. 2. Enter your password in the Old password field. 3. Leave the New password and the Confirm password fields blank. 4. Click on the Apply button. This will bring up a ZXP Series Toolbox pop-up screen. To deactivate the the printer driver password, click on Yes. This will bring up another ZXP Series Toolbox pop-up screen. Click on OK.
ZXP Series Toolbox Advanced Security Security Roles Use this section used to establish security roles; i.e., grant and restrict access to various ZXP Series Toolbox screens. Note • The list of users in the drop-down menu (e.g., Guest, HelpAssistant, Local User, localfix, etc.) is derived from the list of users on the system. To set security access roles: 1. Select a user from the drop-down menu. 2.
ZXP Series Toolbox Print Viewer Print Viewer When you print a PRN file, you print directly to the printer, bypassing computer applications and associated printer drivers. This utility can be used to ensure that your printer is working properly by isolating it from driver-related and communication-related issues. Print PRN file Note • Sample PRN files are stored in the following default directory/folder: C:\Documents and Settings\All Users\ZMotif\Library To send a PRN file to the printer: 1.
6 Cleaning Caution • PROTECT YOUR FACTORY WARRANTY! The recommended cleaning procedures must be performed to maintain your factory warranty. Other than the recommended cleaning procedures described in this manual, allow only Zebra authorized technicians to service the Printer. NEVER loosen, tighten, adjust, bend, etc., any part or cable inside the printer. NEVER use a high pressure air compressor to remove particles in the printer. Cleaning the Printer Clean your Printer using the Cleaning Cards provided.
Cleaning Cleaning the Printer Cleaning the Rollers Note • Do not use previously used cleaning cards. Step 1. Initiate the cleaning process. a. Press the MENU button on the Operator Control Panel (OCP). The OCP will display the Main Menu. b. Scroll through the Main Menu, and select Advanced Settings. The OCP will display the Advanced Settings Menu. c. Scroll through the Advanced Settings Menu, and select Clean Printer. The OCP will display the Clean Printer Menu. Step 2. Clean the X-Drive Rollers.
Cleaning Cleaning the Printer Step 3. Clean the Y-Drive Rollers. a. Select Clean Front Card Path to run the Y-Roller Cleaning Routine. b. Use Y-Path Cleaning Card 211974-001. c. Follow the OCP instructions. d. When complete, the OCP will return to the Clean Printer Menu. Step 4. Clean the Heated Rollers. a. Select Clean Heated Roller Path to run the Heated Roller Cleaning Routine. b. Use Heated Roller Cleaning Card P/N 211975-001. c. Peel the protective film from the card.. d.
Cleaning Cleaning the Printer Cleaning the Platen Step 1. Open the printer Door. Step 2. Remove the Transfer Film. Step 3. Manually run the Heated Roller Cleaning Card (P/N 211975-001) over the Platen. Platen Step 4. Re-install the Transfer Film. Step 5. Close the printer Door. 86 Zebra ZXP Series 8 Card Printer User’s Manual P1013772-001 Rev.
Cleaning Cleaning the Printhead Cleaning the Printhead A cleaning using the Cleaning Cards usually suffices; however, a separate Printhead cleaning can remove more stubborn deposits when print anomalies persist. To avoid deposits, only use foam-tipped swabs. Caution • Never use a sharp object or any abrasive to scrape deposits from the Printhead. Permanent damage to the Printhead will result. Caution • Do not touch the Printhead if the printer has been in service in the last 10 minutes.
Cleaning Card Cleaning Cartridge Card Cleaning Cartridge The Card Cleaning Cartridge cleans the cards entering the printer through the card feeder. To ensure print quality, the card cleaning roller requires periodic replacement. New card cleaning rollers are included with each print ribbon or may be purchased separately. (To reorder, refer to the Media List on the User Documentation and Drivers CD supplied with this printer.
7 Troubleshooting The table on the next page offers causes and solutions to symptoms related to improper operation. Check the table when experiencing any loss of operation or print quality. Use the following figure in conjunction with the table to help locate the possible cause and effect a solution. Door (shown open) Transfer Film Transfer Station Eject Roller Print Ribbon Input Hopper Idler Roller Assembly Door Operator Control Panel (OCP) Single Card Feed Slot P1013772-001 Rev.
Troubleshooting OCP Error Messages OCP Error Messages ERROR MESSAGE POSSIBLE CAUSE POSSIBLE SOLUTION BOTTOM CUTTER FAIL 17020 BOTTOM CUTTER STALL 17018 BOTTOM HEATER FAIL 17014 BOTTOM LAMINATE FEED 17006 BOTTOM OVER TEMP 17016 BOTTOM SENSOR FAIL 17022 CARD CLEAN ERROR Faulty Card Cleaning Roller (if error during single card feed) or Card Cleaning Cartridge (if cards fed from Input Hopper) Replace the Card Cleaning Roller or Card Cleaning Cartridge, as appropriate CARD FEED ERROR Card is
Troubleshooting OCP Error Messages ERROR MESSAGE POSSIBLE CAUSE POSSIBLE SOLUTION FILM MOTION ERROR Transfer Film not correctly responding to motion commands a. Check the Transfer Film b. Reinstall the Transfer Film c. Power cycle the printer d. Contact Zebra Technical Support FW UPGRADE ERROR Invalid firmware version selected Verify the version, and retry updating the firmware GENERAL MEMORY ERROR There is a problem when accessing memory a.
Troubleshooting OCP Error Messages ERROR MESSAGE POSSIBLE CAUSE POSSIBLE SOLUTION MAG READ ERROR • Encoding error a. Ensure that you are using the correct card type • Defective magnetic stripe b. Check that the cards are loaded with the magnetic stripe in the correct orientation (normally this will be with the stripe down and toward the rear of the printer) c. Ensure that the cards are set-up correctly in the printer driver (coercivity setting) d.
Troubleshooting OCP Error Messages ERROR MESSAGE POSSIBLE CAUSE POSSIBLE SOLUTION OUT OF RIBBON The print ribbon has run out Load a new roll of print ribbon POLL TIMEOUT 17012 PRINTHEAD MOTION ERR Printhead did not move to proper position during initialization a.
Troubleshooting OCP Test Card Images OCP Test Card Images See detailed Test Card descriptions on the following page. Mid Gray Grid On Gray Cyan Stripes 2 Pixel Grid Mid Magenta Dark Cyan Max Gray Offset Dots Smear Min Magenta White Max-Gray Max-Gray White Motion & Registration Gradient Boxes Density Setup Grid On Gray 2 94 Zebra ZXP Series 8 Card Printer User’s Manual P1013772-001 Rev.
Troubleshooting Test Card Descriptions Test Card Descriptions Image Description Print artifacts to look for with this image Mid Gray Flat uniform gray Motion artifacts, banding, platen defects, transfer artifacts, dirt, overall density level Grid On Gray Solid black on top, Colored ribbon wrinkles in the black area, or clear/white gray grid underneath transfer film wrinkles in the gray area Cyan Stripes Horizontal cyan stripes alongside vertical lighter cyan box Non-uniformity or horizontal bandi
Troubleshooting Ethernet Issues Ethernet Issues If both LEDs are off, the printer has not detected the presence of a network cable. To solve the problem: • Verify that the network cable is appropriate and has an RJ-45 connector. • Remove the network cable from the printer. Plug the network cable back in until you hear a positive click. Check the other end of the cable in the same manner. If the printer still does not detect a cable, then continue. • Connect the printer to a known good network.
8 Technical Specifications Standard Features • Thermal transfer and dye diffusion to transfer film • Full color or monochrome reverse transfer printing • Single- and dual-sided printing • Maximum print speed (batch mode; i.e.
Technical Specifications Specifications Specifications Encoding Options • Smart card contact encoder – ISO 7816, PC/SC Compliant • Magnetic stripe encoder – ISO 7811 and JIS-II (new and re-encoded; tracks 1, 2, and 3; high and low coercivity; stripe down; 30 - 40 mil card thickness) • Contact smart card encoder – EMV level 1 certified • ISO 14443 MIFARE (13.56 MHz) and ISO 7816 contact encoder combo Communications Interfaces • USB V2.0 / 1.
Technical Specifications Specifications Card Compatibility • Card Thickness: 30 – 40 mil • Card Size: ISO 7810 format, Type ID-1, CR-80 • Card Material: ABS; PVC, Composite; TESLIN, Composite; PET; PETG; Polycarbonate; PVC Agency Approvals Zebra ZXP Series 8 Card Printer complies with following applicable directives and standards for the ITE: Residential, Commercial & Light Industry environments • • For US/Canada/Mexico/Australia&NZ • FCC Class A, cfr47, Part 15 Subpart J • FCC 15.
Technical Specifications Specifications Electrical • Auto-switching Single-phase AC power • 90V~264V AC RMS and 47-63 HZ (50-60 Hz nominal) • Power consumption: Idle Printing Initializing / Warm-up Sleep 100 W 150 W 300 W 20 W Physical Printer • Height (printer only) 11.9" (303 mm) • Height (with card feeder) 13.2" (336 mm) • Width 14" (356 mm) • Width (with card feeder) 14.9" (379 mm) • Depth 20.4" (519 mm) • Weight (printer only) 27.5 lbs (12.5 kg) Laminator • Height 11.
Technical Specifications Declarations of Conformity Declarations of Conformity ZEBRA TECHNOLOGIES CORPORATION Declares that the following Information Technology Equipment Zebra ZXP Series 8 Card Printer complies with following applicable directives and standards for the ITE: Residential, Commercial & Light Industry environments Applicable Directives and Supporting Standards: 2004/108/EC EMC Directive, EN55022:2006 Class A, EN55024:1998+AD1:2001+AD2:2003EN, 61000-3-2:2006, EN61000-3-3:1995+AD1:2001, 2006/95
102 Zebra ZXP Series 8 Card Printer User’s Manual P1013772-001 Rev.
APPENDIX A Printer Configurations Introduction The Part Number of a particular printer is shown on a label affixed to the bottom of the printer; that Part Number identifies the specific configuration for that printer. The chart on the following page shows the configurations that are available. P1013772-001 Rev.
Printer Configurations Part Numbers PART NUMBER DESCRIPTION Z 8 _ 104 Base Unit _ _ 3 _ _ 4 - _ _ _ _ _ _ _ _ _ _ _ _ _ _ _ _ _ _ _ _ _ _ _ _ Dual-sided printing with single-sided lamination Dual-sided printing with dual-sided lamination _ _ _ _ _ _ _ _ _ - 0 _ _ _ _ _ _ _ _ _ _ _ A _ _ _ _ _ _ _ _ _ _ _ E _ _ _ _ _ _ _ _ _ _ _ Smart Card Options None Contact Encoder + Contactless MIFARE Contact Station _ _ _ _ _ _ - _ 0 _ _ _ _ _ _ _ _ _ _ _ M _ _ _ _ _ _ _ _ _ _ Mag Encoders None ISO HiCo
Appendix B Connecting to a Network Card printers can be connected to an Ethernet network in three ways. Printer Sharing In printer sharing, the printer is connected locally to the host computer and configured to be shared to other client computers. Client computers connect to the printer over the network through the host computer. P1013772-001 Rev.
Connecting to a Network External Print Server A stand alone device that acts as a server on the network specifically for receiving print jobs and passing them to the printer. Client computers connect to the print server over a network. Internal Print Server Similar to an external print server, except the print server is integrated into the printer. This removes the need for a separate power supply and separate device drivers. This is the simplest way to network a printer.
Appendix C Magnetic Card Encoder Introduction This Appendix includes operation and maintenance requirements for Printers with the optional magnetic card stripe encoder. Mag Encoder (optional) behind the idler roller assembly door The magnetic encoder can be set for either high or low coercivity. Use the printer driver to change the encoder setting. P1013772-001 Rev.
Magnetic Card Encoder Driver Setting The Card Setup tab allows the user to specify the Magnetic Encoder Card Type in use. Based on your selection, the printer automatically adjusts various printer properties for optimum performance. If your card type is not listed in the drop-down menu, select Custom and fill out the Card Specifications pop-up screen. To access the Card Setup Tab, select Start > Printers and Faxes.
Magnetic Card Encoder Media Loading Orientation Note • ONLY USE cards that comply with ISO 7810 and 7811 standards for magnetic stripe cards. The magnetic stripe must be flush to the surface of the card to work properly. Never use cards which have taped-on magnetic stripes. Place the cards in the Input Hopper in the correct orientation as shown (with the magnetic stripe down and facing to the rear). Ensure that the cards are seated properly the hopper. P1013772-001 Rev.
Magnetic Card Encoder Magnetic Encoder Cleaning The Magnetic Encoder is cleaned as part of the printer cleaning process; see Section 6. If the frequency of encoding errors increases, the head may need additional cleaning. To cleans, only use foam-tipped swabs. Caution • Never use a sharp object or any abrasive to scrape deposits from the Magnetic Encoder. Permanent damage to the Magnetic Head will result. Step 1. Open the Door. Step 2. Open the idler roller assembly door. Step 3.
APPENDIX D Smart Card Options Introduction This Appendix contains information on the additional operations of a Printer equipped with one or more of the available Smart Card options. Smart Card Encoder (optional) Smart Cards can have a built-in microcomputer and/or memory to store fingerprints, voice recognition patterns, medical records, and other such data. All other printer operations remain the same as the standard models. P1013772-001 Rev.
Smart Card Options Encoding and Reading Smart Cards Encoding data onto Smart Cards and reading the data previously encoded on them is totally under control of the application software; no operator action is required. If you experience any problems with encoding or reading data, refer to the users manual or other documentation for the application software. Driver Setting The Card Setup tab allows the user to specify the Smart Card Type in use.
Smart Card Options Contact Smart Cards Contact Smart Cards have a pad of contacts on the surface of the card that connect to the circuitry embedded into the card. The printer responds to commands that position the card at the contact location, where the printer connects to the contacts on the Smart Card.
Smart Card Options Contact Station Smart Card Interface When a command to the printer interface sends a card to the Smart Card Contact Station, the printer connects the Smart Card Contact Station to the female DB-9 connector on the rear of the printer. DB-9 Connector location for Smart Card Contact Station An attached external Smart Card Programmer can be used to program Smart Card chips. The following table shows the Smart Card Contact Points.
Smart Card Options Contactless Smart Cards Rather than using a contact pad, Contactless Smart Cards use various short-range radio technologies to “connect” to the printer. The printer moves the card to an antenna location on the card path, and the encoding or decoding occurs. All other printer operations remain the same. Media Loading Orientation for Contactless Smart Cards For Contactless Smart Cards, orientation is not a consideration.
116 Zebra ZXP Series 8 Card Printer User’s Manual P1013772-001 Rev.
Appendix E Packing the Printer for Shipment Introduction If the printer is to be shipped, it is important to use the original packing and shipping material to prevent damage to the Printer. If the original material is lost, a replacement Shipping Kit can be ordered from Zebra; refer to the Media List on the User Documentation and Drivers CD supplied with this printer.
Packing the Printer for Shipment Step 7. Remove the Input and Output Hopper, and place them in the foam insert. Note • In the figure below, the printer and accessories are shown in the bottom foam insert, out of the shipping carton for clarity. Cleaning Roller Cleaning Cartridge Input Hopper Output Hopper Step 8. Place the Printer in its protective plastic bag. Step 9. Place the lower foam insert in the Shipping Carton. Step 10.
Appendix F Worldwide Support For Technical Support or Repair Services, contact the appropriate facility listed below. North America and Latin America - Technical Support Zebra Technologies Card Printer Solutions 1001 Flynn Road Camarillo, CA 93012-8706 USA Phone: email: +1 800 511 9909 (when calling from within the U.S.) +1 805 577-7002, option 1 (when calling from Latin America) techsupport@zebra.
Worldwide Support Europe, Middle East, and Africa - Technical Support Zebra Technologies Card Printer Solutions Dukes Meadow Millboard Road, Bourne End Buckinghamshire SL8 5XF, UK Phone: FAX: e-mail: +44 (0) 1628 556 000 +44 (0) 1628 556 001 cardts@zebra.com Europe, Middle East, and Africa - Repair Services Before returning any equipment to Zebra Technologies Corporation for in-warranty or out-ofwarranty repair, contact Repair Services for a Return Materials Authorization (RMA) number.