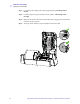
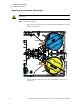
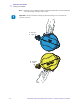
Installation and Setup Loading the Transfer Film Step 3. Load transfer film supply spool onto the supply spindles, green flange side to the left. Step 4. Load the empty take-up spool onto the take-up spindles, white flange side to the right. Step 5. Make sure the transfer film comes off the bottom of the supply spool and feeds to the bottom of the take-up spool. Step 6. The figure below shows the proper installation of the transfer film. 14 Zebra ZXP Series 8 Card Printer User’s Manual P1013772-001 Rev.
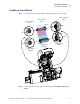
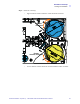
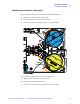
Installation and Setup Loading a Print Ribbon Loading a Print Ribbon Step 1. Locate the print ribbon supply spindles and the print ribbon take-up spindles. Take-up Spindle GRAY Take-up Spool BLUE Take-up Spindle BLUE Flange Flange Supply Spool PURPLE Supply Spindle GRAY Supply Spindle PURPLE Step 2. Load the print ribbon supply spool onto the supply spindles, purple flange side to the left. P1013772-001 Rev.
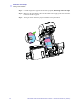
Installation and Setup Loading a Print Ribbon Step 3. Load the empty take-up spool onto the take-up spindle, blue flange side to the right. Step 4. Make sure the print ribbon comes off the bottom of the supply spool and feeds to the bottom of the take-up spool. Step 5. The figure below shows the proper installation of the print ribbon. 16 Zebra ZXP Series 8 Card Printer User’s Manual P1013772-001 Rev.
Installation and Setup Loading a Print Ribbon Loading the Laminate Note • In this description of loading laminate, references to the Lower Laminate Cassette apply only to the Z84 Printer. The Z84 Printer can apply laminate to both surfaces of the card; the Z83 Printer only to the upper surface. The Laminate is loaded into two cassettes. • The Upper Laminate Cassette, used on both the Z83 and Z84 Printers, has a label with the word “TOP” and is colored blue.
Installation and Setup Loading a Print Ribbon Removing the Laminate Cassette(s) Hot Surface • If the printer has been in use, the Heater Cores area of the Laminator may be hot. Step 1. Release the cassette(s): • Upper Laminate Cassette (present on on both the Z83 and Z84 Printers): Press down on its locking lever. Press down Lift up • 18 Lower Laminate Cassette (only present on the Z84 Printer): Lift up on its locking lever. Zebra ZXP Series 8 Card Printer User’s Manual P1013772-001 Rev.
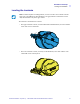
Installation and Setup Loading a Print Ribbon Step 2. Rotate the cassette(s): • Upper Laminate Cassette: Rotate the cassette maximum clockwise. Rotate clockwise Rotate counter-clockwise • P1013772-001 Rev. A ( Draft 1 ) Lower Laminate Cassette: Rotate the cassette maximum counter-clockwise.
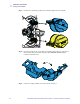
Installation and Setup Loading a Print Ribbon Step 3. Remove the cassette(s) by pulling each cassette straight out from its spindle. Step 4. Open the cassette(s), like a clam shell, by separating its two halves. Grasp the two halves firmly with your fingers, then pull it apart. Do NOT use tools. (Upper Laminate Cassette shown.) Step 5. If there is an empty laminate core in the cassette, remove it. 20 Zebra ZXP Series 8 Card Printer User’s Manual P1013772-001 Rev.
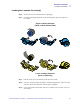
Installation and Setup Loading a Print Ribbon Loading the Laminate Cassette(s) Step 1. Remove the new roll of laminate from its packaging. Step 2. Carefully following the guidelines in the following figure, place the laminate in the cassette. . Upper Laminate Cassette (Used on Both Z83 and Z84) Lower Laminate Cassette (Used on Z84 Only) Step 3. Pull out an inch or two of laminate past the lip of the cassette. Step 4. Close the cassette by firmly pressing the “clamshell” together.
Installation and Setup Loading a Print Ribbon Step 6. Rotate the core to adjust the laminate overhang. Stop when the end of the laminate is even with the edge of the lips of the cassette. Important • Check for laminate overhang any time the locking lever is pressed or the cassette is removed. 0 - 0.5 mm 0 - 1/32" 0 - 0.5 mm 0 - 1/32" 22 Zebra ZXP Series 8 Card Printer User’s Manual P1013772-001 Rev.
Installation and Setup Loading a Print Ribbon Installing the Laminator Cassette(s) • Upper Laminate Cassette (present on on both the Z83 and Z84 Printers): a. Slide the blue cassette onto the upper spindle. b. Rotate the cassette maximum counter-clockwise. c. Hear a click, and observe the upper locking lever snap into place. Rotate counter-clockwise Rotate clockwise • Lower Laminate Cassette (only present on the Z84 Printer): a. Slide the yellow cassette onto the lower spindle. b.
Installation and Setup Loading a Print Ribbon Laminating Contact Smart Cards TBD 24 Zebra ZXP Series 8 Card Printer User’s Manual P1013772-001 Rev.
Installation and Setup Loading a Print Ribbon Using Partial-Width Laminate TBD P1013772-001 Rev.
Installation and Setup Loading a Print Ribbon Clearing the Laminate Channels TBD 26 Zebra ZXP Series 8 Card Printer User’s Manual P1013772-001 Rev.
Installation and Setup Connecting Power Connecting Power Electric Shock Caution • Limit AC power supplied to the Printer to 100 – 230 volts, 60 ~ 50 Hertz. Limit excess current draw to 16 amps or less, using an associated circuit breaker or other such device. Never operate the Printer in a location where operator, computer, or printer can get wet. Personal injury could result.
Installation and Setup Connecting the Printer to your Computer Connecting the Printer to your Computer USB Connection Step 1. Connect the USB cable to the printer and the computer. Step 2. Ensure that the printer’s power switch in the OFF ( ) position. USB 28 Zebra ZXP Series 8 Card Printer User’s Manual P1013772-001 Rev.
Installation and Setup Connecting the Printer to your Computer Ethernet Connection Step 1. Connect the Ethernet Port on the rear of the printer to an Ethernet Network Port. Step 2. Turn the printer’s power switch to the ON ( | ) position. 10/100base-T 10/100base-T P1013772-001 Rev.
Installation and Setup Installing the Windows Printer Driver Installing the Windows Printer Driver Overview Each computer that will use the printer must have the Printer Driver installed. If not already done, connect power to the printer; and connect the printer to the computer. • For USB Driver installation, turn the printer OFF ( ). • For Ethernet Driver installation, turn the printer ON ( | ).
Installation and Setup Installing the Windows Printer Driver Installing the USB Printer Driver Note • To install the Ethernet driver, see page 36. Step 1. If not already done, connect power to the printer. Do not turn power ON. Step 2. Connect the USB port on the rear of the printer to the computer’s USB port. Step 3. Ensure that the Printer’s power switch in the OFF ( ) position. Step 4. Insert the User Documentation and Drivers CD into the CD drive of the host computer. The Main Menu will open.
Installation and Setup Installing the Windows Printer Driver Step 9. The InstallShield Wizard window will open. To proceed with the installation, click the Next button. Step 10. Select Install USB printer drivers, and click the Next button. Step 11. Ensure that the Printer’s power switch in the OFF ( OK button. 32 Zebra ZXP Series 8 Card Printer User’s Manual ) position; and then click the P1013772-001 Rev.
Installation and Setup Installing the Windows Printer Driver Step 12. This will bring up the License Agreement window. To proceed with the installation, select the I accept the terms of the license agreement option, and then click the Next button. Step 13. This will bring up the Customer Information window. Enter User Name and Company Name; and then click the Next button. P1013772-001 Rev.
Installation and Setup Installing the Windows Printer Driver Step 14. This will bring up the Choose Destination Location window. • To accept the default destination location where setup will install the files, click the Next button. - or • Click the Change button, select a folder where setup will install the files, and click the Next button. Step 15. This will bring up the Ready to Install the Program window. To continue, click the Install button. Step 16. Observe the Setup Status window.
Installation and Setup Installing the Windows Printer Driver Step 17. The Congratulations window will appear. Step 18. At this point, turn on your printer; and then click the Next button. The Windows New Hardware Found wizard will find the printer. Step 19. When the InstallShield Wizard Complete window appears, click the Finish button. Step 20. This completes USB driver installation. To use the Printer, you would select it just like you would any other printer connected to a Windows system.
Installation and Setup Installing the Windows Printer Driver Installing the Ethernet Printer Driver Note • To install the USB driver, see page 31. Important • The Ethernet Network must be configured correctly, with the Printer and the host computer on the same subnet mask. If you are not sure how to verify this or change the configuration, consult someone knowledgeable on Ethernet Networks. Important • A valid static IP address must be assigned to the printer. Step 1.
Installation and Setup Installing the Windows Printer Driver Step 8. In the Setup Type window, choose the maintenance operation to be performed: a. Select Upgrade to upgrade the older printer driver, click the Next button, and follow the screen prompts. At the end of the upgrade process, you will be asked to re-boot your computer. Re-boot your computer. The upgrade is complete. b. Select Remove to remove the older printer driver, click the Next button, and follow the screen prompts.
Installation and Setup Installing the Windows Printer Driver Step 11. This will bring up the License Agreement window. To proceed with the installation, select the I accept the terms of the license agreement option, and then click the Next button. Step 12. This will bring up the Customer Information window. Enter your name and the name of the company for which you work; and then click the Next button. 38 Zebra ZXP Series 8 Card Printer User’s Manual P1013772-001 Rev.
Installation and Setup Installing the Windows Printer Driver Step 13. This will bring up the Choose Destination Location window. • To accept the default destination location where setup will install the files, click the Next button. - or • Click the Change button, select a folder where setup will install the files, and click the Next button. Step 14. This will bring up the Ready to Install the Program window. To continue, click the Install button. Step 15. Observe the Setup Status window.
Installation and Setup Installing the Windows Printer Driver Step 16. This brings up the Port Name window. Enter the Printer IP Address, and then click the OK button. Step 17. When the InstallShield Wizard Complete window appears, click the Finish button. Step 18. This completes Ethernet driver installation. To use the Printer, select it just like you would any other printer connected to a Windows system. 40 Zebra ZXP Series 8 Card Printer User’s Manual P1013772-001 Rev.
3 Operation Introduction Printing with the Card Printer is similar to printing with any other printer in a Windows environment. • The Printer Driver Software is installed on your computer (see Section 2). • The Printer is connected to the power source and the computer (see Section 2). • The Printer is selected by either the Operating System or the appropriate application software program. • Printer Properties are set (the factory default values will be appropriate for many applications).
Operation Card Type Selection Card Type Selection The Card Setup tab allows you to to specify the card type in use. Based on your selection, the printer automatically adjusts various printer properties for optimum print quality. If your card type is not listed in the drop-down menu, select Custom and fill out the Card Specifications pop-up screen. To access the Card Setup Tab, select Start > Printers and Faxes.
Operation Printing a Sample Card Printing a Sample Card Sample card designs are installed with the printer driver. To print a sample card: 1. Access the Card Setup Tab, select Start > Printers and Faxes. Right click on the Zebra ZXP Series 8 Card Printer listing; and select Printing Preferences > Card Setup. 2. Ensure that cards are in the Input Hopper. 3. Click of the Test Print button (circled above). 4. The printer will feed in a card and start printing. 5.