
Printer User Manual
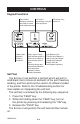

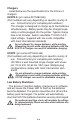
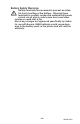
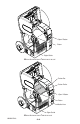
Table Of Contents
- Contents
- Introduction
- Printer Specifications
- Physical
- Environmental
- Printing Characteristics
- Communications Interface
- Communications Protocol
- Pin Assignments
- Media Type
- Media Handling
- Software Features
- Formats
- Accessories and Options
- Power
- Controls
- Keypad Functions
- Self Test
- Batteries and Charging
- Removing and Replacing Batteries
- Conditioning
- Chargers
- Low Battery Shutdown
- Battery Safety Warnings
- Installation of Media
- Peeler Not In Use
- Peeler In Use
- Troubleshooting
- Self Test O-13
- Troubleshooting Guide
- Maintenance
- Cleaning The Print Head
- Cleaning The Platen
- Cleaning The Peeler Roller
- Cleaning Sensors
- Linerless Media Printers
- Communicating to the Printer
- Cable Communications
- IR Communications
- Bluetooth™ Networking Overview
- APPENDIX A
- Interface Cables
- APPENDIX B
- Media Supplies
- APPENDIX C
- Maintenance Supplies
- APPENDIX D
- Product Support
- Patent Information inside back cover

O-11
UMAN-EN2+
continued next page
INSTALLATION OF MEDIA
The Encore 2
can print continuous batches of labels or
print and separate labels automatically using its built in
label peeler. The following details how media installation
for these two modes.
Peeler not in use (Journal, linerless, or batch quantities of labels)
1. Turn unit off.
2. Press and hold the “Open” button on the front of the
unit. Rotate the top back to reveal the paper compart-
ment
3. Remove the edge guide and install the paper roll on
the spindle. Lead the free end over the rubber roller
(platen). Paper should feed from the top of the paper
roll.
4. Slide the edge guide back over the spindle and
against the roll of media. Roll should be against the
inside wall of the paper compartment.
5. Close the top and insure it is securely latched before
beginning to print.
Peeler in use (Do not use the label peeler when printing a batch quantity
of labels)
1. Turn unit off.
2. Press and hold the “Open” button on the front of the
unit. Rotate the top back to reveal the paper compart-
ment
3. Remove the edge guide and install the paper roll on
the spindle. Lead the free end over the rubber roller
(platen). Paper should feed from the top of the paper
roll.
4. Lift peeler assembly by depressing “Open” button on
front of unit. Lead edge of stock over the peeler bar
and under the grooved peeler roller. Stock should
emerge from the slot in the front cover.