
User's Manual Part 1


Data Capture 3 - 3
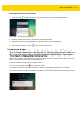
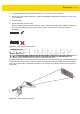
1. Connect the RS4000 to the WT6000. See Chapter 5, Accessories for more information.
2. Ensure that a scan enabled application is loaded or DataWedge is enabled (see DataWedge on page 5-8 for
more information).
3. Press the trigger.
4. Aim the scan beam at the bar code.
Ensure the red scan beam covers the entire bar code. The Decode LED lights red to indicate that scanning is
in process, then lights green and a beep sounds, by default, to indicate the bar code was decoded
successfully.
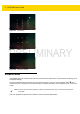
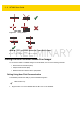
Figure 3-1 Laser Scanner Aiming Pattern
5. Release the trigger.
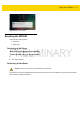
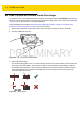
Adaptive Scanning
The RS4000 contains the adaptive scanning feature that automatically adjusts the scan beam width for rapid and
easy scanning of bar codes from near contact to more than 200 inches away.
By default the RS4000 is set to wide scan beam width. When the user presses the trigger, the RS4000 determines
the distance from the bar code. For close bar codes the RS4000 sets a wide beam width and for far bar codes it
sets a narrow beam width. The RS4000 uses distance, bar code type and material to determine the correct scan
beam width.
Figure 3-2 RS4000 Adaptive Scanning