
User's Manual
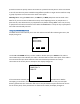
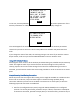
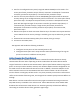


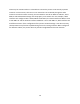
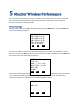
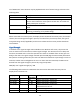
Table Of Contents
- 1 Introduction
- 2 Networking Basics
- 3 Installing Printer
- 4 Configuring the Printer
- Network Settings
- Configuring the Printer through the Operator Control Panel
- Configuring Wireless through the Printer Web Page
- Configuring Wireless through the Driver Toolbox
- Using ZXP Toolbox Wireless Settings Load/Save Buttons
- Using RADIO CONTROL Menu
- Using SET DEFAULTS Menu
- Simple Roaming Used During Connection
- Setting Up an Ad-Hoc (Peer) Network
- Multi-homing Considerations
- 5 Monitor Wireless Performance
- Wireless Info Pages
- Signal Strength
- Noise Floor
- Data Rate
- DHCP & MAC Address Info Page
- Wireless Statistics Info Page
- Wireless Statistics Success and Failure Rates
- Main Status Display Wireless Errors
- Viewing Wireless Information through Printer Web Page
- Viewing Wireless Information through Windows Printer Driver Toolbox
- 6 Troubleshooting
- 7 Technical Specifications
- 8 Glossary
- 9 Compliance Information

36
4. You should now enter a dialog for Security and Channel selection. The security choices
are: None or WEP. It is highly recommended that you choose WEP. While WEP security
is poor, it is significantly better than none. Try to pick a channel that is quiet or not
heavily used. Your Setup Utility may offer Site Management and Congestion analysis
that will help you pick the best channel. Once the selections have been made click Next.
5. If you selected WEP security, you will now need to enter the WEP key. You can enter
either a 40 bit key (10 Hex characters) or a 104 bit key (26 Hex characters). Save the key,
you will need to use it when you connect the printer to the wireless network. Click Next.
6. Now click Connect to establish the ad-hoc network. Nothing exciting happens as the
network has only one peer. No signal strength will be shown.
Once you have created the ad-hoc network, power on your printer and follow the same
instructions as detailed above in the “Configure the Printer through the Operator Control
Panel” section. After scanning is complete and you are scrolling through the access points, you
will notice that ad-hoc networks are announced by replacing “MAC:xx.xx.xx.xx.xx.xx” with
“ADH:xx.xx.xx.xx.xx.xx” as shown below:
Once you have selected the ad-hoc network, selected the WEP key size, entered the WEP key
and pressed connect, the printer should connect to the ad-hoc network. The computer wireless
antenna icon should show signal bars. The printer OCP should also show a solid antenna icon.
When there are more peers connected to the ad-hoc network than just the printer, the printer
will also turn on an additional OCP icon that looks like a folder:
The folder icon is useful to determine whether another peer is connected to the same ad-hoc
network as the printer. When using the OCP Info display to see the Wireless Info, an ad-hoc
connection will display as follows:
SSID: Test
ADH:00:a0:f8:be:fe:72
Chan = 1 SIG = 52%
SEC MODE: WEP
CRYPTO: RC4
MAX SPEED: 54 Mbps
NEXT SELECT CANCEL