
User's Manual
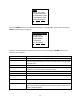
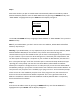
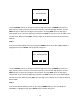
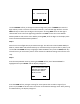

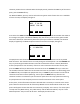
Table Of Contents
- 1 Introduction
- 2 Networking Basics
- 3 Installing Printer
- 4 Configuring the Printer
- Network Settings
- Configuring the Printer through the Operator Control Panel
- Configuring Wireless through the Printer Web Page
- Configuring Wireless through the Driver Toolbox
- Using ZXP Toolbox Wireless Settings Load/Save Buttons
- Using RADIO CONTROL Menu
- Using SET DEFAULTS Menu
- Simple Roaming Used During Connection
- Setting Up an Ad-Hoc (Peer) Network
- Multi-homing Considerations
- 5 Monitor Wireless Performance
- Wireless Info Pages
- Signal Strength
- Noise Floor
- Data Rate
- DHCP & MAC Address Info Page
- Wireless Statistics Info Page
- Wireless Statistics Success and Failure Rates
- Main Status Display Wireless Errors
- Viewing Wireless Information through Printer Web Page
- Viewing Wireless Information through Windows Printer Driver Toolbox
- 6 Troubleshooting
- 7 Technical Specifications
- 8 Glossary
- 9 Compliance Information

18
display again. The CANCEL soft-key can be pressed at any time to abort the Setup Wizard and
return to the main Wireless menu. By knowing the SSID and/or BSSID, the access point you wish
to connect to can be found in the scan list. There may be occasions where the access point of
interest is not displayed. This can happen due to noise or interference during the scanning. If
you can’t find the access point, press the CANCEL soft-key and retry the Setup Wizard until the
access point is found. Once the access point you wish to use is displayed on the OCP, press the
SELECT soft-key. If the signal strength for the selected access point is less than 25%, the display
changes to:
When the signal strength is less than 25%, it is likely that you will have problems connecting to
the access point or have problems after the connection is established. This is only a warning to
offer you the opportunity to resolve potential problems by improving the signal strength before
continuing. Press the CANCEL button to exit the Setup Wizard or NEXT to continue connecting
to this access point.
If the SSID is hidden, it is necessary to enter SSID manually, otherwise this step is bypassed. The
display for manually entering the SSID looks like:
The SSID must be entered one character at a time. Each character can be any visible ASCII
character. The character that is currently being set will slowly blink. Use the CHANGE soft key to
cycle through the ASCII character set until the desired character is shown (Remember that the
SSID is case sensitive). If there are more characters that need to be set, then press the NEXT
soft-key to add another character and use the CHANGE soft-key to select the correct ASCII
character. When the last character has been set (and while it is still blinking) press the EXIT
soft-key to complete the SSID entry. (Warning - Do not press the NEXT soft-key after the last
character has been set otherwise you will need to repeat this entire step.) Note that entering
the SSID text incorrectly will prevent successful connection to the access point.
THE SIGNAL STRENGTH
IS < 25%. TRY
CHANGING ANTENNA
ORIENTATION OR MOVE
PRINTER CLOSER.
NEXT CANCEL
ENTER SSID, 1 - 32
CHARACTERS:
0
CHANGE NEXT EXIT